Sunday, August 25, 2013

Monochromatic Birthday Wishes


This card is a monochromatic card which basically means using all the lights and darks of one color.  This card is using shades of purple.
The front of this card is actually larger than an A2 card, which opens in the back.  The border sticks out beyond where you open it.  The frosting has Stampin Up Crystal Effects on top with a hint of Stampin Up glitter to just give it a lil sparkle.  I love how the green just pops against that purple.

Now off to go create some more!

Netta

Friday, August 23, 2013

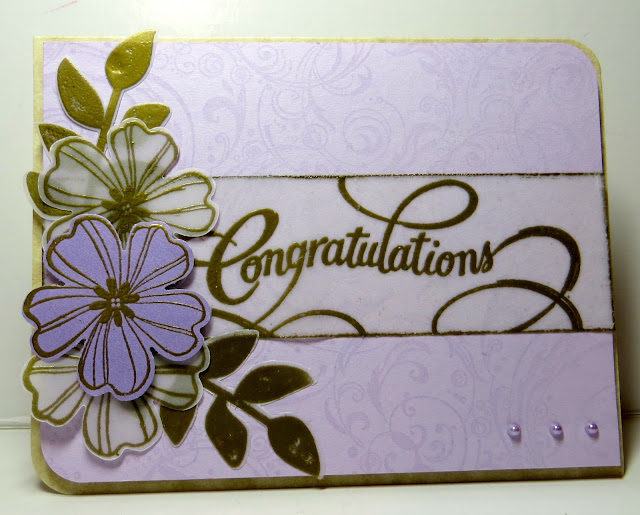
To the Happy Couple

First I created a background by stamping with versamark on a light purple piece of cardstock.  Next I cut the cardstock down to fit the size I wanted for my A2 card and rounded out two opposite corner ends.  Congratulation, flowers and leaves were all embossed with gold on Stampin Up Vellum.  It is the easiest vellum I have found to emboss on.  Two of the flowers and the background was popped up with pop dots.  Three light purple pearls in the corner was the perfect touch.  


Congratulations to the newly married couple! 

Netta

Thursday, August 22, 2013

Christmas Is Coming

A couple of weeks ago, I finally got my first set of Christmas Cards done for the year!!  3 down....147 to go!!  LOL

This stamp set is called "Christmas Is Coming" from Crafter's Companion.  I won it last year and never inked it.  The pickup and mailbox is all one stamp which barely fits an A2 card.  The words "Christmas is Coming" also comes with it along with "Greetings".  This set gives you everything you need to stamp in and outside the card.  I colored it with my Touch Markers and the background was sponged with my Memento Inks.  A little Stickles glitter for snow finished off the snow.  

It's a beginning......now to keep going!
*S*
Netta


Wednesday, August 21, 2013

Magical Marquee Birthday

I found a wonderful video on how to make a Marvelous Magical Marquee card at

It is not a fast card to make.  I think it took me a whole afternoon as I could not get it to open correctly.  Once I got the hang of it, I was able to make two birthday cards.  

I have two versions on how to keep it closed.  
If you have nothing to do one afternoon, give this a try.  The recipient of your card will certainly feel special!

Have a great crafty day!!
Netta


Monday, August 19, 2013

May the Wind Always Be At Your Back...

My brother loves to ride and does so at every moment.  I knew I needed to make him a birthday card about riding.  I found a free digital image online and it was perfect although I had no idea what the rest of the card would be! 

It took me a couple of quick image prints to get the correct size for the A2 size card I wanted to make.  I got a photo of him by his bike for all the colors and colored the image with my touch markers.  After I was done, I cut the image out.  The image had hair but I hand cut out a bandana  & glued it down on the head like he wears it.  I also put his initials on the pocket of the jacket. With my favorite white pen, I created the beard he has in the picture.  With pop dots stuck to the back of the image and I set it off to the side.  
Not sure why I could not get a good picture but the brown on the bike is actual silver and the grayish is actually black!


I grabbed a couple of stamps, sponges, ink and scrap paper to create the background.  
If you look at the photos, you can see where I even made reflection of the weeds in the water.  To make the reflection, I stamped with the blue on the back of a piece of plastic.  Because the plastic is so slippery, I pressed the image down very carefully onto the water but opposite of the weeds. 

The cardstock was folded to form an A2 Easel Card.  I matted the background on black and glued it down onto the Easel card.  The biker was stuck down on the background.  


 It looked funny with a biker standing in front of water, so I sponged black along the bottom to look like dirt.  To continue the land out from the water edge, I made the rest look like a highway and a great scenery for a biker to stop and rest!

 I had some yellow tape that I layered on black paper to make a road.  The words were printed out with my Cricut and sponged with ink to look the background.


I had one issue....Somehow, even with measuring, I stamped the Happy Birthday too low, but I still think it came out well!  


I know he will enjoy receiving the card just as much I enjoyed making it for him.  

*Happy Birthday Big Brother*

*S*
Netta

Sunday, August 18, 2013

Mojo Monday #306

I have decided I need to sit down before the next month and write down every card I need to make along with the date needed by.  September is an easy month so I will fill up the extra time making Sympathy cards for the local nursing home I donate to.  Out of 5 cards needed, I made 3 this weekend.  First up....

Anniversary Card for my brother and sister-in-law.


I did faux stitching on the outside mat.  The Circle mats were cut from Spellbinders.  I saved the butterflies that punched out to use on the card.  The butterflies were cut from Martha Stewart punch (largest) and Stampin Up (smaller vellum).  All of the highlighting and faux stitching were done with THE BEST white pen ever....uni-ball Signo pigment ink pen.    

The 2 hearts were cut out from Sizzix die cut.  I punched a lot of little flowers with a punch I bought in a $1 bucket at Michael's Craft Store.  I glued them all over the heart and put a drop of blue Stickles in the center.  I also added a couple of stickle covered butterflies on top.  The flowered heart was popped up with pop dots slightly off set from the heart with faux stitching.  


I am submitting this to Mojo Monday!

thank you for stopping by...=)
Netta