Monday, April 27, 2020

Kit and Clowder-Dolphins

This image was one I colored a few months ago but never finalized into a card.  Now that I have lots of RAK's to do, I thought it was the perfect time to finish up and send off.
This class was a Copic Aug 2018 class I did with Kit and Clowder called "Underwater Magic".


This digital stamp was included in the class through Kit and Clowder.

Slowing building up my RAK cards and several, I think, will go in the mail this week.

Netta


Sunday, April 26, 2020

Kit and Clowder-Tropic Paradise

Here is another stab at coloring with my Prismacolor Pencils.  This card was actually my first attempt on using my pencils and Kit and Clowder April 2020 class called Tropic Paradise.


You actually can start any part of the card but I chose to start with the greenery.  I think next time I will start more center.  My hand kept rubbing against the green smudging it around the leaves.  I was glad to add a background to cover it up.  Got to work on how to avoid that in the future.


The image used today was part of the class.

I am at home with the stay-at-home order and ready to create another RAK card so I am off to start another pencil class!

Netta

Saturday, April 25, 2020

52 CCT April Technique Challenge

Herringbone technique is the challenge this week.  You probably have seen it on quilts.  The idea is to plot and plan where to place the pieces down.  The hardest part on this card is planning what paper to use!  I went with plain shimmer or sparkle cardstock on this card.  You will need 3 or 4 colors.


You can glue each piece as you place your strips down but I just ran my base cardstock through my Xyron to cover the whole thing right away.  I chose to use the darkest color first and placed it down diagonally across the card.  In the photo below it is the longest black piece.  Now decide where to place two shorter strips on either side of the long piece.  You can now see it formed 4 different size triangles...one on each side.  The size of each triangle will depend on where you put the dark strips down.   It's your choice!

It's hard to see because my next color is the same shimmer color as the base but if you look close you can see how the next two pieces went.  

Keep placing strips until you have the triangles filled in.  Some of the triangles might require more fill in than others. I realized after I took the photo below,  I had grabbed the wrong color on next two triangles.  I was able to remove them easily and replaced them with the shimmer cardstock that I originally started with. At least you can easily see how the next pieces are placed!
 

Once you have everything filled in, trim all the edges to match the base.
  

Here is the base finished off so you can see all the strips on this card.


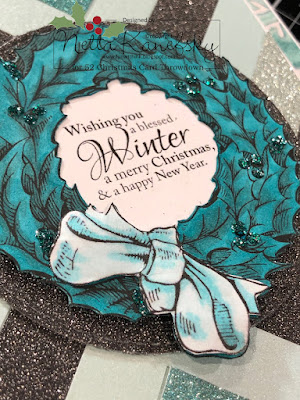
The photo at the top shows the finished card and in the center of the card is a digital from Graciellie Designs.  I printed one set of the sentiment and 2 of the wreath on my computer.  Colored the wreath on one and just the ribbon on the other with copics (#BG45, BG49, BG18, BG000, BG45)....fuzzy cut the colored wreath outside and inside.  I glued it down over the words, leaving the very edge unglued so I could trim it underneath.  I just lifted the edge of the wreath so the tips of my scissors could cut underneath in a rough circle.  I did not have to be perfect because no one would see underneath the wreath as it would be glued down.  

The ribbon on the 2nd wreath was cut out.  I flipped it over onto a sponge mat and used the McGill Paper Blossom ball tool to rub the center of the ribbon. It gives the ribbon a 3D affect when you glue it down.  I put a small amount of silicone glue underneath so the ribbon would keep its shape in mailing.


What a great way to use up scraps!  I have seen the Herringbone Technique but I do not recall if I have ever tried it on a card. 
I enjoyed making this card so I went back and created another card.
 On this card I used 4 Christmas scrap paper, My Favorite Things Square Die, Stickles green and Recollections Christmas*Noel Stamp set. 


If you are staying home, grab some scraps, glue and cardstock.  I will see you over at 52cct.com when your done!

Stay safe and keep crafting
Netta


Thursday, April 23, 2020

Kit and Clowder-Lighthouse

My husband bought me a box of 150 Prismacolor Premier Pencils for Christmas two years ago.  I signed up for Kit and Clowder pencils classes several months ago to learn how to use them.  Happy to say I am finally putting the two to work!

This card was from the August 2019 Pencil class called "Guiding Light".


I love that we can download the videos and book to work at our leisure for each of the classes.  The steps are so easy to follow and it's so relaxing coloring.


The lighthouse stamp was part of the Guiding Light class.
Off to go work on another class!  

Netta

Saturday, April 18, 2020

52 CCT April Theme Challenge

Today's theme is deer and forest at 52CCt.com.  I just love this card I made today!  It just reminds me of a nice snowy winter day.  As my daddy use to say....the deer are hunkering down until the snow blows by!


I used ripped paper towel and grey ink with a sponge to make the hills.  The back pine trees was stamped with grey and the front trees stamped with black ink.  The stamp I used had rocks with the pine trees but I didn't want the rocks.  I just placed paper towel down and stamped the trees.  The rocks stamped onto the paper towel and not the card.
After I was done I used a toothbrush and white paint to splatter snow all over the image.


What will you create with this theme?  
Netta

Memento London Fog and Tuxedo Black
Sponges
Deer from Hero Arts "Winter Animals"
Trees from Stampscapes Nature Sheet
Whit Tempera Paint for the snow
Studio G Glitter Glue
Toothbrush

Wednesday, April 15, 2020

Missing You

I have 4 grandkids and I really miss them.  Thank goodness they are old enough to call me, text or FaceTime.  I was thinking, I make all these cards but never for them.  With all my time these days, I decided now was a good time

Here is my first card.


I used sheets of Sticky Note pad to protect areas as I added the distress oxide ink.  I left part of it white on purpose for image to be glued down onto.

Not sure which one will get this card so I will decide after I am done all 4.
Happy crafting!
Netta


Copic: E00, E02, E11, E13, E15, E17, E21,
           B02, B06
           W0, W03, W05
Ranger Distress Oxide: Antique Linen, Seedless Preserves, Tumbled Glass, Picked Raspberry
Brushes for the Oxide
Large Sticky Note Pad
Penny Black Stamp "A Friend Is"
StudioG Clear Stamps Miss You
Versafine Ink Onyx Black for sentiment
Memento Tuxedo Black for image


Saturday, April 11, 2020

52 CCT April Color Challenge

I love the Poinsettia set from Tim Holtz.  Combined with the folder in the set, it makes such a beautiful flower with all the details.  

The colors in today's challenge is just red and white.  I used a cranberry red on my card.  


In the closeup below it looks like I used pink stickles on the flower but it is actually diamond.  It must have picked up the pinkish in the sparkle.  


Come join us with the red and white challenge.  You will find us at 52 Christmas Card Throwdown!


Netta

Copic #R39
Embossalicious Evergreen Embossing Folder
Tim Holtz Sizzix Layered Tattered Poinsettia
IO Berry Branches Die 349-J
Stampin Up Big Shot die Pretty Pines
Spellbinder Die A2 Curved Borders One
Diamond Stickles


Sunday, April 5, 2020

Stamping Thoughts and Prayers & Tidbit

I have made a lot of sympathy cards in my past, but the one I had to make now was hard. I have put it off for a week now and today decided I just had to sit down and do it.  
Someone I knew through work passed away from ALS.  He was such a kind, strong and well loved man.  He fought it to the very end.  My heart just breaks for his wife and his family.  The past few years of their life was grabbing as many memories as they could and taking care of him.
He will be missed.


On todays card, I used my Misti to stamp on one side of the card, flipped it over and did the other side. After heat embossing in silver, I colored the image with colored pencils.  I love the colored pencils on black as it really makes the color pop.


I have a little tidbit for all of you.  It came from a 93 year old gentleman.  I gave him a card and I watched him struggle a bit to open it.  His sight was not the best and his fingers didn't work as well.  He suggested I leave one side of the card just a bit shorter than the other to make it easier for folks to open their card.  Something I never thought of before but it made sense.  Now, after I make my A2 card base, I trim the back of the card about 1/8th of an inch. Just enough to make it easier.  

I wanted to make sure to get a card off to the family to let them know I am thinking of them.  I knew it would be a while before I saw them due to what the world is experiencing right now.

A hard card to make.
Stay safe and healthy everyone. 
Netta

Stampendous! Class a'peel Dot Sparklers Black stickers
Crafters Companion Sunflower Stamp
Spellbinders Vintage Elegant Word Stamp
Derwent Inktense Ink Pencils
Silver Embossing Powder
Stickles Diamond Glitter glue


A Christmas Lost and Found

Strange title but true!  I created the baubles portion of the card months ago and lost it.  I swore the 2 pups got a hold of it and chewed it up but no matter how much I looked I never found even a piece.  After looking for a week, I gave up.

Last week while cleaning I found it!  It had actually stuck to bottom of one of my Misti's.  I happen to flip it over and found it. Safe and sound.  I wish I could tell you what the die is or what were the Spectrum Noir Sparkle colors, but I cannot remember either.


I finished off the card by making the distress Oxide background using the smooshing technique, cut it with My Favorite Things Wonky Stitched Die and glued it onto a piece of sparkle silver cardstock.  Cozy and Bright was stamped with Memento tuxedo Black and outlined with Copic FY1.

Was an easy card for sure!  

Stay safe everyone and keep crafting!
Netta

Saturday, April 4, 2020

52 CCT April Sketch Challenge

I love the digital image from Sassy Cheryl's....Half Moon Santa.  
I printed it out 3 times so I can cut layers.  
The first layer I left intact and colored the hat.  The rest is cut and layered.  The hat has White flock on it to look like fur.  Santa hair was colored Wink of Stella to get a nice white shimmer.  


You can see the layers better in the following photo.  I used a McGill Blossom Ball Tool on the underside of the fur, beard and mustache to get the more fuller rounded look to those areas.


This image was perfect for the sketch challenge this week at https://52cct.blogspot.com/


Thank you for stopping by.  Have fun this week with this challenge!
Netta

Nuvo Crystal Drops Ivory Seashell
Lijm Kit Silicone glue for the layering
Copic Markers Color Rv13, R39, Eo4, Eo2 and R29
Wink of Stella Gl. White 
White Flock 
McGill 6 MM tool and pad
Digital Image Half Moon from Sassy Cheryl's