Friday, November 3, 2017

Halloween Witch


I was leaving on vacation and ran out of time to post this card in time for Halloween before I left.  It's a Halloween card I quickly made up for a friend before I left.  

Thank goodness for the Misti as I made a big mistake when I stamped this card.  I masked off the moon and Witch to stamp the boughs.   After removing the mask, I realized I had the boughs going behind the moon and I had already removed my stamps from the Misti and cleaned them off! I masked off just the witch and was able to recreate where the bough went by using the Misti.  
I bought this stamp several years ago but unfortunately I do not remember what company.  

Hope you all had a great Halloween!  I was able to go trick or treating with my two youngest grandchildren and it did bring back a lot of memories when my two boys were young.  Great fun

Manetta

Friday, October 6, 2017

Saving Paper

How many of you have special paper you don't want to use up?   
Or perhaps you do not have enough to do what you want?

For my card, I wanted enough of the sparkle paper to mat my image and to die cut a design out.  I only had enough to mat the image with.

Here is a trick!

Cut the middle out.  

It gives you an extra piece of paper to mat your image....

and have enough left over to die out!

After the card is put together....no one would even know there was missing paper on the back of that image.

Hugs
Netta


Saturday, August 26, 2017

Ice Cream Splatter


I joined the Bloobel Stamps Progressive Challenge and for August we got to pick one of 7 images available.  I chose one called "Ice Cream Cool".   I made this card for a girlfriend as her birthday is coming up early September.  I have a little bit of time to come up with something cute for the inside before I have to mail it off.  The Happy Birthday die came from Amazon and is one of the "no-name brands" from China.  The image was colored with Copics and fussy cut out so I could glue it down on the background.  For the background I sponged 2 Distress Ink colors Spun Sugar and Picked Raspberry around the top.   

I learned how to oil paint many years ago and there was a technique I use to use to make the ground look like it had tiny rocks or sand.  You used a toothbrush and some oil paint that was thinned down with linseed oil.  Now I see that same technique is now used on cards all the time.  I used that technique on the card above with black splatters.  I love the pink with the black look.   I took a few photos on a white copy paper to show you how I got the black splatter on the card.  

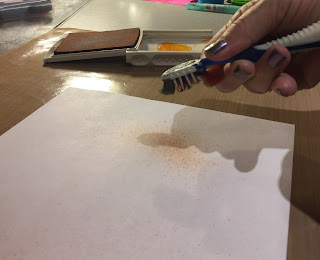
Drop a few drops of re-inker onto the cover of the ink pad along with a couple of drops of water to make the ink a little thinner and mix it together.

Drag a toothbrush in the ink to cover the bristles... making sure to grab enough ink.

You might want to protect your area as this next part may splatter ink where you do not want it to.  You also will want to wear disposable gloves unless you do mind getting your fingers full of ink.  It was hard to get a good photo, but I used my finger to run along the bristles of the toothbrush. This causes the ink to splatter against the paper.  In the next two photos, I used the bristles to face down toward the paper and up towards the ceiling.  They both give you a different kind of splatter on the paper.


The splatters on the left came from pointing the bristles up to the ceiling. They are more spread out.  The splatters on the right are from the bristles pointing down toward the paper.  These are more contained into an area.  

Try the ink splatter technique using sponges or different size brushes.  It will give you different types of splatters.  Also experiment with holding the tool higher or lower from the paper.  

I hope you give this easy but messy technique a try and let me know what you think!

Happy crafting!

Manetta


Thursday, July 6, 2017

Mermaid Cellafina

I wanted to share to share a card I created using Mandy's Mermaid image.  


I printed the image 3 times using Word to get the size I wanted.  My plan was to glue the image together in layers.  I lightly colored some areas with Copic markers, depending on the area I needed on each of the three images.  After the markers, I recolored using Spectrum Noir sparkle glitter brush pens.  To blend the colors in the hair and on the Mermaid, I had to work fast as the glitter dries quick.  The only part that was not colored with the glitter brush pens was the skin areas.  Those areas are colored with Copic and left alone.  Cutting it all out took some time, especially around the Mermaid.


You can see some of the sparkles shine through with the close ups.  To make the bubbles, I used a 2 sizes of sticky dots and pressed tiny glass beads into it until all areas were covered.


 Cellafina was fun to color, especially using the glitter pens.  If you want to give her a try as well, you can find this image at Mandy's shop... AkaManuArt

Go have some fun!

Manetta


Sunday, June 11, 2017

May You Find Comfort

Time for more sympathy.  It's always hard to come up with so many sympathy cards each month.  I am happy to do it for the nursing home to give out but the reason why is difficult.  I have been putting it off all week and now the deadline is up. 

Here is what I finally came up with today.


I ended up making 5 of these sympathy sunset cards.  


To make this card, I used 4 different stamp sets.  A Stampin Up set "High Tide",  a Stampendous Set "Seaside Chair",  Sheena Douglas set "A Little Bit Scenic" and another set from long long ago that I do not know the name of.  The Misti really helps getting several cards of the same done in record time.  I did my usual to get the sunset look...sponged the ink on.  

With the cards delivered, I can now go back to getting birthday cards done.

Thank you for visiting!
Manetta


Wednesday, June 7, 2017

Betsy & Her Bouquet


Is she not adorable!!  She is another image from Mandy's Art and Soul and a perfect image to practice coloring the folds in the clothes, hair and flowers.  I wish I had kept out all the markers that I used but it was overwhelming having them sprawled all over the table.  I put them away without thinking.  

I think I found my new addiction....

Manetta

Wednesday, May 31, 2017

Don't do Anything on Father's Day

I am practicing coloring with copics today.  I need lots and lots of practice, but I am up for the challenge!

Bloobel Digital Stamps has a Progressive Challenge on her Facebook page.  Each month we get a free image.   As long as you create and share, you automatically get the next months image for free.  

May's Progressive Challenge image was called "Bored at Work".  My Father's Day card is my submission to May challenge.

(Inside: Pretend your in Congress.  Happy Father's Day Dad!)


Manetta

Monday, May 29, 2017

Owls Times Two...It's about digis..

(This is my 2nd post today...scroll down for the 1st)

Today I decided to use this adorable digi image called "Owls Times Two" from Mandy's Art and Soul.  It was a monochromatic color challenge to myself to use just 4 markers..Copics # BV00, BV04, V22, V28.  I "fussy cut' the owls out and went around the outside edge of everything with #V28 to get rid of the white paper that shows on the edge.  The image is popped up with pop dots to give it some dimension.

(Inside card:  Another birthday...it'll only HOOT a little.)

My niece Mandy is extremely artistic and has recently decided to join the digital stamping world on the internet to show off her skills.   Many of us call them...digi stamps.   Mandy's site is at Mandy's Art and Soul and she is always adding new images to color.  I already have my sights set on a few more that I will need to pick up!

For those who do not know what a digi stamp is... digi stamps are black & white digital images that you download onto your computer.  This allows you to be able to resize them before printing out. Once you print them out with black ink, they are now like a regular rubber stamp image you would stamp on a piece of cardstock.  You can also print them out with very light colored ink to do the no-lines coloring technique.  

 I like digis' as they are easy to store in folders on my computer and are inexpensive.  Each digital image has a tag attached to it, so I know exactly where I got the image from and if it was a freebie or not.  Each folder on my computer matches my book of rubber stamps.  If I am looking for an image of a flower, I look in my book under Nature or on the computer, which is also under Nature.  

Digi stamps do have the same copyright laws as rubber stamps so be careful and pay attention to the terms and conditions that comes with your digi stamp.  If you do buy any, please be respectful and do not pass it around to your crafting friends.  The creators spent a lot of time creating the images for us to use and they do not charge that much for them.  Passing them around as a freebie is actually stealing from those who graciously share their talent with us.

I had a lot of fun coloring the Owls and challenging myself today.   I am off to go start coloring another image from Mandy...after a dip in the pool to cool off!

...until later

Manetta

Lighthouse

Two stamping sets.
Two versions. 
Two different reasons.
One day of inky fingers and fun!


Hope you are enjoying your day with a little crafting time!

Netta

Monday, May 15, 2017

Dies That Traveled Far

I got several dies on Amazon that traveled from China... dirt cheap and free shipping.  They arrived several weeks ago and I had not tried them out yet.  Yesterday, I decided to sit down and use some of them.  

I must admit, they cut excellent and I rarely had to poke any pieces out after.  Most of them fell right out.  If you are like me...I dislike dies that are time consuming.  

Here are some of the dies.  I have a few more which I hope to use soon!

Celebrate card has two new dies used.  The stitched square and green leaves. 

 I used the butterfly square for the Birthday Wishes card.  It was a scrap piece of paper I had experimented on with water colors. 

 I think this palm tree with the person laying in a hammock is my favorite die out of the bunch (so far).  Again for this card I used a background that went wrong.  I was able to salvage it by cutting it down for this card.  You see the birds?  That is a die that came with the hammock die.  I almost threw it away thinking it was a piece of left over metal!  It is so tiny so if you buy this one...watch out for the little guy!

 This peacock card also used up some scraps.  I glued the peacock onto some sparkly cardstock.  I fussy cut all around the peacock so the feathers showed the sparkly purple.

To be able to play again is so much fun!  I missed it!

Thank you for stopping by and have a wonderful craft day.

Netta


Tuesday, May 9, 2017

2017 Mothers and Others Day


Every year my husband has a big event on Mothers Day for  Alzheimer's unit at the nursing home.  It is a celebration for the care-givers...Mothers & Others.  I make the invitations each year.  This the invite this year.


Thank you for stopping by and have a great crafty day!

Netta  

Sunday, March 26, 2017

Four-Fold Get Well Card


Four-fold...great card when you need a lot of pages for many to write a message!  The best part..it fits into an A2 envelope for mailing.


Here is the 1st page I left blank for writing.


The card opened showing all 3 pages for writing a little get well message.  Sorry for the shadow.  I just could not get the lighting to work for me today.  

Have a great crafty day!
Manetta


Rubber stamps: Stampin Up "Thoughts & Prayers"
Leaves: Impression Obsession DIE334-Y
Cardstock: Stamping Up
Stamping Up Butterfly die


Wednesday, March 15, 2017

No..It Is Not Christmas Season

...but because of all the snow everyone got North of us....
I am sharing a Christmas Card I made using 


Thank you for stopping by!

Manetta 


Watercolor Scene


I tried out watercoloring with a stamped image that was heat embossed with white. 
 Need more practice but it was fun.  Will definitely play with this technique some more.

Manetta

Sunday, March 12, 2017

So Many Dies

Wanted to show you all what I have been busy working on for the past week!  I have been working on re-organizing my dies every moment I could.  A task I have been avoiding because I was not sure what to do, but after much thought, I got a plan.

 I used Avery Elle Stamp & Die Storage 5 5/8" x 7 3/8" Pockets.  I cut a piece of cardstock to fit inside the envelope and glued a  magnet on it.  The magnet size all depended on how many dies or how big the die was.  The magnets I used were the big sheets I got from Home Depot...made to cover the front of an air vent.  Worked perfect and much cheaper.   I used my Dymo to make the labels.  
I was able to go from this........(4 shelves worth of cases and containers, bags, envelopes etc)....


to this.....(1/2 shelf)..... 

 I have 2 envelopes left over so I just made it.  I was able to put 98 different sets of dies from many different companies into 60 envelopes and those all fit in one 5 3/4" x 5 3/4" container!  

Here is the side view...

A couple of them have something a small magnet on the back if the dies did not all fit on the front but 98% of them are just on the front.  I wanted to make sure I had more supplies for future so I tried to order more today at Amazon but they are discontinued.  Avery came out with an envelope slightly larger than what I have which disappointed me because I like to keep everything the same.  After much searching I found another company that had the exact size and according to the write-ups, the envelopes are pretty close except the cost.  Much cheaper!  

 I went to Michael's and found the perfect containers I wanted to store them in.  They were on sale this week for only $4 and used to put a plant in.  The sides are straight and not slanted like most baskets and such.  They hold 60 envelopes in each.  There was only 3 available so I snatched all 3.  

All the dies are now in my book 
Manetta's Organized "A" to "Z" Book and Everything Between
  so now I know exactly what I have for Dies and they are easy to find!

It feels good to get more organized in my room.  Some day I will be done...right?  

*smiles*
Manetta 

Supplies
EXAMPLE of the Magnets:  Magnets
Substitute Envelopes:  CheckOut Store
Ashland Greenhouse Market Container (sold at Michaels) 
 

Saturday, February 25, 2017

Happy Day Chicken

Today is one of my sister's birthday.  
Happy Birthday Brenda!!

Brenda is crazy in love with chickens.  She has those fancy ones with tuffs of feathers off the head...ones that lay eggs bluer than a robin...ones in many colors.  When I saw this set of stamps from Stampin Up called Hey Chick ...I just had to have them to make her a birthday card!  She loved it.


I learned in a Stampin Up class how to make the chicken wire.  We used an embossing folder called  "hexagon dynamic textured impressions folder".  Before we ran it through the Big shot, we inked it carefully with black ink.  It really does look like the chicken wire my sister uses around her chicken coops!  I used a sponge to lightly color in the sky to give it some color.

The card was so her!  lol
Manetta

Wednesday, February 22, 2017

Gracie

Do you keep a stash of cards and when you need one, you just pick one out....or are you like me?  I do not have a stash of cards and make them as I need them.  I try to think about the person as I make their card.

Someone I know had a birthday on Valentines day but I didn't want to make a card that had a Valentine theme.  I wanted something totally different.  She has a Yorkshire Terrier named Gracie, so I found a free image online and colored it with Twin Markers.  I used a picture from her FB page to use as a guide to color her with.  I used rectangles to cut the image so I could layer it up.


The background took a bit between the layers and drying.  I cut a piece of black cardstock in the size I wanted.  I brushed a layer Lumiere  Metallic Bronze all over the cardstock.  I was not fussy and some of the brush strokes left black showing through. After I was done, I tilted the cardstock up over the trash can and sprayed Tattered Angels Glimmer Mist in colors blues, greens, peach, lemon and candy red.  I just kept spraying the colors to let them run down mixing in some areas. After I was happy with those colors my final coat was Heidi Swapp white color shine which I just sprayed over it in different areas.  I linked what each product was in Amazon in case someone wanted to see what they looked like.   I ran it through the Sizzix with an embossing folder while it was still a little bit damp.   

I popped it into the mail to her and had to wait to post the card here so she would not see it ahead of time. she has received the card so I was safe to post it!

Manetta

Sunday, February 19, 2017

Spot's Get Well

I had fun this morning coloring the free digital image from Mo's Digital Pencil called Spot.  I needed two get-well cards and this image was perfect!
Thank you Mo's for the image!


Microsoft Word was used to print out the image.  I used Twin Touch Markers on the brown Spot and used Dick Blick Markers to color the grey Spot. You cannot see the background very well on the brown spot card but I used the old Stamping Up  Watercoloring crayons on both cards.

Thank you for stopping by.  I am now off to go make my cards I need in March.  

Manetta

Friday, February 17, 2017

Bloobel Progressive February Challenge

I wanted in on the progressive monthly fun so I bought the Bloobel February digital stamp "Bake Me a Cake".  I make a lot of birthday cards so nothing wrong with having one more stamp to play with!

Here is my card using the Bake Me a Cake digital stamp.

https://www.bloobel.com/blogs/news/bloobel-progressive-challenge-february-2017

I used Tim Holtz Window and Window Box Sizzix to cut the window out.  The cardstock was all scraps from my scrap paper pile.  The candles were punched from a Stamping Up punch.  The image...of course...is from https://www.bloobel.com Love Lisa Bloobel's digital stamps and have several. 

 If you are looking for something different for your cards, check out her store!  Lisa is also offering a progressive challenge (check out her blog  where each month you get a free image emailed.  The requirement you must post your creation before the end of the month to be "in" on the next month.  If you want to join...just purchase the digital stamp and get creating! 
Thank you for visiting!
Manetta

Submitting this card into Bloobel 2017 February Progressive Challenge


Wednesday, February 8, 2017

Valentine's Day Cards

This year I bought 4 digitals images from Mo's Digital and right now there is a great sale going on for the Valentine images.  
Spent Sunday coloring while waiting for the big game to begin. On Monday morning, all 4 were mailed off!  I wish you could see the sparkle on each card but I still struggle with trying to get the glitter to show up when I take a photo.  I used the Spectrum Noir Sparkle Glitter Brush Pens on each card and they look super cute.  The images were colored with a mix of Copic and Spectrum Noir markers. 

(click on each photo to enlarge)


I am not a huge lover of Valentine's Day.  I try to get my husband to stop buying me something.  He normally buys me a fruit bouquet which I share with everyone at the office.  I think it is a day for companies to make money.  I believe we should be showing love 365 days a year in many small ways each day.

With that said.....kids do not understand it all.  They think of it as a nice party day at school!  Being one who loves to make cards, I can't pass up making my 4 Grandkids a Valentine card but they are the only Valentine's Day cards I make.  

Thank you for stopping by!
Manetta