Monday, May 29, 2023

52CC-May Stash -Using up that Glitter

Use it up is the theme this week.  Those who know me well...knows full well how much stuff is in my craftroom that could be used up!  

*please click on the photos to see each photo better*

First thing I thought of was Jennifer Mcguire's video I watched a few weeks ago.  Use up that glitter was her theme. You can see it here on how she made her card... 

https://www.jennifermcguireink.com/2023/05/use-up-your-glitter.html.

It was very easy to follow and not that much of a mess.  The hardest part for me was to find a background die! Cut out the die and place it down onto a piece of cardstock that had an adhesive sheet on it.  Smash glitter into all the areas that was still open.  That was it!

 I had a piece of blue metallic cardstock left over from a project and white glitter from years ago that I used. I also found a package of Stampin Up Multipurpose Adhesive Sheets NEVER OPENED from several years ago too!  The white card base was also from my stash.  I had measured and put my fold on the wrong spot so I just stuck it in my pile to use up someday.  I made that work as my base.  It was very short on one side and I had enough of the blue metallic cardstock, so I placed a strip along the wider edge.

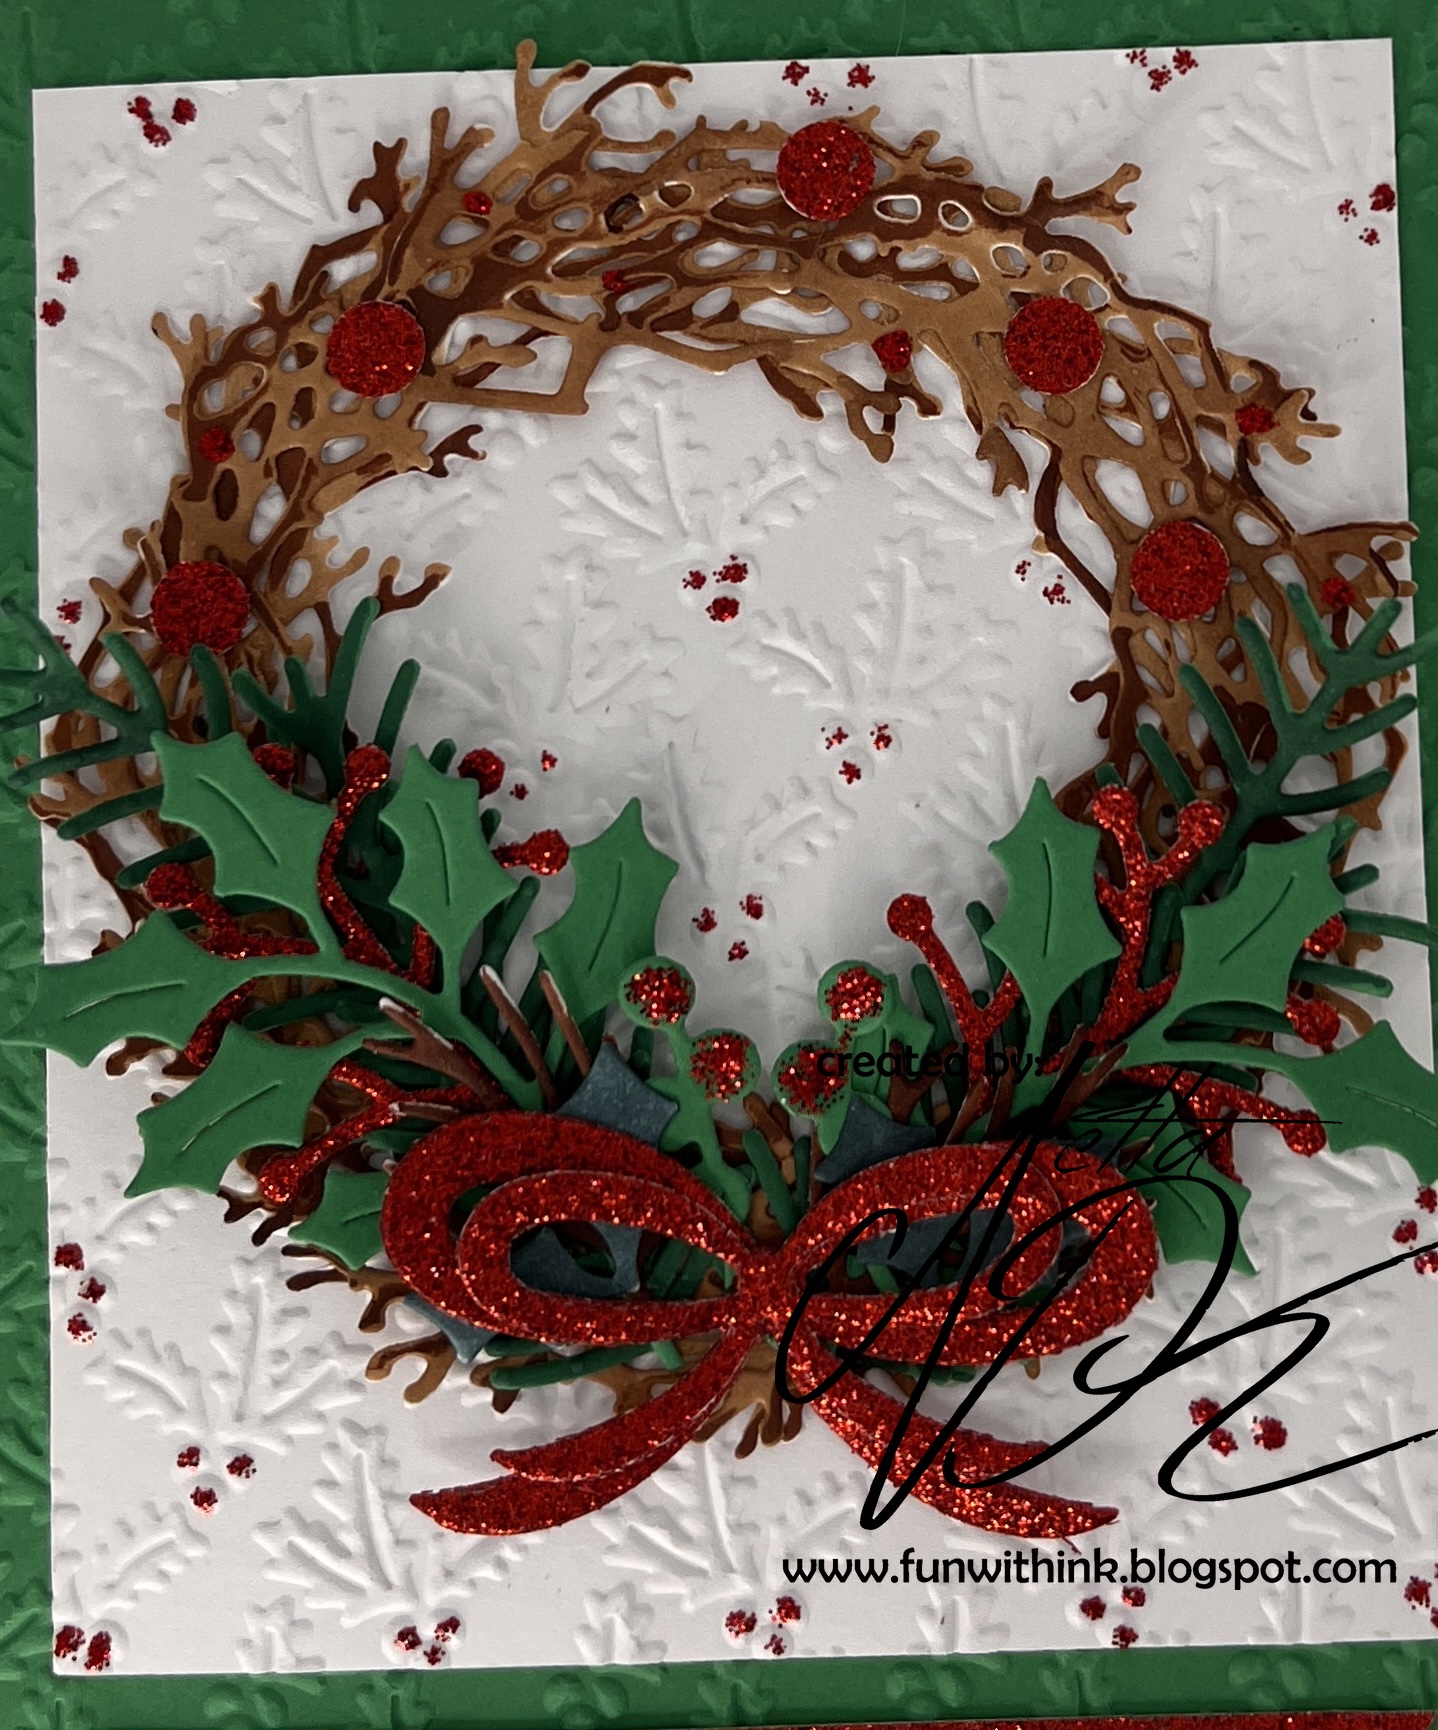
This card is so pretty.  Here is a close up so you can see the sparkle from all that glitter.  It looks like I used a glitter background but this way I am using up some of that glitter I have been hoarding for so long.


I had so much fun, I decided to make another one but this time for a birthday card.
I just love the look of the ink color and glitter on the background.
 
 
I started out with blending in the colors on the white cardstock..blue, yellow, orange and red.  Next layers are the adhesive, background die cut and then glitter.  I used the same step as the video.
It truly is pretty in person!


Submitted Christmas Card to Challenge

https://52cct.blogspot.com/2023/05/may-stash-challenge.html 


Supplies From My Stash:
 
                  Christmas Card
White Cardstock
Metallic Blue Cardstock
White Glitter (so old I do not know the company)
Stampin Up Beautiful Blizzard Sentiment
Stampin Up Blueberry Bushel Ink
Snowflake Background Die (Company Unknown)
Stampin Up Multipurpose Adhesive Sheets 

Birthday Card
White and Black Cardstock
Enjoy stamp set (Company unknown)
Top Dog Flower Lace A2 Mat Die 
Nuvo Sparkle Dust Glitter
Memento Ink:  Danube Blue, Dandelion,Tangelo, Lady Bug


Saturday, May 27, 2023

Letter D for Dragonfly Birthday

This will make a great Masculine birthday card I think and I have a few of those coming up over the summer.  I have enjoyed playing along with the Alphabet Challenge as it is giving me a chance to pull out stamps and supplies I have not used in a while!  

The boat, dragonfly and cattails image was all one stamped image on white cardstock.  I stamped in black and re-stamped again with Versamark so I could heat emboss.  I wanted it to stand out a little more than if I had just stamped it down flat.  I colored the image with my Copic Markers and fussy cut it out.  I printed the sun out with my computer and used Copic markers for the water.  I also added a touch of white pen to resemblance a few small waves.  Next I glued down the image.  I randomly stamped cattails along the bottom, Happy Birthday at the top and another small dragonfly with black ink.  I was so glad I recently picked up a new set of Happy Birthday Stamps as the hollow one from the set worked perfect. I wanted to be able to see the sun in part of it.  

Of course, it's a birthday card and birthday cards needs some sort of glitter/sparkle so the wings have a small amount of glitter on them.

It took two tries to get the sun printed the right size but overall I am very happy with how it came out.

Now done with letter D and I can't wait for letter E.  


Submitted to Challenge

https://alphabetchallengeblog.blogspot.com/2023/05/d-is-for-dragonflies.html


Supplies:
 
White Cardstock
Stickles Eucalyptus Glitter
Papertrey Ink Birthday Your Way Stamp Set
Impression Obsession Change the World Stamp Set For Dragonflies
Impression Obsession Lighthouse Stamp set for Cattails
Versafine Onyx Black
Sun by PngWing
VersaMark Watermark stamp pad
Arteza White Gel Pen 1.0mm
Copic Markers YG11,BG75,B000, B21, E13, E15
Heat Gun
Clear Embossing Powder
Misti
Tim Hotz Small Scissors


Monday, May 22, 2023

52CCT-Theme Christmas Music

      When I saw this theme, I knew exactly what I was going to do.  Lucky I had the pieces to put it together!

It looks like the Carolers are singing to "someone" at the front door.  

I have the Carolers positioned so she is to the back and the two boys have pop dots behind them so they are slightly to the front.  I needed to ground them somehow so I added snow under them. 

Inside:  

"The Best Way to spread Christmas Cheer 

Is singing loud for all to hear" 


Submitted to Challenge:

https://52cct.blogspot.com/2023/05/may-theme-challenge.html


 ***Update***
 

Supplies:
 
Black and White Cardstock
Stickles Nuvo Glitter Drop
Scribbles Shiny Winter White 3D Paint
Stampin Up Brightly Lit Christmas Die
Impression Obession Carolers Die
Stair Die
Stampin Up Seasonal Die
Black Pop Dots
Music Background by PngWing
Distress Oxide Prize Ribbon
Blender brush

Sunday, May 21, 2023

3 Dimensional Tree Card

I love purples and blues on a Christmas card because I think they give off the sense of cold.  In my neck of the woods, we do have cold during that time and I love it!

No stamping on this card.  Just die cutting.

I die cut 3 sets of trees and used Distress Oxide with a blending brush to get a two-tone color the trees.  I also used the same colors to do the background of the base.  

First layer, which was the tallest trees in the back, was glued down, Next layer, was popped up with skinny pop dots. Last layer had a thicker pop dots.  It gives each set of trees dimension.

I wanted the very front (deer and Merry Christmas) to be the deeper purple but the Merry Christmas blended in too much.  I had a deeper purple Glitter so I used that and wrote over the top of it.

I tried to make Bokeh circles like the photo below by using water, the eraser part of a pencil and a dropper  to get smaller dots on the base background. 


 Submitted to Challenge

https://christmaskickstartchallenge.blogspot.com/2023/05/challenge-74-colour-palette-fun.html


Supplies

Neenah Classic Crest Solar White Cardstock for Base

Scrap Deep Purple Cardstock

 Distress Oxide  Ink: Habanero, Dusty Concord, Seedless Preserves,Shaded Lilac, Tumbled Glass

Stickles Dark Blue
 
No Name Merry Christmas Die

Impression Obession Deer Trio Die
 
Sizzix Tim Holtz Treeline Die
 
Water

Pop Dots
 
Blending Brushes

Saturday, May 20, 2023

TASFT May Challenge- Hoppy Birthday

This challenge is the whole month of May challenge.  We had a choice of sketch or Mermaids.  I chose the sketch.
 
 
I did not have a background stamp that had birthday words on it so I just used torn copy paper along the edge and kept moving the stamp down.

 I found the image in my computer from long ago and it worked great.  To finish it off, I added a little sparkle because birthdays always have to have some sparkle on it!
 
I used my computer to type and print the sentiment strips. 
Inside: Not Me, that's who!  Hoppy Birthday


Supplies

Neenah Classic Crest Solar White Cardstock for Base

Scrap Navy Cardstock

 Versafine  Ink: Habanero, Deep Lagoon, Spanish Moss, Imperial Purple, Satin Red, Majestic Blue

"It's Your Birthday" from Fiskars Birthday Cheer Stamp Set. 
 
Image from Sherry West
 
Copic Markers B000 and YG11
 
Prismacolor Pencils: Goldenrod, Apple Green, Dark Green, Black, 70% Cool Grey
 
Stickles Black Diamond and Eucalyptus 

Pop Dots

Thursday, May 18, 2023

52 CCT May Colour Challenge-Christmas Wreath

 Brown, Green, Red

That was a hard color combo to come up with for Christmas card and the only thing that stuck in my mind was this wreath, so I went for it.

I used white cardstock and cut two wreaths.  Before I glued them together, I randomly colored the twigs with the copic markers to give them a two tone look.   

I glued everything down and punched a bunch of red circles from scrap red glitter paper for the berries.  After everything was glued down, I added glitter red dots.

I think I covered the color challenge well.....brown twig wreath, red ribbon and holly berries with green evergreen leaves.


 Some day I will get good at taking photos because it really is pretty. 


 Submitted to Challenge

https://52cct.blogspot.com/2023/05/may-colour-challenge.html 


****Update****


Supplies

Neenah Classic Crest Solar White Cardstock for Base

Scraps Green, Brown and Glitter red Cardstock 

Impression Obsession Twig Wreath Dig Set

Embosselicious Evergreen Embossing Folder for Background

Ribbons from Stampin Up Pretty Pines Die Set

Evergreens from Penny Black Holly Flourish Die Set

Merry Christmas Die from Spellbinders 3D Poinsettia Surprise Envelope Die Set

Stickles Christmas Red 

Copic Marker for the Wreath E57 & E29

Regular hole puncher


Wednesday, May 17, 2023

Letter A & C Challenge

Part One

The current letter is C for Cats for the Alphabet Challenge Blog

I did not have a cat image and I need more Christmas Cards to add to my stash so I was lucky to find the perfect digital image Kitten in Christmas Present to purchase.  

I used Copic markers  (B000, B21, B23) for the blue background.  Prismapencils was for the image (Carmine Red, Crimson Red, Golden Rod, Apple Green, Dark Green, Seashell Pink,Burnt Ochre,Sienna Brown and Blender Pencil).

I used Nuvo Crystal drops Ivory Seashell for the snow.  Nuvo Glitter drops White Blizzard on the ribbon and Christmas bulb for the glitter.

Seasons Greetings came from Christmas Blessings Set.

Submitted to Challenge


Part Two

Letter A (playing catch up)

 I wanted to start at the beginning of the alphabet challenge and continue playing along to keep caught up. Lucky I was only one alphabet off and that was the letter "A".  I think this card would have been acceptable!  I made this for my grandson's 3rd birthday.  Just a bunch of handcutting with sissors, white pen and circle punches! For his nose, I used a flower ball tool to round it out and used a lot of glue underneath to keep it somewhat rounded in the mail. 


A for Adorable-Anything Cute


Wednesday, May 10, 2023

Birthday Flowers

 I had fun coloring up this flower with my Prismacolored pencils.  

It's been awhile since I pulled them out last!


Supplies

Neenah Classic Crest Solar White Cardstock for Base

Scraps Orange Cardstock 

Strathmore Colored Pencil Paper

Arteza White Gel Pen

Koh-I-Noor Progresso Pencils: Flowers #1, #2, #11, #21, #22  Leaves #19, #20

Versa MarkVintage Sepia Stamp Pad

Versafine Onyx Black

Stampin Up Birthday Wit (inside of card)

Altenew Label Love "Happy Birthday"

Altnew Blossom & Bloom Stamp and Die

Sizzix Tim Hotz Alterations Mixed Media

Pop Ups

Saturday, May 6, 2023

Emboss it, Drag It, Glue It, Mail It

I just love this card but of course brown and blues are my all time favorite combo.  The folder I used is absolutely beautiful even left with just white cardstock but I felt like experimenting.  Remember, it is a 3D folder so you need to mist the cardstock lightly with water before you emboss.  That will stop the cardstock from cracking.
  Once dried (only a few moments), I used the Simon Hurley Lunar Paste and a paint brush to color in the flowers.  I didn't like it so I tried dragging the ink pad over it to see how the colored flowers would look then.  Still didn't like it so it went in the trash.  Next I dragged the ink pad across another white embossed cardstock, going down and across until I was satisfied with the look.  All total I think I dragged it like 10 times.  
Look at that detail on those flowers!!
 
 I love how it just made the flowers pop but to me it still needed some color.  Since I had the Lunar Paste out, I tried brushing it in the center and that did it for me.  Just enough color.  I put the dots back in the flower with a sepia pen as they were were filled in with paste.  I cut a white mat and just finger colored the edge of the mat with paste and on a white scrap for the flag.  Happy Birthday was glued down flat but the flag was raised up with pop dots.

The Simon Hurley paste has such a pretty metallic shine to it so I took another picture with a bit stronger light to show you the shine it gives off on all the blue.  It is so pretty and shiny!


There is a trick that I have used for years with all my sentiment dies.  I cut out all the sentiments in the set and space them out on a laminate sheet to preserve them for future use. The sheet, once done fits in the holder I have for that die set to keep them together. I place the laminated sheet on the card to get an idea if it will fit with what I want.  It has been really helpful to me over the years so I wanted to share the tidbit with you.

This card is actually a very simple card and you do not need a ton of supplies to create it.  If you are looking to make a fast but pretty card, then give this technique a try!  Emboss, drag, glue and mail.
 

Supplies

Whte and Brown Cardstock

Creative Expressions 3D Embossing Folder -Cosmos Bouquet

Versafine Vintage Sepia Stamp Pad

Nuvo Light Mist Spray Bottle with Water

PaperCrafter Free Sentiment Dies

Rangers "Simon Hurley" Lunar Paste-Clear Skies

Small paint brush

EK Success "Martha Stewart" Sepia Writing Pen

Pop Ups