Showing posts with label embossing. Show all posts

Saturday, July 15, 2023

Christmas Pets

 I was so excited to be invited as a guest designer this week over at 52 CCT.  Its a Theme challenge this week and the theme is Pets!

What to choose from?  I have dogs in many poses.  I have cats.  I have lambs.  I have so many to choose from!  I ended up with this stamp set "Santa Paws" from Art Impressions.  I have used many stamps in this set but today I am working with the group of singing dogs.

 I stamped the image first and masked it so I could do the sky which is Distress Oxides Prize Ribbon, Dusty Concord and Tumbled Glass.  Those colors are my go-to when I make a night sky.  The stars are splattered Dr Ph Martins Pen White Ink.  it comes with a dropper.  I just dipped a brush into it and splattered the ink. It works the best for me for stars.  Next I colored with my Prismacolor Premier colored pencils.  I love that sentiment that was stamped on vellum and clear embossed with Altenew Crystal Clear embossing powder.  I picked the sentiment up from Rubberstamps.com called Christmas Cheer.

I hope you join us over at the 52 Christmas Card Throwdown.  Just click the link and it will take you over to the Theme Challenge-Pets.  We all would love to see what you make too!


Saturday, May 6, 2023

Emboss it, Drag It, Glue It, Mail It

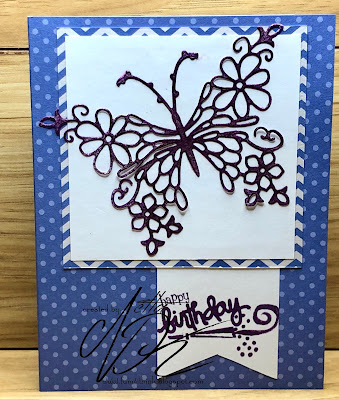
I just love this card but of course brown and blues are my all time favorite combo.  The folder I used is absolutely beautiful even left with just white cardstock but I felt like experimenting.  Remember, it is a 3D folder so you need to mist the cardstock lightly with water before you emboss.  That will stop the cardstock from cracking.
  Once dried (only a few moments), I used the Simon Hurley Lunar Paste and a paint brush to color in the flowers.  I didn't like it so I tried dragging the ink pad over it to see how the colored flowers would look then.  Still didn't like it so it went in the trash.  Next I dragged the ink pad across another white embossed cardstock, going down and across until I was satisfied with the look.  All total I think I dragged it like 10 times.  
Look at that detail on those flowers!!
 
 I love how it just made the flowers pop but to me it still needed some color.  Since I had the Lunar Paste out, I tried brushing it in the center and that did it for me.  Just enough color.  I put the dots back in the flower with a sepia pen as they were were filled in with paste.  I cut a white mat and just finger colored the edge of the mat with paste and on a white scrap for the flag.  Happy Birthday was glued down flat but the flag was raised up with pop dots.

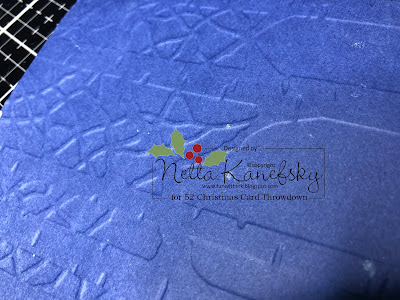
The Simon Hurley paste has such a pretty metallic shine to it so I took another picture with a bit stronger light to show you the shine it gives off on all the blue.  It is so pretty and shiny!


There is a trick that I have used for years with all my sentiment dies.  I cut out all the sentiments in the set and space them out on a laminate sheet to preserve them for future use. The sheet, once done fits in the holder I have for that die set to keep them together. I place the laminated sheet on the card to get an idea if it will fit with what I want.  It has been really helpful to me over the years so I wanted to share the tidbit with you.

This card is actually a very simple card and you do not need a ton of supplies to create it.  If you are looking to make a fast but pretty card, then give this technique a try!  Emboss, drag, glue and mail.
 

Supplies

Whte and Brown Cardstock

Creative Expressions 3D Embossing Folder -Cosmos Bouquet

Versafine Vintage Sepia Stamp Pad

Nuvo Light Mist Spray Bottle with Water

PaperCrafter Free Sentiment Dies

Rangers "Simon Hurley" Lunar Paste-Clear Skies

Small paint brush

EK Success "Martha Stewart" Sepia Writing Pen

Pop Ups

Thursday, April 27, 2023

52 CCC April Technique Challenge-Embossed Vellum

I got another Christmas Card done towards my goal for 2023.  

 I didn't count how many cards I threw away working on my idea!  Nothing lined up right.

My idea was to make an image on the inside of a vellum card and to heat emboss a stamp image on the outside of the vellum.  The inside was colored and the outside was just the image embossed in white.

When closed, you can see the colored poinsettias through the vellum.  

 
I finally accomplished my idea.  I love experimenting, especially when it finally comes out like I planned.
 
At 52CCT challenge was to emboss but it did not say dry emboss or heat emboss.  Hoping heating embossing is ok!


Submitted to Challenge
 
https://52cct.blogspot.com/2023/04/april-technique-challenge.html
 

****Update****


Supplies

Stampin Up Vellum Cardstock

White Cardstock 

Nuvo Embossing Paper Glacier White Powder

Heat Gun

VersaMark Ink Pad

Altenew Crispe Dye Ink-Sea Breeze and Tide Blue

Colorado & Craft Company-Slimline Poinsettias

Blue Sequins

Dr. Ph. Martin's Pen-White Ink

Blending Brushes


Sunday, April 2, 2023

I am back!.....again! 52 CCC April Sketch Challenge

 Since I wrote I moved...well.... I moved again!  Bigger home but the best part is I have a craft room that I love with all my stations set up.  My husband and I even built a moveable table big enough for me to scrapbook again.

So now that I am all set, there is no excuse to start my Christmas cards.  The best way I knew to get started was to go back to my old friends at 55 Christmas Card Throwdown.  It was an easy way to start that Christmas Card creation bug going.  I used holographic paper and wow is that hard to photograph!  Would you believe this paper is white?  Need to work on the lighting at my desk.

I took the Sketch they are using this month and kept flipping it around until I was happy.


Good to be back...

Netta


Submitted to Challenge:

CAS Christmas Card April Sketch Challenge


Supplies

Scrapbook.com Holographic Mirror paper 

White Cardstock

Spellbinders Classic Ovals Large

Cricut Cuttlebug Kitchen Weave Embossing Folder

Prickley Pear Stamp "It Came Without Ribbons"

My Favorite Things "Stylish Snowflakes" Die

Handcut Tags by hand


Sunday, October 4, 2020

Card Making Day 2020

 Last night I wanted to post my cards I made for Card Making Day but I had lost my mojo and went to bed early!

I got a couple of birthday cards done and Christmas cards.

I think it was a great day yesterday!


With the Christmas Cards, I used some embossing paste and stencils from Altenew to create backgrounds.  I got these done and while they were drying I worked on the birthday cards posted above.  The pine cones background was actually used two stencils.  I have one more background but I am saving that one for a Christmas card I will do later.


Enjoyed my day so much I may continue today!

Hope you had a great crafty Card Making day as well

Netta

Saturday, August 22, 2020

52 CCT August Technique Challenge

How many have heard of Shadow Stamping?  How many have heard of Shadow Stamping with a stencil?

Here are some videos to help you out if you are never heard of it

I have done Shadow Stamping in the past. You just stamp twice...once with a light color and once with a darker color but the 2nd time is off set just slightly from the 1st.  It gives it a shadow look.  
One of the videos shows how to Shadow Stamp with a stencil...something I have never tried so I did some experimenting.
I found, never use a light cardstock, as I could not tell where I stamped white.  I stamped way off kilter.  I might still use them some way...some how...on a card.

The sample I ended up using on my card was a Tree Stencil on a navy cardstock.  First I inked white with a sponge and then over the top (slightly off from the white), I inked with a dark blue.  You can tell where I inked because blue over the white became a lighter blue.   I wished I had more Christmas stencils to experiment with.

Here is a close up.  It looks like it is a shadow is on the front from a moon at the back of the trees.  I think, if I did this again with the trees, I would stamp at a big distance so it would be more white and less dark.

After the ink dried, I got to thinking...could you emboss with a stencil?  I did a search and found the out others have.  Here is the recipe I used with my Big Shot
Platform
Plate
Rubber Mat
Paper
Stencil
Precision Base Plate

Here is the backside.  It works but next time I would EMboss and not DEboss the image.  Since I already had the front done, I had to place the stencil on top so I could match up the image with the stamped image which caused it to deboss.


Now...go on over to https://52cct.blogspot.com/ and check out the beautiful creations from my fellow Designer teammates.  There will be a place for you to add your card as well for this challenge.
See you over there!  Let's go....

Netta


2 Techniques Used:
Dry Emboss with a Stencil
Shadow Stamping with Stencil

Ingredients:
Memory Box Birch Tree Stencil
Hero Arts Hero Hues Unicorn Ink
Stampin Pad Blueberry Bushel
Navy Cardstock
Foam Mounting Tape
Spellbinders Building Snowman Die
Left over White Glitter cardstock
Winter Wonderland Embossing Powder
Rubberstamps.com Sentiment "Build a Snowman"

Wednesday, July 29, 2020

Cone or No Cone

My boss has been down for at least a week now with really bad back pain and he is so missed at work.  
I wanted to make him a quick card to let him know I was thinking of him.
He loves dogs so I made him this card. 
Inside it says "On the bright side...You don't need a cone."

I know he will appreciate the thought.
Ralph...get well quick!  We miss you!

Netta

Copics: C00, C1, C3, 100, E55, E57, E59
Ranger Archival Ink
AI Stamp Set Doggy Kisses
Stamping Up Punch
Scrap blue paper
Versamark
Embossing Fine Detail Clear powder
Heat Gun

Sunday, July 26, 2020

Surrounded With Love


Someone very dear to me lost her mom a couple of days ago, so this morning I made her this card.  

I had the pleasure of knowing her mom over the years.  She was a sweetest woman and very close to her daughter.
There has been struggles over the past few years so it is one of those blessings in disguise.  No matter what...it is always difficult to say goodby.  Nothing about it makes its easy.
MJ, if my arms could reach you, I would give you the biggest hug.  I know you have the best support with Al.

Much love to you.
Netta


Memento Ink: TangeloDandelion, Teal Zeal, Summer Sky, Danube Blue,Desert Sand
Distress Ink Forest Moss
Stampin Up: Chocolate Chip and Baked Brown Sugar
Large Post It Note
Misty
Penny Black Stamp "Paradise"
Just Rite Sentiment Stamp "Sympathy Handwritten"
Clear and White Embossing
Sponges
Areza Water Color Real Brush Pens: Ginger, Coffee, Crocodile Green, Seawood Green, Sapphire Blue, Night Sky Blue,
Versamark pad and pen
Embossing Gun

Saturday, June 13, 2020

52 CCT June Color Challenge

Christmas card created with a couple of non-traditional Christmas colors.
Purple, Pink and Gold Christmas card!

I used Distress Oxides...one pink and two purple to make the background.  The background stamp was stamped with gold in a Misti.  I left the stamp in the Misti and stamped again with clear embossing so I could heat emboss it.  I found over the years I did not need a ton of colors of embossing powder.   Just stamp in color and embossing with clear.  You get just about the same look and effect.
I cut two wreaths..one gold and one purple to match the mat.  


So now is your turn!!  Grab that pink, purple and gold items in your stash and have a go!
See you at 52CCT!


Scrap purple cardstock
Gold ink
Scrap gold cardstock
Clear Embossing powder and heat gun
Penny Black Whirl Wreath die 
The Stamping Place Background Stamp
Distress Oxide Spun Sugar, Seedless Preserves and Dusty Concord

Saturday, May 23, 2020

52 CCT May Technique Challenge

Ever do a card when after your done you say Hmmmmmm


This card did not come out like I wanted. 

 Embossing was the theme at 52CCT today.  
I may have to go back to the drawing board and rethink what I was thinking!


Well ....anyway....I hope your crafting day is better than mine! lol
Netta

Saturday, January 26, 2019

52 CCT January Technique Challenge


Time for another Challenge at 52 CCT!  This time it is all about heat embossing!  


I like this challenge as I sort of got away from heat embossing lately.
Right in the middle of my project, my embossing gun died.  I had to run down to the craft store at 8 pm just to buy a new one. I knew I was on borrowed time anyway as it was over 20 years old!  I got a Paper Studio heat gun.  I was shocked as the price of the new one was what I paid for mine long ago. This one is a little more slimline & lighter in weight which makes holding & using it easier.  It heats up faster as well.  On this project, because I was embossing white on white, I took my time and stamped only a couple of snowflakes at a time.  By the time I got done, I was surprised the tool was quite warm and it even had a lot of rest as I worked the snowflakes slowly.  Hope it gives me another 20 yrs like my first one.

After the embossing was done and cooled, I rubbed 3 different colors of Distress Oxide on the card, making sure they over lapped in color.  I used Peacock Feathers, Mustard Seed and Tumbled glass. Embossing does not hold the color so it is easy to wipe off the snowflakes to make them stand out against the color.  The snowflakes came from BoBunny stamps set called Snowflakes Stamp.  Sentiment was a dollar store purchase years ago.  I first had it done in white to match the card but the words just did not show up well enough so I ripped it off. I re-stamped with Versafine Onyx Black.  Versafine sometimes will stay wet long enough so you can emboss.  I used clear embossing powder on it and heat emboss the words as well.

Thank you for stopping by.  I hope you play along with the 52 Christmas Card Throwdown team!  Show us what you got!  *S*

Netta

Wednesday, April 4, 2018

Beautiful Black Ice

My friends and family back home, in NH know black ice as a thin coating of glaze ice on the road.  It is not really black but it is transparent so the black road below it shows through so sometimes is called clear ice.  The roads looked dark and so shiny.  You could not tell if the road was wet or coated with ice glazed over it.   Not something anyone likes to drive on.

Black ice in the crafting world is a card technique and you use a foil sheet, archival black ink, versamark ink, heat gun and clear embossing powder.  

It kinda reminds me of the Black Ice on the roads when done!  Black and shiny!


The close up of the card picked up the brown around the card because you use a foil sheet.  The foil sheet is from Stampin Up called Champagne Foil Sheets.  


I experimented with this technique on 3 different cards. It's so beautiful once done and addicting.

There are youtube videos to show you how to do this technique.  You should try it!

Thank you for stopping by!  I hope you have a great crafting evening.

Netta


Sunday, March 27, 2016

Spring is in the Air

Nothing like a Birthday card with butterflies and flowers to say Spring in the air!


This is another card where I used a piece of the Strathmore Chromolux Mirri Sheets to cut the flowers out and colored with Tim Holtz Adirondack Alcohol Ink.  I used a technique from Crafts on the Run blog to glue the die cut into the negative image cut from the background.  She recommends embossing the background and then cut the image out of it so that is what I did.   A little bit of stickles on the butterfly wings and on celebrate finished off the card.  The word celebrate is from the Sizzix Tim Holtz thinlit set Script Celebration Words. 

I am submitting this card to the following challenges:

Thank you for checking out my creation!


Saturday, May 24, 2014

Red and White Christmas

Still going strong on my Christmas cards!  I think I am pretty close to 40 made so far this year.  Cardstock is all from left overs.  I sat down and sorted all my scraps and placed them in 12 x 12 plastic containers.  Right now I have 2 colors in each but eventually will move them out into single.  I have them lined on a shelf and since I did that I find it is the first place I go to when I need paper or cardstock!  Great way to use it up because out of the choices in the containers, I will find something that will work with what I am doing.  The only speciality paper container I have is Christmas so while I am working on Christmas cards I will have the case open and ready to dig through.  


Netta

Monday, December 30, 2013

Very busy Christmas Time!


I have been absent but not idle!  Not only was I busy trying to get ready for Christmas and finish my Christmas cards but I also had to get ready for a two week vacation!  

Now that is behind me and I am now on vacation, I thought I would just take a few minutes to post some of the cards I had been working on!


Netta