Thursday, December 30, 2010

MCE-Christmas Magic

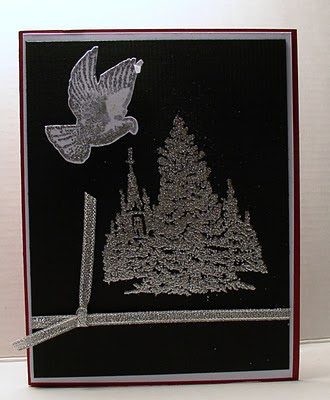
The MCE challenge for December was called Christmas Magic. Only colors we could use were Red, Black, White and/or Silver (in any combination). Image had to be mounted and ribbon used on the card. For some reason I had a very different time with this challenge. Here is the card I came up with


Here is the card I got in return. I think it is absolutely gorgeous!! Thank you Jessica!!


Thank you for stopping by. Manetta

Wednesday, December 8, 2010

Christmas Cat in Santa Hat


Ahhhh Thanksgiving is done and the Christmas Holiday is here!!! Christmas is my favorite holiday. I have the inside of the house done and the tree is up with lights on. Just need to finish decorating it.
How are you all doing with your Christmas Cards? I think I am ok...might have a few here and there. My total count is at 102 cards made this year!
This card was easy but just took a bit of time between cutting and letting the inside dry. I made it for a woman who watching animals for many people while they are away...including me...I have 3 dogs.
I found a scrap of red paper that worked well and had some nice sparkle to it...what is a Christmas card without some sparkle, glitter and shine!
Stamped Cat in Santa Hat rubber with Mometo Tuxedo Black
Nestabilty cut the window, the red edge and the window (clear transparency)
For the white of the hat I used something like Scribbles (no label on the bottle).

Happy Crafting!
Manetta

Tuesday, November 30, 2010

Winter Cardinal

I used the Reverse Masking technique. Once the acetate window was cut for the reverse masking technique...the rest was simple. Some use paper for the window but I like to use acetate as it allows me to see through.
I used my cuttlebug and oval nestie to cut the oval window out . I cut the acetate to exactly match the cardstock so I would not have to try to find the center. I just matched the edges up.
*HINT: use painters blue tape to hold down your acetate. Painters tape does not rip the paper like regular tape or masking tape will.
I stamped the Winter Cardinal right over the acetate and only what was stamped in the exposed oval window went onto the cardstock. Before removing the acetate I used a sponged for the edges.
Very easy. No glitter or bling. Just a simple snowflake in the corner.
This card would be easy to mass produce.

Have a wonderful day!
Manetta

Monday, November 29, 2010

Simple Christmas Card


I normally make over 100 Christmas cards so to get to that number quicker, I needed to make a few easy cards. My husband loves all the mice images so I know he will be choosing many of the mice cards to hand out to co-workers.
This card was easy. I stamped Kiss Me Mouse stamp Momento Black onto a cream cardstock and then mounted it onto a gold premade card.
Bow was made using my Bow Easy.

Thank you for stopping by!
Manetta

Tuesday, November 23, 2010

Thanksgiving Turkey Cards

OUCH!!
Has it really been that long since I last posted?
Between shoulder injury, surgery and company for several weeks...it seems my blog has been quiet...but I am back to making cards.
I found a turkey stamp for a dollar and made a couple of cards I wanted to share with you.
The first card is the tri-shutter fold and the flowers (one the front and the bud) are dahlia folds. The wording was printed on my computer.


The second card is a tent fold card. Very easy. I enjoy making this card and will make more for my co-workers for Christmas to display on their desk through the holiday season!


Thank you for stopping by and I hope you have a wonderful Tuesday!!
Manetta

Wednesday, October 6, 2010

Hanukkah 2010


This is another card that I made on World Card Making Day. It will be my Hanukkah cards this year! This stamp came from Outlines. I used markers to color and over the darker blue and candles flame (which is hard to see) I used stickles.

Thank you for stopping by!
Manetta

Sunday, October 3, 2010

World Card Making Day Creations

I joined a couple of challenges for World Card Making Day. This challenge was to use one or more inches. Love this house mouse set.


This Challenge was to keep it simple. I just stamped and embossed on navy card stock.


This Challenge we had to use this ad as inspiration. I looked at the colors..that it is night time and there are stars.


I have more cards that I did this weekend which I will share later. I am pretty please with what I got done this weekend. Hope you had as much fun as I did on World Card Making day!
 thanks for stopping by...
 Manetta

Saturday, October 2, 2010

Happy World Card Making Day!!!

This fun day always falls on the first Saturday of each October, kicking off the holiday card-making season.
I want/NEED to seriously concentrate on creating my Christmas Cards and I have a few Halloween cards to do. Today will be my card day….no plans except to create!
To get me in the mood….to do Holiday Cards............I am going to throw a DVD holiday movie in. With the sun shining and temperature shows 80's (I live in FL)...I have to get into the excitement of the season somehow.
.
Will be back later with some cards I made!
Manetta

Thursday, September 30, 2010

Fall Is Here!

You know what comes next don't cha? *brrrrrrrrrrrr* weather!!

This card was stamped with Sunflower Frame rubber stamp...colored with Blick markers...cut out and placed on paper from the Fall/Halloween paper I had left over. This week I committed myself to sending out 5 cards to 5 people for no reason...nadda...zip...ziltch reasons! A "just because" card. Here is one card I made to send out.....now....thinking and wondering...who will get this card...
 hmmmmmmm 


 thanks for stopping by!
 Manetta

Wednesday, September 29, 2010

Mojo Monday Christmas Mouse

Do you ever get stuck when making a card? No mojo juice? Feel like all your cards come out looking the same?
That was me ...yesterday.
All you have to do to get your mojo going again
is to head on over to Mojo Monday blog like I did.
This weeks sketch was a choice of two
The idea is to take the sketch and use it as a base to get started...I try to turn it upside down...right side up...sideways...to see what works for me.
Here is what I came up with!


This image came from Christmas House Mouse Stamp Set.
Have a wonderful day!

Manetta

Tuesday, September 28, 2010

Lights all a Tangled


This mouse ...from Lighten Up Mouse Set....is busy untangling the lights from the box and hopes to have it done in time to decorate the trees for Christmas! Stamped first and then masked so the row of Christmas trees would be behind him...each bulb on the light strand glistens colors from a drop of stickles....makes for a pretty Christmas Card.
 Thank you for stopping by!
Manetta

Monday, September 27, 2010

Mistletoe Mice

I had not used this ribbon technique in a long time. I liked how the checkered green white and red ribbon came out when I pulled it apart by the threads. Thank you for stopping by! Manetta

Sunday, September 26, 2010

Mistakes can become Works of Art

Never throw away a mistake when you make cards!!
You never know when you can use it.
This card was stamped with a background stamp 2 years ago! I never used it because the middle of the stamp did not stamp completely so I just threw it into my "Mistake box".
I dug through my box and decided I could use it. The card was the inspiration for my colors.


Close up the hat and snow...
the hat is made from Styrofoam balls and the snow is Diamond Dust.


Hope this card inspires you to start your Christmas Cards and
if you enjoy this Christmas Tree Mouse...it is on sale this week...along with all the other mice stamps!
thank you

Saturday, September 25, 2010

Christmas Gone to the Toilet...

ahhhh not really...however I did make a Christmas card using something you normally find only in the bathroom...
Check out these Snowmen from Let It Snow Set made from....


Toilet Paper!!


 I tried to get the shimmer to show up. If you click on the photo and enlarge it..it is easier to see. Grab yourself a roll from your bathroom, spray bottle with water and the instructions on how to make your casting from your favorite stamp!


  • You will need about 6 to 8 squares of toilet paper and a stamp that is deeply edged and not too finely detailed.
  • Layer the toilet paper over the stamp and wet it.
  • Mold it over the stamp and blot off excess water....carefully pressing down to get a good imprint of your rubber stamp mold.
  • Tear or cut off excess paper around the molded image.
  • Let dry over night.  You can use a heat tool to speed up the process but be careful not to burn the tissue.  I prefer to just let it dry until the next day.
  • Take off mold and trim.
I used double sided tape to apply mold to cardstock.  Don’t use wet glue or glue sticks as this might make the mold wet and destroy the mold.   I have also colored with Pearlescent Chalk and sprayed with glimmer mist to give it a nice shimmer. Embellish as desired.
If you don’t have any glimmer mist, you can always make your own.  
  • In a small spray bottle add equal parts decoupage lacquer or Mod Podge (I heard white glue like Elmer's will work too but have not tried it) and water.
  • Add small amount of PearlEx Powder or Perfect Pearls, recap the spray bottle and shake the mix together.
  • You can also use a drop or two of re-inker if you wanted a colored glimmer mist.
If it clogs when you spray, just add a little more water to the mix.  


 thank you for stopping by...

Friday, September 10, 2010

Happy New Year!!!

Sunday, September 5, 2010

Cover-a-Card Background Meets Alcohol Ink

I had so much fun making this card! I made the background paper design out of glossy paper and alcohol inks ....and then stamped over the design with the Cover-a-Card Flourishes. I think Jasper with Butterflies just so dog-gone cute! I colored him with Blick markers and "painted" the butterflies with stickles. Once the stickles dried...I used liquid glue to cover the butterflies.
I have not stamped anything on the inside yet....I am waiting until that "Ut Oh" moment happens...when you realize you needed a card-yesterday!! lol


For more inspiration..don't forget to head on over to Create With Faye.

Thank you for stopping by!

Wednesday, September 1, 2010

Spooky Woods!

Did you realize how close the holidays are? *panic look* Halloween is just around the corner!!! Realized I better get started working on my Halloween and Christamas cards. EEEKKKK


Since the Cover-a-Card Branches rubber stamp is 5 3/4 x 5 3/4 in size...I used my Mega Mount to hold it.... inked the stamp with Memento Black....stamped the background and then sponged ink to get the sunset look.
I stamped the "Spa Day" Witch, colored with Blick markers and cut her out.
The bow was made with my Bow-Easy to make my bow.
One down....how many more to go??? lol
 Stop on over at Create With Faye Blog to get more inspiration!

Thanks for stopping

Wednesday, August 25, 2010

Michelle Zindorf Technique

I love her techniques!!! I saw her card and had to try to make it for my brother. He is always taking pictures of animals and has some wonderful photos. I popped this in the mail to him on Monday.....I think he will love it!
Have a wonderful day! Netta

Tuesday, August 17, 2010

Sympathy for a Friend

A woman I have known for several years lost
one of her children yesterday to cancer.
No one wants to see their child pass away.
It has to be the worst feeling ever.
This card is for her.


I used the Cover-a-Card Background stamp for the background and used Silhouette11 flower stamp over the top. "With Sympathy" words are from the Iris & Tulip Set.

Thanks for stopping by!
Netta

Tuesday, August 10, 2010

Faux Mother of Pearl Dress

In May I did a Faux Mother of Pearl Technique and with the extra paper I stamped this dress. I used Momento Ink and sponge to go back over to get the darker colors. With a bit of the scraps I was able to also punch out a flower.
Thank You for stopping by!!
Netta

Wednesday, August 4, 2010

More Photo Stamping

Wanted to share a couple more photo cards that I did. These required 5 stamps each.
thank you for looking!
Netta

Sunday, August 1, 2010

Photo Stamping

This is a very easy technique but one I have wanted to try for a long time. I recently read an article at Stampers Quest and it gave me the inspiration to give it a try.
Stamping on Photos
I love taking photos of scenery so this techinque is right up my ally!
Find a nice sunset...find a nice stamp...stamp and voila! Your done the hard part!

In the photo above...I wanted to show you how you can actually turn a photo upside down and get a different view. I was able to stamp and get two cards out of one picture using the same stamp.

  Play around....and have fun! thanks for stopping by.. Netta

Sunday, May 9, 2010

Faux Mother of Pearl Technique

This technique is called Faux Mother of Pearl Technique. So easy and so beautiful!  Check out the blog Create With Faye to see what she created using this technique.


 Happy Mother's Day to all the Moms!! 


Netta

Monday, May 3, 2010

Glitter Window Technique


This technique is called Glitter Windows.  I have never tried this before and found it was one of the easiest techniques I have ever done. Trick is...to make sure you have a very sharp small pair of scissors or new blade for your knife! For my glitter windows...I cut out the snowman and all the tassels on the stamp Mashmallow Mug.


Netta

Saturday, May 1, 2010

Buttons Buttons... Who Has Buttons

I joined in on a challenge "What is Next?". Each day we were given a new item to add to our creation...out of 5 days...our creation had to show 3. Here is mine...


Day 1 use ink...I made clouds using Summer Sky Momento Day 2 use pink purple and blue....Buttons for Momma bird and two baby birds Day 3 use letter M... Mothers day Day 4 to put a hole...was difficult lol...added a hole and slipped a fiber thru it..hard to tell Day 5 material...I was so stumped on this...finally gave it up!!! But had my 3 at least... thank you for looking!!

Netta