Wednesday, May 18, 2016

Get Well Flowers

Can you believe it is mid-May already?  Wow time is flying by!

A couple of weeks ago, my friend's mom fell and broke a bone.  She is pretty much immobile right now...recuperating in a family member's home.  My friend shared how lonely she gets because the rest of the household are busy with work, school, etc.  I thought it would be nice if the Yahoo group I belong to sent her cards to perk up her day a bit.  She has been getting cards every few days from us.

This is the card I made and sent to her.  A bouquet of flowers that won't die over time!


The flowers were made from a Big Shot Die cut from Stampin Up.  I am not sure if they even sell it anymore but you can make it with any flower die cut.  The flower section just slips into the middle of the pot.  I sent a note to pull the flowers up and out of the pot to help her "open" it.  

See you soon!


Wednesday, May 11, 2016

Whole Lotta Bull....Birthday Bull

Today I am sharing a masculine birthday card which opens a bit differently than what I normally make.
The bird stamp inside and the moose outside is from Stampin Up Walk in the Wild set.
The brown paper with circles and stripes is all one piece that was left over from another project and it fit perfectly.
The card is one that you prop up and the opening is the circle area at the top.  I am not a fan of masculine cards.  Like many, I find them difficult to create.  This card came together pretty easy which is unusual for me.  


The moose was colored with Copics E15, E21 and E33.  For the sky I have a piece of heavy plastic that was cut into cloud shapes.  I sponged it with Memento Summer sky. The grass was sponged with Memento New Sprout and Cottage Ivy.  I did faux stitching around the circle on the inside.

Popped this card into the mail today for a brother-in-law's birthday.
Happy Birthday Steven!


Saturday, April 30, 2016

Recycling Christmas

Every once in awhile, I will save old store bought cards that I have received by others .  I just cut them up to make a new card out of the pieces. The card I made came from 2 cards.  The trees pulled off easily enough off one Christmas Card.  The background came off another card.  I just cut it down to fit the size I wanted.   

Here is my recycling Christmas card.


I am submitting this card to Only Christmas Card Challenge Week #16.

Thank you for stopping!  If you try a recycling card, I would love to see it! 


Wednesday, April 27, 2016

The Outlawz Twisted Thursday Challenge

UPDATED 5/1/16
I was chosen for Outlawz Challenge April 21st...Tic Tac Toe Challenge.
Yaaaaaa me!

click on photo to take you to the Outlawz Challenge Site


I have not submitted a card into the challenge for a long time but I have been trying to keep up with them.  This challenge is always an "Anything Goes" Challenge. 


 The reason they call it Twisted Thursday is they always add a twist each Thursday and this twist is Tac Tac Toe.  You had to pick 3 in a row and add them to your creation.  I chose Flowers, Lace and Ribbon/Twine.  I added the purple and blue twine to the center of the flower.  The double-sided paper came from Stampin Up.


The fold on the front of the card is called a Drapery Fold.  I am always up for trying a new fold and I finally gave it a shot.  I see more Drapery Fold cards in my future!!

Well, I am off to go upload to the Outlawz challenge.  If you ever need some ideas or love challenges...head over to see them at http://outlawzchallenges.ning.com/ .

See you soon...

Tuesday, April 26, 2016

Outlawz April Progressive Challenge


Time for another Outlawz Progressive Challenge.  This time the image was given to us by Sheepskidesigns.  The image is so beautiful and I am so thankful Andrea shared this image with us!  I wish that I had a Mom still with me so that I could give her this card but both my Mom and Mother-In-Law passed.  I know that both of them would have enjoyed it!  Thank you Andrea!
This image was colored with Copics #RV21, RV04, R20 and R29.  I colored the green with Touch markers #56 and 53.  The lighter green was covered with stickles Eucalyptus.

It was a fun image to sit quietly and color.  Something I need to do more often to get the practise in.

I am submitting this card creation to the Outlawz Progressive Challenge. 
Thank you for stopping by.


Saturday, April 23, 2016

Black Magic Christmas

The past couple of days, I have been just sitting down coloring images using the Black Magic Technique.  It is a technique I learned years ago.  The first card I will show is a Christmas stamp from Art Impressions.  
It is called Black Magic Technique because you stamp on a dark piece of cardstock and it creates a dramatic look once colored.  Normally they use a solid image for this technique but for this card I decided to try using one that was not solid.  It was difficult to cover the blue and get the white completely white on the penguins and snowman. 


Here is what you need.
  1. Dark colored cardstock like navy or black.
  2. White Craft ink
  3. Just plain colored pencils ( I used Prismacolor Pencils)
  4. White Gel pen that will work well on dark cardstock.  I tried many until I found the one that works the best and leaves a nice crisp white line.
  5. Rubberstamp (solid image is preferred for most)

First thing you do is stamp your image with White Craft ink onto your dark colored cardstock.  You can heat set the craft ink if you have a heat embossing tool but I left mine a few hours to dry.  Craft ink does not dry fast like other inks and if you touch it or rub it, it will smear.
Once dry, color your image with the colored pencils.  Don't be afraid to press hard when coloring.  The richer the color, the greater the contrast.  
After you are done coloring, use the white gel pen to accent the image with dots around it or add lines where you colored.  Just have fun!


I will share more cards in the next day or two of images I colored

Thank you stopping.  Feel free to leave a message below if you have any questions or comments.

I am submitting this card to the Only Christmas Card challenge


Monday, April 18, 2016

Demure Flower

Finally found out the name of this stamp that I used on this post Birthday Wishes.  It is a rubber stamp from Penny Black called Demure Flower.    I have a few more stamped out from when I borrowed the rubber stamp but seriously considering buying this stamp!  


This image was colored with Copics # R20, RV21 and RV04.  I used Tropical Tangerine Stickles to give it a glitter effect.   Thinking of you is from Impression Obsession 

Thank you for stopping by!  


Friday, April 1, 2016

Snowy Ornaments


I came across something I had begun last year but never finished and decided it would perfect for several challenges that I needed in a hurry.  Torn paper for snow, a couple of different shapes and sizes punches, snowy paper and voila`.  A new card was born!  
I used this card sketch from Sweet Sunday Sketches for the format on my card.


I am submitting this card to the following challenges:
Only Christmas Card
F & M Layers Challenge
SBR-Us Sketch Challenge
The Outlawz Twisted Challenge: Layers

Have a fantastic day!


Tuesday, March 29, 2016

Butterfly Border

I recently bought a Memory Box Kensington Border die that is so pretty.  I used it to make two sympathy cards to add to my stash.  One I left simple and the second darker one I used a little bit of purple glitter on the butterflies.  
The sentiment "With sympathy" came from one of my favorite sympathy word sets from Impression Obsession.


Have a great day!!

Monday, March 28, 2016

Birthday Wishes

I know how some crafters are...do not like to lend things out because you never know what condition it will come back in.  Some do not treat them like you would, but if you ever know a crafting buddy where you can exchange, there is a big plus. 

I have a crafting buddy I trust and once in awhile we will swap dies or stamp. She left me borrow this beautiful flower stamp (do not know the company or name) so I got busy and stamped a bunch.  The flower is in a different position on them all.   I decided to sit down last night while watching my Walking Dead TV show and color one with my Touch Markers # 67,#65 and #63.  There is a light blue grey colored all around the flowers which was hard to photograph.  Using #62 and #63 I dropped dots all around and stamped the Happy Birthday with  Versafine Deep Lagoon.  To finish off the card, I placed a few crystals.
Very simple but pretty one layer card.


It's Monday and off to work for me but I hope the rest of you get to sit and relax with some crafting!


Sunday, March 27, 2016

Spring is in the Air

Nothing like a Birthday card with butterflies and flowers to say Spring in the air!


This is another card where I used a piece of the Strathmore Chromolux Mirri Sheets to cut the flowers out and colored with Tim Holtz Adirondack Alcohol Ink.  I used a technique from Crafts on the Run blog to glue the die cut into the negative image cut from the background.  She recommends embossing the background and then cut the image out of it so that is what I did.   A little bit of stickles on the butterfly wings and on celebrate finished off the card.  The word celebrate is from the Sizzix Tim Holtz thinlit set Script Celebration Words. 

I am submitting this card to the following challenges:

Thank you for checking out my creation!


Outlawz Happy Easter Challenge

Happy Easter to all who celebrate!

It is time for another The Outlawz Progressive Challenge and it is an Easter image...perfect for today.  The cute bunny on my card is a digital image from Gerda Steiner Designs.  Thank you Gerda for sharing it with us!  I had a lot of fun coloring this image. 


 The egg behind the bunny was an image I found on the internet from a kids free coloring page.  I just loaded it into Microsoft Word and brought it down to the size I wanted.  After coloring it with copics, I put a little bit of stickles on it to give it a little glitter look.


The bunny was colored with Copics, cut out and glued down onto a piece of white foam.  After it dried I cut it out again and glued it down onto the egg so it would be popped up like the bunny was sitting in front of the egg.  The glasses has crystal glaze to make it look like thick glasses.  I noticed after taking the picture that it was not quite dry in the center.  I think I have it so thick it is going to be an overnighter!  


  I used a Sweet Sunday Card Sketch to help me design the card.


Thank you for stopping by.  I hope you have a wonderful Easter day...maybe do a bit of crafting like I am!

I am entering this card into the following challenges:
SBR-Us Sketch Challenge #6


Saturday, March 26, 2016

Halloween Meets Christmas

I know...you are thinking.....this card does not look anything that resembles Halloween. 

My husband and I love to decorate for Halloween.  This year, while doing some major overhaul on the Halloween items we stored, I came across a couple of 19 1/2 in x 26 in sheets Strathmore Chromolux Mirri Sheets.  We bought them at a Halloween store.  They sold as haunted mirrors and we used them in one of the displays a couple of years ago.  I thought about throwing them out but being like most crafters, I look at stuff with the eyes of a crafter and ask...What can I use this for?  

Well right then a lightbulb went on and I thought of the Jim Holtz Adirondack Alcohol Inks I had. This reminds me of tin foil and also of silver shining cardstock.  I decided to cut them down to size and give them a try.  Dies cut beautifully on it and embosses well.  The alcohol inks work just perfectly.  


For this card, I used  Cottage Cutz Lantern & Poinsettia die to cut it out.  I colored it using the Jim Holtz Alcohol inks and a small paint brushes.  The background was embossed with snowflakes which i think is a Martha Stewart folder.  

I am entering this card into the following:
FB Only Christmas Cards Week 11
Outlaws Twisted Thurs to use Green
F & M Challenge

Thank you for stopping by!

Thursday, March 17, 2016

A Warm Hello

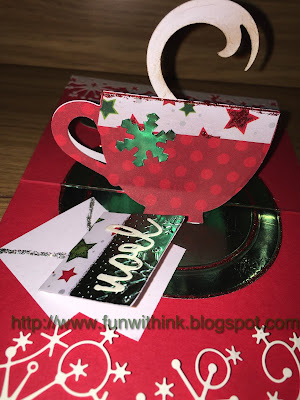
I wanted this card, when opened, to resemble a winter tablecloth with a hot cup of coffee or tea sitting on a saucer.  Doesn't the spoon look like it is ready with sugar to stir into the hot beverage?  I imagined the person is relaxing at the table while opening their Christmas cards they received in the mail.  The card opened on the table is where I will place my greetings to the recipient.  
It's a card within a card!

(Just click on each photo if you would like a larger view)


 I am entering this card into the following:

FB Only Christmas Cards Week 10
F & M Snow or Glitter Card Challenge
SBR-Us Challenge #49

Thank you everyone in advance for the kind words!


Sunday, March 6, 2016

Elf-On-A-Card

A little glitter paper, elf image, left-over green paper, few copic markers, a card sketch and a Spellbinder "Radiant Rectangles" makes a cute Elf Card!!


I am entering this card to the following challenges:
SBR-Us Challenge #92
FB Only Christmas Cards Week 9

I hope this inspires you to start making Christmas Cards...it is never too early in my book!


Friday, March 4, 2016

Reindeer Games Screen Divider

I had to make a shaped card so I went with the Screen Divider fold.  The card folds right up and fits into an A2 card.


 The base starts with an 5 1/2 x 11 card.   Along the long side I scored the card at 2 3/4, 5 1/2 and 8 1/4.  At the scored lines, fold the card with mountain and valley folds.  To create the legs, fold 1/2 the card, center and punch the 2 panels with a decorative punch about 1/2 way up at the bottom.  Then do the same to the remaining 2 panels.  I used a Stampin Up label punch. 


You can use any decorative border punch for the top of the card.  The rest is just panels you decorate and place on the card.


The stamps I used here is an Art Impressions set Reindeer Games.  The stars are from Heidi Swapp and Jingle all the Way came from Marianne design Collectable.  The images were colored with Stickles glitter glue and Copic Markers.

I am entering this card into the following challenges: 
 Danni's Dreams Challenge
F & M Shaped Card Challenge
Only Christmas Cards Challenge

Have a super day!