Saturday, February 23, 2019

52 CCT February Recycling Challenge

Stash= cache, hoard, stock, stockpile, store, supply, accumulation, collection, pool, reserve  
We all know this term very well!
Who does not have a stash of something in our craft room?  Ribbon?  Cardstock? Buttons? Brads?

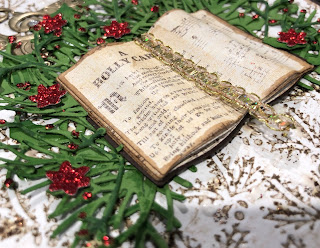
The challenge this week at 52cct.com is to use up some stash.  Where do I begin?  I have so much!  I finally pulled out my Christmas container that is filled with items I have collected for over 20 years ago to get some inspiration.

I narrowed on few that I have had for years.  They came from a kit of Christmas items.  I broke the kit up over time and have used pieces of it here and there over time.

I used white cardstock and an embossing folder from Embossalicious.  I swiped Distress Ink Walnut Stain over the folder and embossed the cardstock for the background.  Wiped the edge with E-Z Walnut Ink and glued it down onto a dark brown cardstock. The star and noel word had holes for brads to hold them onto the paper.  Instead of using brads, I used Starform Stickers over the holes and glued them down with Ranger Glossy Accents. It works well with metal.  The evergreens & red flowers came from a mix of dies from several companies. 

I created the book to look like it had several pages with the scrap ribbon I found in my stash as a bookmark.  I was lucky to find a piece of cardstock that had many bits and pieces of songs and poems from Christmas.  It worked well for my book.

Here is the finished project for the Stash challenge.

The challenge was a great way to use up old scraps and get another card done!  
Come on join and us.  Love to see what you would do.


Saturday, February 16, 2019

52 CCT February Theme Challenge

I was inspired to make this card from a painting of trees and behind the trees were many colors in the sky. 
 Perfect for the 52CCT challenge, which is Winter trees.


I used Distress Oxide ink and Memory Box "Garden Birch Trees" stencil to get the background of trees.  To get the snowy hills, I just hand-cut paper and used white embossing paste with palette knife to pat it all over the areas to get mounds of snow.  On top of the paste I used a little bit of glitter glue to get the sparkle.  

Did you notice that many of the dies with stitches, cut the design out but they leave the stitch design behind? It does not make sense!  Example...I have the My Favorite Things Die-Namics.  I used it to cut out the words for my card.  I was thinking I was going to have a nice stitching design the saying. You can imagine my disappointment after cutting them out, all the stitching was left behind.  I glued my saying down and cut out another on dark blue cardstock.  I glued the stitching down around my saying after I fussy cut it out.  I have a few dies that are like that.  Just seems backwards to me!

I hope you are following along and joining in each week.  It's a great way to get those Christmas cards done a little at a time!
Please share if you do.  I would love to see what you make


Thank you for peaking in today!  Have a great crafting day..


Thursday, February 14, 2019

Just a Mandala Note

Happy Valentines Day everyone!
No Valentine card today.  Just a plain card to share.


Just a quick post today.  I cut this MFT Die called "Captivating Mandala" out 3 times.  Two were from scraps and the third piece was cut from a piece I was experimenting with distress oxide ink.

  Remember I told you to keep all your experiments or cards you weren't happy with in a junk box?  Some of them or pieces of them become works of art later on.

 I glued the first two die cuts together and glued them down to a scrap piece that was slightly bigger than the die cut.
I carefully and painstakingly dropped glitter glue.....stop!  who am I kidding?  Heck what I really did was slopped glitter glue colors inside all the holes.  I knew it would be a mess when I got done (I know me so well!  lol) so after it dried, I glued the final piece on top.  

This card went into my pile without a theme.  It's a Just-in-case card.

Have a great day!


Tuesday, February 12, 2019

Happy Birthday Valentine


I have a very good friend who loves to make cards as much as I do.  We love sharing new techniques and are terrible at enabling each other when something new comes along!  I just love her and enjoy her.


Her birthday happens to be on Valentines day but we celebrated it today.  I had to make sure she opened it before I shared it in case she saw the blog post.  I tried hard to not make a typical Valentines Day card for her but I still ended up sneaking some sign of Valentines hearts into it!


I used such a mix on this card, making it up as I went along.  It was a tall but skinny card and fit into a 7 x 5 envelope.  It folded and fit in the envelope ok but I doubt it would be one I would mail in a regular envelope!  Too bulky.


Inside was a basket of flowers that opened up.  Perfect flower basket...they do not wilt and die. 
The white triangle area to the right of the card was the area I signed the card.

Wishing you a wonderful day on your real birthday Pam!
Happy Birthday!


Saturday, February 9, 2019

52 CCT February Color Challenge

The color challenge this time is Green and Silver.  I struggled with this one a bit.  I knew green could be used for trees but what would the silver be?
Finally came up with this creation.


The tree is a stamp set I have had for a number of years from Close to my Heart "Greeting Tree".   I stamped the tree on white cardstock with Memento Bamboo Leave color and fussy cut it out...including the the areas that was left white.  I wanted the black to show through instead of the white. 
 I glued it down and stamped the swirl with versarmark over it so I could heat emboss it with silver.  The Joy came from Inkadinkado "Calligraphy Experessions" stamp set, which I also did with versamark and heat embossed in silver.
These two stamp sets are so old, I have no idea if you can even buy them anymore.  
I finished off the card with tiny silver marker dots all over the card.

I punched out an edge of silver trees to go across the inside of the card.  The punch was an EK punch called "Alpine Trail Edger".

I hope you join us all over at 52CCT with the latest challenge.


  Plenty of creations to look at and get you going.
Thank you for stopping by!


Monday, February 4, 2019

Lemur's Love


Popping in to leave a quick post on a valentine card I made today.  The image I used is such an adorable Lemur image from Mo's Digital Pencil!  Was easy to color up with my copics.
For the eyes:  Y #11, #15 and #17
For the body:  C  #00, #3, #5 and #7
Paper came from Stampin Up paper pack "Sending Love".
Edge of the paper was cut with Die'sire "Decorative Edges" metal die set.  I also used that same die to cut out a skinny edge from scrap glitter cardstock.

2 Valentines card down and 2 more to go!  I can do this!


Sunday, February 3, 2019

Sweet Valentines Day


This image is so adorable!  I joined a group called Simply B Stamps on Facebook.  We got "Peppermint Betty" image free for the first 2019 Progressive Challenge.
This challenge included absolutely no red in any shape or form, must use two scrapbook papers, one embellishment and the image on a full project.
My two different papers were used on the background.  I cut a shape out of the purple diagonal paper and glued that down onto the pink polkadots.  I made my own stitch marks with a black pen.  I used a heart punch and punched out 4 hearts.  I colored them with Spectrum Noir Sparkle Pink Garnet and Inspired Violet.  Glued them down onto the pink polkadot paper.
Am I the only one who ends up with color all over their fingers after using the Spectrum Noir Sparkle glitter pens?  They do not come off your hands very well!
Next up was Peppermint Betty. I let my background paper be the judge of what colors my image will be.  I have never colored any hair other than brown or blonde so coloring pink was way out of my comfort zone.  After it was done, I kinda liked the different look!   It was difficult to get a good camera image as the hair looks like it has red but it is a mix of pinks and purples. The Copic colors I used in the entire image was...
RV #10 13 34 66
V 25 28
R 83
BV 00 23
E 00 11 13
C 00
After I was done coloring I used the following Spectrum Noir Sparkle colors on the hair, dress, cake and canes to get sparkles...
Cosmos
 Macaroon
 Pink Garnet
 Inspired Violet
I fussy cut Peppermint Betty out and popped her up on top of the background.  I printed the words onto scrap polkadot pink paper and made a tag out of it and added it to the upper left.  I used the black pen to make stitch marks on it.
Last to be added was the required embellishment... 3 pink rhinestones in the corner.


This was a fun card to make.  Now that it is done, I am off to go add it to the challenge.  
Happy crafting day!

Saturday, February 2, 2019

52 CCT February Sketch Challenge


Hello Everyone!  It's time for another challenge over at 52 CCT!
Today it is the February sketch challenge.  Here is the sketch. 

I flipped it upside down on my card sample. I actually made this card 3 times this week.  All the parts of the other two was thrown into my scrap pile to be picked up and used on another card.  
I used one of my Ombre ink pads from Recollections but it is hard to see in the photo.  I tried to see what color it was but all the pads do not have a name!  Guess the colored pics on the top is how you know what color is inside!

The snowflake edging along the top is a Memory Box die called "Frostyville Border" .  I have always loved this die.  It cuts very well even through the blue glitter cardstock I used on this card.  The yarn I used reminds me of snow!

Thanks for stopping by and taking a peak. 

Manetta