Showing posts with label cuttlebug. Show all posts

Wednesday, November 6, 2013

2 Poinsettias: Metal Gold and Backing

Backing Poinsettia?  
Your saying what does that mean?
Read on....
When I cleaned my craft room and discovered new old toys to play with...one of those was sheets of self stick metal sheets in the most beautiful bright reds, greens, golds and blue.  
I used one of the golds and ran it through the Cuttlebug with the SU embossing folder "Petals-a-Plenty".  I cut it in 1/2.

Stuck 1/2 down on red cardstock that was folded into an A2  card.  Cut scrap striped paper and placed it onto the other 1/2.

My poinsettia is Spellbinders Shapeabilities Layered Poinsettia Die.  Because it is self stick, it was easy to layer each piece down.  In the middle I found a gold self stick bling that was left over from a project 2 years ago.  The best thing was pressing right down in the middle on the bling made the leaves pop up and look more 3D.

Winter Blossoms came from an old set of Close to my Heart Stamp set "Winter Blossoms".  I found where someone was selling it on Etsy but I don't think it is a set sold anymore.  


Now comes the explanation of the Backing Poinsettias.
As I was cleaning up...I discovered when I pealed the backing off the metal sheets...I naturally had another Poinsettia already created!!!  One side was very waxy, shiny and pretty.  The other side was like paper.  All I needed to do was to glue it down but making sure I had the waxy side up!  

When creating....even waste can be made into something beautiful!!  I wished that I had thought of using the backing off the gold pieces.  By then they had been thrown away and was not useable.  


I was concerned about making enough cards for this year but I think I am actually going to make it1

Hugs
Netta

Thursday, June 13, 2013

Birthday Blue


You ever have something you just had to have ...just knew you would love it....and then not use it?  Just can't?  Nothing comes to mind on how to use it?  
Well...that is me with the birthday folder i bought.  

Finally I used it and I like it!  


*S*
thanks for stopping by!
Netta

Monday, January 30, 2012

Jan 13th Stamping Up Class

Two weeks ago, Jan 13th,  I went to a local Stamping Up Class held by Lisa (Gulf Coast Stampers and Scrappers).  I had not been in a loooong time.  It was good to see old crafting friends again!

Here are the cards we made that night!


I waited to stamp this flower card until I got home.  I wanted it to be a card I could use for a thank you type card.

thanks for stopping by!
Manetta


Sunday, January 29, 2012

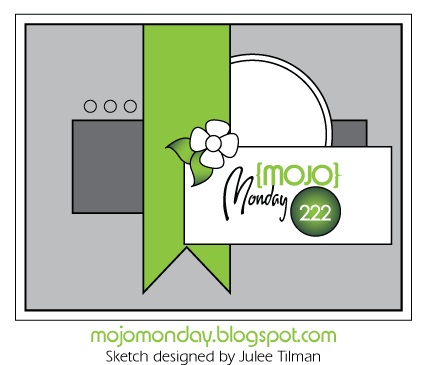
#187 Flutter By Wed-Embossing & #222 Mojo Mon

I am trying to build up my supply of cards in my stash.  Last year I had 4 shoulder surgeries and my husband & I hit my stash hard.  It actually has been fun to begin creating again!  
To get my stash full again, I have decided to try many of the challenges out there.  They certainly help get the creative juices flowing again!


My first challenge was to combine Danni's Flutter By Wednesday challenge and Mojo Monday.  

Every Wednesday Danni creates a challenge and the challenge always includes a Angel, Fairy or Butterfly.  This week we must use any type of embossing as long as one of the three images are on the card.
I used my Cuttlebug and dry embossed an image on the circle portion of the card.  My Fairy sits to the right of my Hello.

Mojo Monday always gives a sketch to follow.  Here is the sketch I used that Mojo Monday Blog put out for January 2nd.  You can use it upside down, rightside up or sideways.  I decided to use it exactly as the image is.


This card will go into my "Everything" Box.  
Happy Crafting!!

Manetta

Monday, May 4, 2009

Image Rak

Here is a quick card I made from an image that was RAK'd to me. I think it came out fun and cute. The background paper is all one piece. The circle area was embossed with my Cuttlebug and one of the Cuttlebug Frills embossing borders. I used diamond stickler around the border of the Margarita glass. Image was colored with markers similar to Copic.

Sunday, April 19, 2009

Blue Wedding

Today was a day for just relaxing in my craft room. I wanted to do something different with this wedding dress stamp and since I love blue...that is the color I ran with! First I stamped the dress with black and colored the roses and part of the dress with cerulean blue. The bodice area and hem was colored with a small paint brush and ultra marine shimmerz. The leaves are hard to see but I colored them with apple green. Every line is outlined with light periwinkle blue. I cut the dress out and used my cuttlebug to emboss it. I used plain kids navy glitter glue with a small brush to paint the blue flowers since I do not have any navy stickles (that will definitely go on my shopping list). While that dried, I used my Nestability and Cuttlebug to cut out and emboss the background at the same time (my new favorite technique!!) for the dress. I wanted a wild kind of background so I chose paper called Vintered Vagabond from Zsiage.com. Behind that I used my Cuttlebug and Dotted A2 folder. After the dress dried, I used pop ups to lift the dress up off the background. Supplies *Markers: apple green, cerulean blue and light periwinkle *Zsiage Vintered Vagabond paper *Cuttlebug *Shimmerz Ultra Marine *Nestability Classic Oval *Cuttlebug A2 Textile Texture and Swiss Dot Folders *Dress stamp from IO Life of Happiness Set *Pearl Blings from Michael's

Saturday, March 28, 2009

Birthday for The Boss

When there is a birthday at work, we start our work day by celebrating the birthday with cards and snacks. I have been making my own cards for about 2 years now. This is a card I made my boss last month. It took me 3 hours to make this card because I just could not get it to look right! I used my Cuttlebug and Nestability to cut out the window and to make the window edging. I stamped the cattail weeds, cut them out and glued them down. For the cattail ends I used a slot punch and glued them down on the weeds. Dragonfly was stamped and embossed on vellum. I have popdots under the wings to keep them up off the card. I used sponge to color the sunset, stampd the weeds and used the slot punch again to make the cattails. Supplies *Martha Stewart Border Punch * Cuttlebug *Nestability *DragonFly stamps unknown *Hot Off The Press Word & Scroll stamp *Cardstock: Unknown Following From Stampin Up *Slot Punch *Inspired By Nature Stamp *Classic Ink: Pumpkin Pie, Really Rust, Yoyo Yellow

Sunday, March 8, 2009

Christmas Stampin' All Year Long Challenge #6

Every Monday, Christmas Stampin' All Year Long puts out a new sketch challenge. This time we had to use three or more eyelets and no other embellishments except for a tag. I used holly leaf eyelets on my tag. The Fairy was colored with markers except the wings. I colored them only with Shimmerz. The mask I made for the fairy was not an easy task but I was able to protect her so I could stamp the background with ink and a sponge. I used clear embossing to stamp on the green cardstock across the middle and then I dusted it with perfect pearls. I didn't have an evergreen bough so I had to use a regular tree. Oh Well....it worked!! This card with the green ribbon was my first attempt. I turned it into a card anyway even tho I messed up! Supplies: *SU InkWild Wasabi, Garden, Green, Whisper white, Real Red *SU Lovely As a Tree *Inkadinkado Snowflakes *Hot Off The Press Christmas Art Word Stamp *Susana's Custom Art & Card Design Fairy Stamp "Sabrina"

Thursday, March 5, 2009

Flutter By Wednesday

There is a challenge every Wednesday involving butterflys at Danni's Dream. I decided to get a jump on the challenge for next Wednesday and created this card last night. I don't normally do much to the inside but I see Danni create the outside and inside so I gave it a shot. Supplies: *SU Ink *SU Markers *Martha Stewart Butterfly Stamp *SU Best Blossoms Stamps *Off The Press Whimsical Words & Doodles Stamps *Detailed Clear Embossing Powder *CB Paisleys *Paper Unknown

Monday, February 23, 2009

Twinkling H2O Halo

I see so many cards with images that have a hint of blue or yellow around them. No matter what I try, nothing seems to work easy for me. I decided to try my Twinkling H2O and chose the color Blue Ice. I spritzed a lot of water to mute the color a little more then usual and left it alone for 30 seconds. Once it softened up a bit, I used a dry brush and painted along the image. It gave the image a bit of shiny halo around it. I used my cuttlebug to emboss with A2 paisley folder. The ribbon gave it an interesting twist in the ripped corner. In case some of you do not know what a Twinkling H2O is....I describe it as a paste version of Shimmerz. To get the shimmery results, it requires an extra step and that is to soften it up, but I like the results. You can spritz water into it and paint with it directly onto your image or you can paint right on your rubber stamp and stamp your image. SUPPLIES: #Colored with Prismacolor Colored Pencils *Cuttlebug A2 Folder Perfectly Paisley *Cardstock *Magnolia image "Tilda with Hearts" *Twinkling H2Os Blue Ice *Ribbon (unknown) *Stamping Up Punch