Thursday, February 23, 2012

Sympathy and Daisy

My husband is after me again to make more sympathy cards so I made him a couple the other night.  I used my  Touch Twin markers to color the flowers and used a white pencil to highlight.  Same technique but each card a little different.


thank you for stopping by and looking!
Manetta

Tuesday, February 21, 2012

My New Toy-Sew Stamper

I ordered a new tool and got it in the other day.  It is from We R Memory Keepers and it is to create faux stitches on your creations.  It came with several attachments to change the type of stitch.  I only tried the straight stitch so far.  It is black self-inking stamper and is suppose to get over 1,000 impressions with it. I practiced on scrap paper first.  I was pleased to see I did not have any issues keeping it straight nor did it skip.  The black ink went on very smooth and even.  I am already thinking they need to come out with white ink for darker cardstock!

Along the top and along the bottom of the main image, you can see where I used the tool.  In the sentiment area, I hand drew them on.  You can definitely see a difference!


thank you for stopping by!

Manetta

Wednesday, February 15, 2012

Happy "Late" Valentines!

This will be a quick post.  I have been so busy with tax season for the past two weeks I have not even been in my craft room hardly!  I did manage to make a couple of cards to mail to my grandchildren.  Wanted to post them yesterday but I came down sick =(...so here they are!!  The images came from coloring book digital images online.  


Ok...back to sorting paperwork!! ugh..

Manetta

Sunday, February 5, 2012

Happy Birthday Chelsea


My granddaughters birthday today!!

Happy Birthday Sweetheart!!

love you

Grammy K

Friday, February 3, 2012


Stamping on Sunset Photos!

Easy...Pretty...Quick

I love it!  

To review how to stamp on photos...please go to this post Photo Stamping

*S*
Manetta

Tuesday, January 31, 2012

Valentine Jasmine


Valentine Jasmine...perfect Valentine card for my granddaughter who LOVES the Disney princesses.  
I got this image from a coloring page online.  I used my new Touch Markers to color the image.

The inside of the card has lots of sparkles!


Manetta

Monday, January 30, 2012

Jan 13th Stamping Up Class

Two weeks ago, Jan 13th,  I went to a local Stamping Up Class held by Lisa (Gulf Coast Stampers and Scrappers).  I had not been in a loooong time.  It was good to see old crafting friends again!

Here are the cards we made that night!


I waited to stamp this flower card until I got home.  I wanted it to be a card I could use for a thank you type card.

thanks for stopping by!
Manetta


Sunday, January 29, 2012

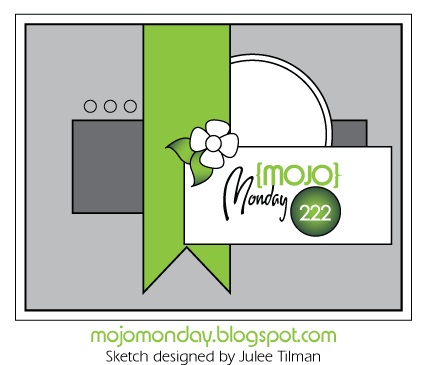
#187 Flutter By Wed-Embossing & #222 Mojo Mon

I am trying to build up my supply of cards in my stash.  Last year I had 4 shoulder surgeries and my husband & I hit my stash hard.  It actually has been fun to begin creating again!  
To get my stash full again, I have decided to try many of the challenges out there.  They certainly help get the creative juices flowing again!


My first challenge was to combine Danni's Flutter By Wednesday challenge and Mojo Monday.  

Every Wednesday Danni creates a challenge and the challenge always includes a Angel, Fairy or Butterfly.  This week we must use any type of embossing as long as one of the three images are on the card.
I used my Cuttlebug and dry embossed an image on the circle portion of the card.  My Fairy sits to the right of my Hello.

Mojo Monday always gives a sketch to follow.  Here is the sketch I used that Mojo Monday Blog put out for January 2nd.  You can use it upside down, rightside up or sideways.  I decided to use it exactly as the image is.


This card will go into my "Everything" Box.  
Happy Crafting!!

Manetta

Thursday, January 26, 2012

Hello Friend


A little Liquid Leaf Gold painted on cardstock, Black Opal embossing powder, nestabilities and cardstock and you have a Hello Card for a Friend to let them know you are thinking of them!!

*smiling*
Manetta

Monday, January 23, 2012

Sunset Postcards


I was able to create 7 of this A2 size postcards in one evening. They were to be attached to the top of 7 baskets of cookies to hand out for a business. 
I used a piece of scrap cardstock to protect the sky area while I sponged on the water section. I flipped the scrap cardstock over to protect the water section and sponged on the sky.  After I just stamped the Impression Obsession boat scene on top with black ink.

I may make more and use them on top of a regular card!

Manetta

Tuesday, January 17, 2012

From Christmas to Everyday


I wanted to show you how one simple change can totally change the look of a rubber stamp. The image is actually a Poinsettia. To change the look of the flower…all I did was color the image purple with highlight of pink, added some purple glittered and added colorful leaves. I now have an image I can use at Christmas time and any other time I need a big flower!
January 21st is “Send a Hug Day”. I may just have someone in mind who would love to get a hug card from me!!


Thanks for visiting me!  Have a wonderful crafty day

Manetta

Sunday, January 15, 2012

Butterfly Card and Bookmark in One


I wanted to make a card for a co-worker and include a bookmark as she reads a lot. I combined the card and bookmark together. It is a tri-fold card and after it is folded, it fits into an A2 envelope.


The cardstock was cut at 10 x 5 1/4
I scored at 4 1/4 and again at 8 1/2. You can use a tool to perforate at the 8 1/2 score line or you can bend the cardstock back and forth several times. This will break the paper threads and allow the recipient to remove the bookmark very easy.
The rest was decorating the card the way you choose. I made sure the ribbon on the front was placed exactly where the ribbon on the bookmark would be placed so they lined up evenly. For the bookmark, I used only one word from the sentiment on the front…Smile. I made sure my sentiment stamp was cleaned so it would stamp just the word smile. To color it black, I used my black marker to color in only the word Smile.


Thank you for visiting today!

Manetta

Monday, January 9, 2012

Secret Pal


The Holidays are over. All the decorations are finally taken down, packed and put away until December 2012. My craft room is finally back in order. It tends to get cluttered during the Holidays because the closets are where we store all the Christmas decorations. The house seems so empty and hollow. It was nice to have a little break and I had to push myself to sit down to craft again but once I got going…it felt good!
There are some occasions for making cards other than the typical Birthday, Christmas, Anniversary, etc. There is one coming up on January 8th called Secret Pal Day. The card I made for my secret pal will be slipped into her desk on that day for her to find. She LOVES butterflies so I hope she enjoys it!
To get the butterflies 3D, I stamped the background Cover-a-Card stamp twice and cut out the butterflies I wanted to stand out more.


Thank you for looking and have a wonderful crafty day!
Manetta

Tuesday, December 27, 2011

On To Thank You Cards


Most of the holidays are over and now it is time to send the thank you cards. I made a card special for my Dog Sitter Michelle. All year she is available last minute to watch my dogs for me if I need to be away for any length of time. I don’t know what I would do without her!
Since her life is always involved around animals (she works for a veterinarian), my cards to her always involves a dog or cat. This is the thank you card I made for her. I will slip some money into it and drop it off tomorrow. I love stamping the images with VersaFine ink. It covers very well and dries so fast. I have used mine constantly for the past year and it is still as good as new!


I hope everyone had a wonderful holiday! I know I did. I almost hate the idea of putting away all the beautiful Christmas lights next weekend. I enjoyed the tree and decorations so much.


Happy Crafting!

Manetta

Thursday, December 22, 2011

Easy Magnetic Bookmark


Need a quick last minute gift for a teacher? Here is an easy craft for a child and a great way to use up an 2011 magnetic calendar.
Teachers are surrounded by books so a perfect gift is a bookmark! This craft project took 5 minutes! I had extra 2011 magnetic calendars I will not be using so I cut one down to the size I wanted. Folded white cardstock, glued two pieces of the magnetic calendar on the inside, stamped with Momento Black Ink, put a little bit of black glitter on the flowers, a ribbon on top and I was done! That simple.
When you glue the magnetic pieces to the inside of the cardstock…make sure you have positive and negative facing each other. If you put negative and negative or positive to positive, it will not work. The bookmark slips over the top of the page and the two magnets connect, holding the bookmark in place.


My children have grown up but crafts like this are fun to do with the grandchildren!
Happy Crafting!
Manetta

Sunday, December 11, 2011

Christmas Tags


Cards are done, now on to the “extra” stuff like gift bag toppers, boxes, bags and toppers. Here are a couple of tags I made this week. I found six old manilla tags that I bought at Walmart’s two years ago. They were 5 inches long so I trimmed them down to about 3 1/2 inches. I stamped some white snowflakes, Merry Christmas in gold and used sponge to sponge on color. I got 2 done and 4 more just need the gold Merry Christmas stamped on them. Almost time to wrap my gifts and add these tags on top with a bow!
That’s two tags down and 4 more to go!
Now I heading back to finish my other 4 tags….*S*

Manetta

Wednesday, December 7, 2011

Tealights Christmas Gift


Ever wish you had that one little gift to give to someone to say thank you? You can make several of these in one night and have them ready to hand out!
This cute little box I made holds 4 tealight candles that I decorated with a tissue stamped image. I am thinking about making one for everyone I work with…just a little something to give them at Christmas. They are quick to make, the box only requires one sheet of 8 1/2 x 11 cardstock and one piece of white scrap paper.


I should have posted this sooner tonight but I was looking all over for my camera. I misplaced it and after searching, I gave up. Sat down at my computer and there it was…sitting on my keyboard. My husband has since gone to bed…but I will be sure to ask him how that camera just happened to show up on my keyboard! lol

Happy Crafting!
Manetta


Thursday, November 10, 2011

Cabin in the Woods

Wow.. with four shoulder surgeries this year and therapy..I hadn't realized so much time has gone by since I last posted here! 
But I am on the road to recovery and just started crafting again a couple of days ago.  Ahhhh to feel the scissors and rubber stamps in my hands again....

My favorite Christmas stamps are two that have a cabin on them.  I used one to make a card last night and I wish I could remember where I bought the stamp.

All I did was highlight the snow with blue marker and color the cabin brown.  The cardstock came from the DCWV "The Winter Wonder Stack".  After it was all matted and glued down, I used Stickles to highlight lightly over the snow and on one big snowflake on the background cardstock.


Yup...feels good to be back!
Manetta


Sunday, July 24, 2011

Crayon Resist-Sprinkle of Color

Crunch time is on! I am down to 8 weekends left before my next surgery so that means I have to step it up and get my Christmas Cards done! Yesterday I got 12 images ready to put on a card. This Poinsettia card is one I took my time with. I used the Crayon Resist technique. I tried this technique a few years ago but never used it again. I love how it came out.


Crayon Resist Technique is relatively simple to master and you can get beautiful finished images to use on your creations.  The only issue you might have is using a white crayon on white paper.  It is difficult to see where you have colored so I used a very strong light right over my work area and it made it easy to see.  Here are the step by step directions.

1.  I stamped my Poinsettia image all over white cardstock with stazon black ink.  Stazon is best as it is a permanent ink and will not smudge when you sponge the colored ink.  Many feel it is best to use a glossy cardstock but I used Georgia-Pacific white cardstock I bought from Walmart and it worked great for me.

2.  I used a white crayon and colored on my image where I wanted to highlight.  Because the crayon is waxy, no ink will stay where you color with the white crayon.

3.  I sponged and rubbed in color on the Poinsettia with the following colors of versafine ink  smokey gray, majestic blue and deep lagoon.


4.  Mounted my image on teal paper and attached to an A2 card.  My image was slightly larger than what I needed so I trimmed it and used the extra on the inside of the card. 


I love the colors!  Why don't you give it a try!
*smile* 


Netta

Friday, July 15, 2011

We Are All Here!


This card was a slow process.  I had to stamp, color and cut out each character.  Each character is attached to a separate acetate on one end and the other end is attached to the card.   I added snow two different ways on the card.  Next time you go to any store like Walmart, Target, Michael’s etc…buy the Tulip Puffy Dimensional Fabric Paint in White/Blanc.  You can just squirt it where ever you want.  I used it under the Mistletoe Mouse by just squirting it on the card.  It dries pretty quick if you do not put it on too thick.  There is another way you can use it for snow.
On this card, I used it on the gingerbread house and on the stocking, but if you look at the two, you will notice a difference in the texture.


On the stocking I squirted it on and let it dry.  On the gingerbread house, I squirted it on but I also heated it up with my heat gun.  It gives you the puffy snow look!
Here are some more views of the card.


I used almost the entire Christmas House Mouse Clear Stamp Set on this card.  It was time consuming but fun especially as the characters all bounce around as you open the card!
Now to figure out who will get this creation at Christmas time.  I think someone in my house has already claimed where it shall go…*S*
How many cards have you made so far?


Tuesday, July 12, 2011

Party with the Bears

I made a birthday card for my granddaughter who turned One year old. I used googly eyes and gave each bear a fuzzy nose!

Happy Birthday Gracie!


Monday, July 4, 2011

Christmas in July Has Begun

Christmas in July cardmaking has begun! I am going to try..by the end of July...to do one for each day in July. That will be a big help towards my 100+ cards I need to make.

Here are some I have done already! Hope they inspire you to get going on your cards as well.

Netta 
*updated*
Nominated 7/10/11


Monday, June 27, 2011

Bow So Easy


How many times have you tried to tie a bow using the rabbit ears method? Do you know what I am talking about? Grabbing two loops and tying them in a knot. I don’t know about you, but my bows never come out right. They never lay flat and they are always lopsided!
Using the simple plastic tool called the Bow-Easy helps you make a bow with less stress. The bows range from 2 3/4 inches all the way down to a teeny size 3/4 inch and guess what? They are perfect every time and the options are endless..single loops, double loops, triple loops and more!
Here is a card with a bow made using the Bow-Easy tool. It makes one little detail such a huge difference on the card! Bow making has never been easier!

Manetta


Wednesday, June 15, 2011

Soooo Quiet....

I had a total left shoulder replacement so my crafting has been on hold for now. Until I get back into crafting....here are some more Relay For Life Cards I created.
Enjoy...


Netta

Wednesday, May 18, 2011

Back Aches & Pregnant

8 of us at work chipped in and bought a co-worker baby gifts (she is having twins). Of course, I offered to make a card! She is having a lot of back aches lately. This digital image and words are perfect for her. I created this card like a very large matchbook card. Inside is a large chocolate bar. The size of the card is 8" x 6. The teal pages inside was added to give place for the 8 to sign. I covered the entire Pregant lady with liquid glass.
Thanks for stopping by!
Netta