Sunday, October 28, 2018

52 CCT October Challenge-Masking Take 2

52 Christmas Card Throwndown new challenge is about masking.  I already did one card.  To read about it and what is masking... click here 52 CCT October Challenge-Masking technique.  I did have this card posted on that same page but I was not able to upload it to the challenge so I opened up another page for this card.

  On this card, I masked the penguins to protect them when I stamped the big tree.  I also masked the snowman's butt area to stamp my little tree.   This card has one more fun technique called paper piecing on it. I stamped the jacket, hats and scarfs on other paper. Cut them out and glued them in place.  

Going to go add this one to the challenge as well.  Happy Crafting!!


Netta

52 CCT October Challenge-Masking Technique

Update!  
My card was chosen as the winner for this October Masking Technique!  


I was taught when I oil painted, you always start with images far away like mountains and work your way in close.   One thing I discovered in card making it is opposite.  You start with images closest to you and work your way backwards so the mountains would be last.  
This week at 52 Christmas Card throwdown.... it is all about masking.  


 In my Santa card, if I did not use the masking technique, my big tree would have been stamped over the reindeer.  The Christmas Tree would have been stamped over the Santa.  The Santa would have....oh well........you get the idea!

  So masking is important to get the images behind each other instead of over.
  Definition of masking is basic stamping technique of covering a stamped image so that other images may be placed over it.  Masking may seem difficult but it is really quite easy. 
 Just stamp the image you need to protect on a piece of thin scrap paper.  I used a post it note so it is stuck down and won't move on me.  Just make sure to stamp part of the image on the sticky area of the post it note.  This next part will seem a bit weird and out of the norm.  

Cut the post it note image out but not on the line...Cut the image out just inside the lines.  If you cut on the line and stamp over it, it will leave a slight white edge around the image.  If you cut just inside the line the white edge will be hidden in the stamped image you are protecting.  Hope that makes sense!

Oh......a little tidbit..........keep your mask with your rubber stamps!  Next time you need a mask for that image, you are all set.  It's all done for you.

Here is what it looks like using the mask.   I am protecting the deer image I have stamped underneath..... (using my Wizard of Oz voice "pay no attention to the human shadow in the photo") 

Here is another mask protecting the Santa .  I want the tree to look like it is behind the Santa.  You notice on this mask I did not cut the whole Santa out as I only needed to protect one small area.

When you remove the mask, you can see how the tree now looks like it is behind the Santa.  

Another great reason to use the masking technique.....when you need to protect your images when you are air brushing backgrounds or sponging backgrounds as well. 
 Love to see what you do!

I am off to go add this to the challenge .....
http://52cct.blogspot.com/2018/10/october-technique-challenge-dt-call.html

Happy crafting!
Netta

Friday, October 26, 2018

Crazy Reindeer


This digital image was free from Bugaboo Stamps back in 2017 I believe.  Never used it before so I printed it and colored it up with my copics.  I fussy cut it out so I could glue it down on the background I had airbrushed earlier today.  The background of snow was just hand drawn with copics.  The snow was done by using my favorite....white gel pen.  I love this crazy reindeer all done up.  He is so cute!


Happy crafting
Netta

Tuesday, October 23, 2018

Another Christmas Pet for 52CCT

Update!  
I got Honorable Mention for October Pet Theme!  


Another pet card for 52 Christmas Card Throwdown!  
With a sponge  and Nuvo Mousse Powder Blue..I covered the entire background. Next I used the mousse color Coastal Surf to get a darker color along the top edge. The mousse glides on so smoothly and has such a pretty sheen to it.  I stamped snow swirls all along the top and sprinkled glitter on it.
The cute stamp is from Whipper Snapper called "Hello Friend".

I die cut the Merry Christmas words twice....once on white cardstock and once right through the scene.  After I got the card put together, I glued the white words down into where I cut out and then put the blue words right on top so they are raised slightly yet still part of the scene.  
If you try this Camouflage technique, make sure you save all the little tiny pieces you would normally throw out.  You need to put them back as well.


One more added!

Netta


Monday, October 22, 2018

52 CCT Challenge-October Theme

Update!  
My card was chosen as the winner for this October Pet Theme!


This weeks challenge at 52cct.blogspot.com is about theme's and the theme is Pets.  I had to dig hard to find something that was considered a pet and not a wild animal like a polar bear, deer or moose.  I finally remembered I had bought a set of stamps last year from Art Impressions called "Santa Paws Set".  As a matter of fact...I liked this set so much I bought it twice!  LOL  Gave the other set to another friend.  

I used the group stamp in this set and the words "Happy Howl-idays!".  I also used two stamps from a Stampin Up set called "Winter Woods".  I used the mask technique so the trees look like they are behind the group of dogs. 

I got to play with my Derwent Inktense 36 pencils for this card.  It's been a long time since I pulled them out and I think I will do more with them.  After the card was put together, I used Nuvo Crystal Drops "Simple White" for the fur on the hats and for snow.  The snow on the ground and tree were sprinkled with a dusting of sparkle while wet & then extra knocked off.  I only wanted a hint of sparkle.  Snow falling was just a white pen.

Well I am off to go add this to Christmas Card Throwdown for pets. 
Hope to see you there too!

Netta


Sunday, October 21, 2018

Peaceful Ocean Turtles


A woman saw a Christmas card I made my boss last year and asked if I could make her husband a birthday card for her. 

I had not used these dies nor had I inked up the turtle before.  After I was done, I was reminded of the time I once saw a turtle while on vacation.  I was snorkeling by myself in the ocean by Turks and Caicos.  I was giddy with happiness as I spotted a turtle peacefully swimming along without a care in the world!  I followed him at a safe distance away so I would scare him.  It was a pure joy to watch.  

This card was fun to make..especially since it reminded me of that day snorkeling with the big sea turtle.

Happy Crafting!
Netta

Tuesday, October 16, 2018

52 CCT Challenge-October Color-Take 2

I decided to give the silver challenge another go (see prior post


This time I used Distress Oxides colors Seedless Preserves, Lucky Clover, Twisted Citron and Mustard Seed.  I just kept coloring all over the white square with different colors until it was filled and I was satisfied with the color.  I had no idea if this next idea would work but I decided to give it a try.

I wet a paper towel & folded it to make it like an ink pad.  I stamped a pine branch stamp against the wet paper towel to "ink" it up and set it down onto the paper...letting it set for a moment before lifting it off.  I had a dry paper towel which I padded gently after each time I inked with water.  I was a bit disappointed my idea did not work until it began to dry and I could see it was doing exactly as I hoped. It had lifted just enough color and if you look close you can see the pine bough marks behind the ornaments.  I wanted the effect of Christmas tree boughs and the hint of color from Christmas tree lights bouncing off the boughs.

All in all...I was quite happy with the results!
I will be adding this to the challenge at http://52cct.blogspot.com as well.

Happy Crafting!

Netta


Sunday, October 14, 2018

52 CCT Challenge-October Color

I have been busy making Christmas cards and happy to say I have passed the 1/2 way mark of what I need!  It is a good feeling...especially with the holidays only a few weeks away.

I have several I have made, but for today I want to show the card I made for this challenge.  This week it is color over at Christmas Card Throwdown and that color is Silver.


I always love blue and sparkling silver together.  I think it is so beautiful on a card.  The silver on this card was backed on the baubles and hand trimmed.  The background also has silver as well.  Silver snowflakes, with a hint of sparkle in them, line along one edge (take my word for it..they sparkle but the card just would not photo well!).  

Off to go load it up for the silver challenge.


Enjoy!!
Netta


Wednesday, October 10, 2018

52 CCT Challenge-October Sketch

Update!  
My card was chosen as the winner for this October sketch!  


Every week there is a new challenge at Christmas Card Throwdown that involves the following....

Week 1 - Sketch
Week 2 - Colour
Week 3 - Theme 
Week 4 - Technique or Stash

I have been following along at home but I decided this time to actually start posting.  When I play along with the challenges, it helps to keep me on track with making my Christmas cards.  I got a little slack this year and catching up now!

Here is my post for sketch!


Here is the sketch I used.


One more for my holiday box!

Netta

Sunday, June 3, 2018

Sweet 16 Pop-Up Book Fold

I was asked to make a special Sweet 16 Birthday Card.  


I love the digital image I used.  It is located in an Etsy Store called "Small and Round".  The image is called Spirals Digital Image.   I printed it out with my canon jet printer onto X-Press It blending card and used copics to color with.  

I cut the Happy Birthday three times & glued them altogether.  I offset the white color layer to give it a highlighted background.  Ranger Glossy Accents covered the top of the words and while wet I sprinkled a very tiny amount of fine glitter on top.  Just to give a hint of sparkle.


 I have colored very few images of people with copics.  I need to do it more often.  It's actually very relaxing when you take your time.


Have a great day and thank you for stopping by! 

Netta


Monday, May 28, 2018

52 Christmas Card Throwdown-January Week 1

Can you believe it is almost June already?  At the present time, I have 8 made towards my 100 needed.  Most of my cards are handed out.  Only about 40 are mailed.   I figure I have 28 weeks left to making Christmas cards. So I don't go crazy at the end of the year, I need to make 3+ cards a week.  Think I can do it?  I am going to give it my best shot!

One way to get on track is to get back with the challenges from 52 Christmas Card Throwndown challenges.  I will start with the challenges in January and work my way through to get caught up.  Each week is a different but same challenges.
Week 1 is always a sketch
Week 2 is always about color
Week 3 is always about a Theme they choose
Week 4 is some type of Technique or Stash

So here I go....Week 1 challenge-a Sketch


Today I used a stamp from Stamping Bella called  Christmas Mouse.  I stamped the mouse twice and cut one out after I colored it with my Copics.  I love using a glue to prop up the image slightly to get a 3D effect for the image.  Sometimes the dimensionals are just too thick for me.  The one I use is a Universal Transparant glue from Olba Company.
The background was made using a stencil and 2 colors of Nuvo glimmer paste...Pink Opal and Garnet Red.  


Well that is one done for the week.  Off to make another card.  I need a birthday card next.

Have a great crafty day!

Netta


Wednesday, April 4, 2018

Beautiful Black Ice

My friends and family back home, in NH know black ice as a thin coating of glaze ice on the road.  It is not really black but it is transparent so the black road below it shows through so sometimes is called clear ice.  The roads looked dark and so shiny.  You could not tell if the road was wet or coated with ice glazed over it.   Not something anyone likes to drive on.

Black ice in the crafting world is a card technique and you use a foil sheet, archival black ink, versamark ink, heat gun and clear embossing powder.  

It kinda reminds me of the Black Ice on the roads when done!  Black and shiny!


The close up of the card picked up the brown around the card because you use a foil sheet.  The foil sheet is from Stampin Up called Champagne Foil Sheets.  


I experimented with this technique on 3 different cards. It's so beautiful once done and addicting.

There are youtube videos to show you how to do this technique.  You should try it!

Thank you for stopping by!  I hope you have a great crafting evening.

Netta


Thursday, March 22, 2018

Mothers and Others Cards

I am back!
Month of December  & into January was crazy between getting ready for Christmas, finish making and mailing my cards, and getting ready my vacation. I had a magnificent time visiting Thailand but life is so different there.  Since returning, I have an even more appreciation for USA!

So now I am back to crafting and it feels good!  Just in time to make my husbands 30 invites he needs each year.  I have been working on them for the past month.  First I cut and punched all the pieces out and piled them up.  I grabbed a pile and glued that piece down on all 30 cards.  Grabbed the next pile and started on that one.  All I can say is thank goodness for my Misty as stamping the "Your Invited" was so much faster.   I recently finished them and over a month earlier than he needed them. Go me!

The die set "Radiant Rectangles" was probably not the best choice to make this card with as it had so many tiny pieces that did not pop out well out of the die so after each and every cut, I had to sit and poke the pieces out.  I got a lot of binge watching shows doing these cards!   I guess it was worth it as I like the final results.


My job is done!  Now on to fun cards....

Have a great crafty day!

Manetta


Friday, November 3, 2017

Halloween Witch


I was leaving on vacation and ran out of time to post this card in time for Halloween before I left.  It's a Halloween card I quickly made up for a friend before I left.  

Thank goodness for the Misti as I made a big mistake when I stamped this card.  I masked off the moon and Witch to stamp the boughs.   After removing the mask, I realized I had the boughs going behind the moon and I had already removed my stamps from the Misti and cleaned them off! I masked off just the witch and was able to recreate where the bough went by using the Misti.  
I bought this stamp several years ago but unfortunately I do not remember what company.  

Hope you all had a great Halloween!  I was able to go trick or treating with my two youngest grandchildren and it did bring back a lot of memories when my two boys were young.  Great fun

Manetta

Friday, October 6, 2017

Saving Paper

How many of you have special paper you don't want to use up?   
Or perhaps you do not have enough to do what you want?

For my card, I wanted enough of the sparkle paper to mat my image and to die cut a design out.  I only had enough to mat the image with.

Here is a trick!

Cut the middle out.  

It gives you an extra piece of paper to mat your image....

and have enough left over to die out!

After the card is put together....no one would even know there was missing paper on the back of that image.

Hugs
Netta


Saturday, August 26, 2017

Ice Cream Splatter


I joined the Bloobel Stamps Progressive Challenge and for August we got to pick one of 7 images available.  I chose one called "Ice Cream Cool".   I made this card for a girlfriend as her birthday is coming up early September.  I have a little bit of time to come up with something cute for the inside before I have to mail it off.  The Happy Birthday die came from Amazon and is one of the "no-name brands" from China.  The image was colored with Copics and fussy cut out so I could glue it down on the background.  For the background I sponged 2 Distress Ink colors Spun Sugar and Picked Raspberry around the top.   

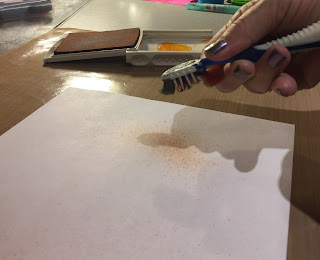
I learned how to oil paint many years ago and there was a technique I use to use to make the ground look like it had tiny rocks or sand.  You used a toothbrush and some oil paint that was thinned down with linseed oil.  Now I see that same technique is now used on cards all the time.  I used that technique on the card above with black splatters.  I love the pink with the black look.   I took a few photos on a white copy paper to show you how I got the black splatter on the card.  

Drop a few drops of re-inker onto the cover of the ink pad along with a couple of drops of water to make the ink a little thinner and mix it together.

Drag a toothbrush in the ink to cover the bristles... making sure to grab enough ink.

You might want to protect your area as this next part may splatter ink where you do not want it to.  You also will want to wear disposable gloves unless you do mind getting your fingers full of ink.  It was hard to get a good photo, but I used my finger to run along the bristles of the toothbrush. This causes the ink to splatter against the paper.  In the next two photos, I used the bristles to face down toward the paper and up towards the ceiling.  They both give you a different kind of splatter on the paper.


The splatters on the left came from pointing the bristles up to the ceiling. They are more spread out.  The splatters on the right are from the bristles pointing down toward the paper.  These are more contained into an area.  

Try the ink splatter technique using sponges or different size brushes.  It will give you different types of splatters.  Also experiment with holding the tool higher or lower from the paper.  

I hope you give this easy but messy technique a try and let me know what you think!

Happy crafting!

Manetta


Thursday, July 6, 2017

Mermaid Cellafina

I wanted to share to share a card I created using Mandy's Mermaid image.  


I printed the image 3 times using Word to get the size I wanted.  My plan was to glue the image together in layers.  I lightly colored some areas with Copic markers, depending on the area I needed on each of the three images.  After the markers, I recolored using Spectrum Noir sparkle glitter brush pens.  To blend the colors in the hair and on the Mermaid, I had to work fast as the glitter dries quick.  The only part that was not colored with the glitter brush pens was the skin areas.  Those areas are colored with Copic and left alone.  Cutting it all out took some time, especially around the Mermaid.


You can see some of the sparkles shine through with the close ups.  To make the bubbles, I used a 2 sizes of sticky dots and pressed tiny glass beads into it until all areas were covered.


 Cellafina was fun to color, especially using the glitter pens.  If you want to give her a try as well, you can find this image at Mandy's shop... AkaManuArt

Go have some fun!

Manetta


Sunday, June 11, 2017

May You Find Comfort

Time for more sympathy.  It's always hard to come up with so many sympathy cards each month.  I am happy to do it for the nursing home to give out but the reason why is difficult.  I have been putting it off all week and now the deadline is up. 

Here is what I finally came up with today.


I ended up making 5 of these sympathy sunset cards.  


To make this card, I used 4 different stamp sets.  A Stampin Up set "High Tide",  a Stampendous Set "Seaside Chair",  Sheena Douglas set "A Little Bit Scenic" and another set from long long ago that I do not know the name of.  The Misti really helps getting several cards of the same done in record time.  I did my usual to get the sunset look...sponged the ink on.  

With the cards delivered, I can now go back to getting birthday cards done.

Thank you for visiting!
Manetta


Wednesday, June 7, 2017

Betsy & Her Bouquet


Is she not adorable!!  She is another image from Mandy's Art and Soul and a perfect image to practice coloring the folds in the clothes, hair and flowers.  I wish I had kept out all the markers that I used but it was overwhelming having them sprawled all over the table.  I put them away without thinking.  

I think I found my new addiction....

Manetta

Wednesday, May 31, 2017

Don't do Anything on Father's Day

I am practicing coloring with copics today.  I need lots and lots of practice, but I am up for the challenge!

Bloobel Digital Stamps has a Progressive Challenge on her Facebook page.  Each month we get a free image.   As long as you create and share, you automatically get the next months image for free.  

May's Progressive Challenge image was called "Bored at Work".  My Father's Day card is my submission to May challenge.

(Inside: Pretend your in Congress.  Happy Father's Day Dad!)


Manetta