Tuesday, December 31, 2019

Boss's Christmas Explosion Box

(2nd post today so make sure to see the post prior)
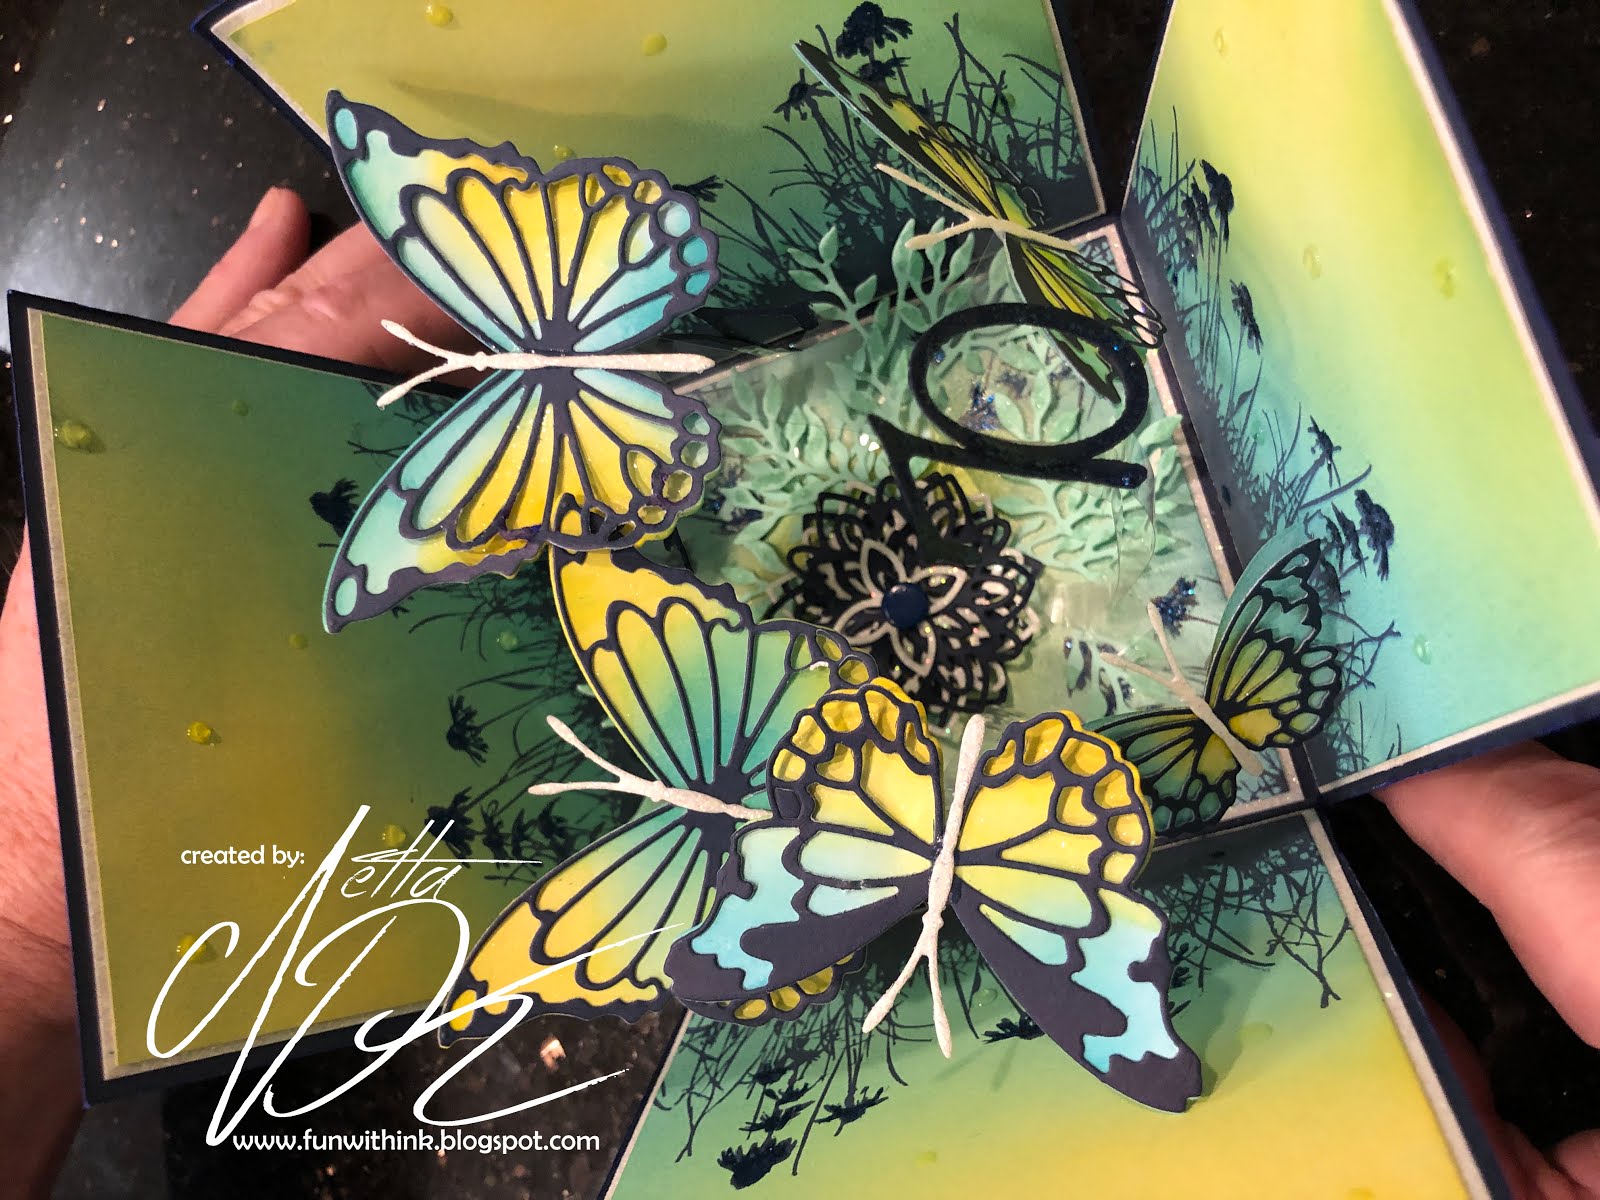
I wanted to share a gift card explosion box I made for my Boss a few weeks ago.  It was to house a gift card the whole Team gave him for Christmas and it was given to him at our Christmas Party.  
An explosion box card, is made from sheets of cardstock that nest inside each other.  It looks like a regular gift box and when you lift the box top off, the sides drop down which causes the layer(s) to explode (drop down) to reveal whatever is on the inside. 

 I have done a couple of explosion boxes which you can see here Birthday Butterfly box and here Mickey & Minnie box.  


The inside of this box had a beach scene because the gift card was to a place where there are beaches to enjoy.


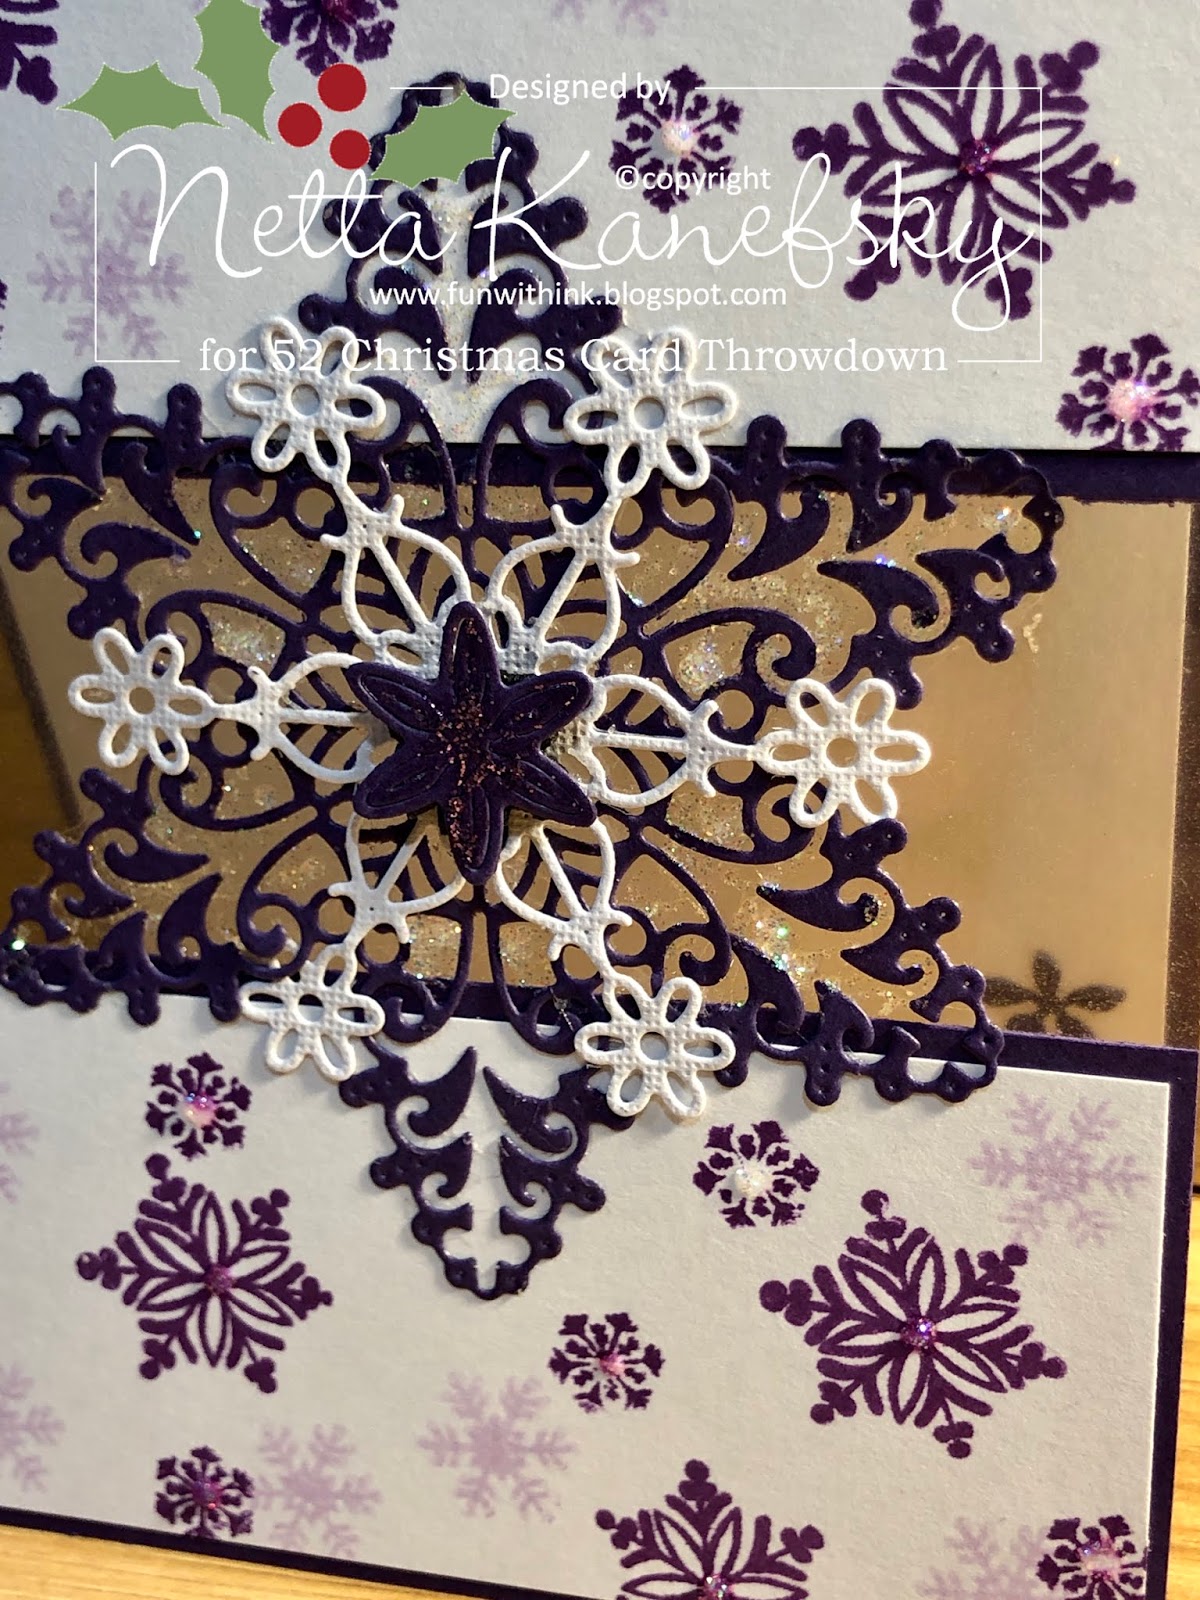
Two of the sides had snowflakes because it was a Christmas gift.  The other two sides continued from the middle with sand and ocean.


On one side of the beach scene was actually a gift card holder.  I used a card of mine to show where the gift card would go for the photo.  After my boss checked out the box he thanked us for the "gift" and started to put it back into the form of a box.  He never saw the gift card.  The funny thing is the gift card had a beach scene on it and it was the exact same color as the beach scene on the box...same blue and same sand color.  We had to stop him to point it out to him!  I had made the gift box before we got the gift card and we were all pleased it was a perfect match!


This is what it looked like with the whole box laid flat.  I had made myself a Christmas tree stencil and cut the trees out by hand.


There are many instructions and you-tube directions out there to learn how to do this so I will not go over it again however I did want to give you my dimensions.

Box is a 12" x 12" cardstock scored at 4" and 8"
turn the cardstock to score again.  
You will end up with 9 boxes.
On the 4 corners I used a Christmas tree pattern drawn by hand.  
Box top was cut at 6 3/4 square and scored 1 1/4 all the way around.

These boxes are so pretty but can be time consuming... depending on what you create on the inside.  Some put several layers on the inside but each layer is a little smaller than the layer below it.  


Well, today is New Years Eve so Happy New Year! 
I want to thank everyone who visited my blog in 2019. 
 Hope I was able to inspire you someway or somehow!
Be safe everyone and have a Happy New Year. 
 See you in 2020!!


Netta

Tattered Lace Christmas Snowflake Frame die
Memory Box Frostyville Die
Impression Obsession Die #DIE078-F
My Favorite Things Stylish Snowflake Die
EK Snowflake punch
Copic Sea #B01, B04 and B06 was Air Brushed
Sea caps was drawn with white gel pen
Beach Scene was a kit that came with everything in the middle of the box

Old Timer Slider Birthday Card

Recently one of my co-workers had a birthday.  She was always mentioning how old she was (insert rolling of my eyes since I am about double her age lol).  She also can take a good joke so I made a slider card for her and it was all about being old.  The digital image is from Polkadoodles and is the 2nd time I have used her.  I just love that old lady image. 


When she pulls the tag to the right, both sides slide out with messages about being old.


It has been a long time since I have made a slider card so where do you go when you need help?  You-tube!  In my search on instructions, I came across a video that showed how to make a stand for the slider card.  That was the best invention because the prior slider cards I made had to be propped up to show.  I have links below on the 2 you-tube video's I used to make the card. 


It could now be stood up with all her other cards.


She did get a kick out of the card.  

Thank you for stopping by and I hope you get to have some fun crafting today!

Netta


Stand https://www.youtube.com/watch?v=6MKtsrf9Ljs
Double Slider Card https://beccysplace.blogspot.com/2015/04/tutorial-double-slider-card.html

My Favorite Things Inside Outside Stitched Rectangle Die
Craft Smith 12 x 12 Paper Pad Seafoam Greens
Wshite Cardstock
Polkadoodle Scratch It Digital Images and verses
Copic Colors #BG10, BG13, BG18, T4, RV55, RV66, Y13, Y17, E00, E13
Gellyroll Green Star Pen
Stampin Up Sizzix folder for background
Stampin Up Paper Shaper Round Tab Punch Whale Tale Style (retired)

Monday, December 30, 2019

Nursing Home Watercolor Christmas Class

I was asked if I would go over to a local nursing home at the end of November and have a little class with a small group as an activity.  I had made a watercolor card (can be seen here --> Nov Technique) and thought it would be fun to do with the group. I wanted to share the end result with you.  I had all the supplies cut and ready for them.  I also printed out some examples of the Northern Lights.  
As it turns out...I didn't need examples!  This group had so much fun making their backgrounds and they did it their way!  I had an amazing time helping them create their masterpiece.


Watching these 80-90 year old creating their cards and having so much fun was such a joy. They did not care if the glue got on the edge and you could see it.  They did not care if their frame was a little crooked.  They did not care if they got ink fingerprints on the edge.  They had fun.  Some comments and questions I heard them say was....
"How do you give away your cards after you are done?" 
"I am going to get a frame and hang it up!"
"This was so much fun!"
"I have to really think about the special person to get my card."

It brought me down a level and reminded me to Just-Have-Fun.

Netta

Wednesday, December 25, 2019

Merry Christmas!

Merry Christmas Everyone!
Last cards for 2019!
Made for my co-workers.


Hope Santa brought you lots of crafting goodies.
Enjoy your day!
Netta


Sunday, December 15, 2019

Woodland Christmas Scene


Do you ever find, at the last minute, you need to get a few more Christmas cards done that you did not plan on doing?  Maybe a few quick thank you cards?  Here is an idea for a quick card that is perfect for those moments.


All you need 2 colors of ink...one black and one blue. Also a sponge for the blue ink.  
You will need some type of scenic stamp and a sentiment.   
A round punch and a piece of post-it note to mask the moon so you can ink the blue around it with the sponge.
You can use a white gel pen, a glitter pen or stickle to add snow on the trees or along the hills.  You could also color in the evergreens or just keep it simple and plain.
 With a Misty or Tim Holtz tool, you could create several cards very quickly.
My Misty came in handy as it was easy to make a bunch thank you cards for after the holiday.  


Beginning of this week, I was able to mail off all my cards.  Now I just need to finish up a few that I have to hand out this week.  Just in time as Christmas is next week!!!  

Netta


Monday, December 9, 2019

Cutout Snowflake Scenic Card


Such a pretty card!  I thought this would be easy but it took me forrrrrever!  
 It was fun however and I was very pleased with the results.  I made the scene behind the snowflake bigger than I needed so I was able to cut the words Joy out of the left overs to match the background.  The reindeer crossing on the ice was a nice touch.  

Here is the video I followed to make it...

How is the card making going?

Manetta


Tim Holtz Sizzix Holiday Words: Script thinlit die
Hero Arts Winter Animals Stamp
Stampin Up Beautiful Blizzard Stamp
Stampin Up Festive Flurry Die and Stamp
Distress Oxide Tumbled Glass, Frayed Burlap
Distress Ink Mermaid Lagoon and Peacock Feathers
VersaMark Dazzle Frost Ink pad
Memento Tuxedo Black
Versafine  Onyx Black
Signo White Pen
Gelly Roll Sparkle Pen
Q-tip

Sunday, December 8, 2019

Moose Inside Shadow Pop Up Box

I have a niece who is in the service and she loves Moose as much as I do. She just returned back from overseas so I made her a special Christmas card.

It is a pop up box card and lays flat for mailing.  The wow part is when you open it.  
The 3 layer Moose scene pops up.  

I know she will love this card...


The best tutorial I found to make this fold was a youtube here.....


Thank you
Netta


Sizzix Tim Holtz Merry Moose Die Set
Sizzix Tim Holtz Merry Christmas Die Set
My Favorite Things Inside and Out Stitched Rectangle
IO DIEI54-A Bird Group
Memory Box Frostyville Border Die
Stamping Up 1 1/4' circle die
Technique Inside Pop-Up Box

Saturday, December 7, 2019

52 CCT Farewell to 2019 Challenge

It's now December.  Time to wrap up making all those Christmas Cards and get them in the mail.  I have already been receiving cards since the 3rd week of November!  

The last challenge at 52 Christmas Card Throwdown is to pick a previous theme from 2019. I choose to redo the challenge from January 19th....


Have you ever gone out walking in the woods to get your tree or when it was kind of dark from a storm brewing or it is so quiet except the crunch of the snow beneath your feet?  The snow is glistening from the bright moon.  So quiet and peaceful.  


I loved taking walks in the woods.  I remember one time, I went out for a walk in the woods close to home and it was snowing.  Not a sound anywhere.   I spotted tracks from a rabbit and decided to follow them.  I knew they were fresh tracks or they would have been buried.  I happened to look up and directly in front of me...almost eye level....was the biggest beautiful white owl.  Biggest I have ever seen!  He was just staring at me not moving...so quiet. We just stared at each other.  I think I ruined his lunch because he must have been following that same rabbit.  I backed out slowly to go home to get my camera.  Of course when I got back he was gone, but I will never forget that moment.

Yup....silence...walking in the woods.  Nothing like it.
The memory inspired me to make my card for the Silent Night.  Actually, I made not just one but 31 cards.


Thank you for stopping by.  If you still need to get a few more cards done...go back to 52 Christmas Card Throwdown and see if you feel like doing a sketch, color, theme or technique challenge.  The challenges are along the top of the page, so pick one and scroll down the list.   I can't wait to see what you will share with us!  

Netta

Stamping Up Carols of Christmas for stamp on the truck door
Scribble Shiny Christmas Red for the dots
Impression Obsession Class Truck Die
Stamping Up Balloon Punch for tires
Tim Holtz Treeline Die
Ripped Scrap White Cardstock ripped for snow banks
Waverly Chalk Acrylic Paint and paint brush for the snow
Impression Obsession Fir Trees


Saturday, November 23, 2019

52 CCT November Technique Challenge


Watercoloring is the technique this week....something I have not really done before.  I have been wanting to make a Northern Lights card this year so I thought this would be the perfect time.
To tell you the truth, I was not fond of what I did but once I put it together, I loved it!
The frame and tree was popped up away from the background to give the background some distance.
I will have to give this a go again.  Was not difficult to spread watercolor paint on watercolor paper.  LOL


Have you done watercolor before?  Show us what you can do over at 52cct.  While your there...check out the other design team member's works of art!

Netta

Saturday, November 16, 2019

52 CCT November Theme Challenge

Does anyone hang candy canes on their Christmas trees?
Growing up, our tree was always filled with those sweet red and white stripe delicious candy.  My boys also got to enjoy the candy canes on the tree as they grew up too.  Still today, even though my boys are grown, I still hang them on the tree.  I guess they are a little bit of flash back to me when I was young and my kids were young. 
A tradition so minor but still means a lot to me to see them hanging there... more like an old ornament you hang year after year....not so much a sugary treat.

Todays challenge is about sweet treats.  I found this digital image at the Esty shop recently.  It is a KLM Designs called Candy Cane Gnome.  I colored him up with Derwent pencils and added Spectrum Noir Sparkle Pens over parts of the image.   


The red swirl background he is on is actually an old technique using shaving cream and some red re-inker.  Just get some cheap shaving cream and spray a nice thick coating in an old cake pan.  Drop a few drops of re-inker on it.  In my case, I just used red but you can add a couple of colors if you want.   You can use a stick, toothpick, knife or whatever you want and swirl it through the shaving cream.  The idea is to make a design with the re-inker in the shaving cream.  Don't go too crazy mixing because you just want a marble look.  Now take your piece of cardstock and lay it on top of the shaving cream, pressing down slightly into it to make sure the cardstock is covered.  Now lift off your cardstock and take a spatula or something flat to scrape off the shaving cream.  Take a paper towel and dab the cardstock.  Set aside to dry.  You can make several backgrounds with this one batch.  


The Stamping Palace Peppermint Candy background was stamped with a cranberry red pigment ink.
The picture above is a close up so you can see the "shine" on the gnome.
Don't forget you can always head over to 52CCT for more inspirations from the other design teams blogs.


Nearing the end of card making for 2019.  Hope you are as far ahead as I am!

Happy Crafting...
Netta

Saturday, November 9, 2019

52 CCT November Color Challenge

 Today is a new 52CCT challenge and it is a color challenge.
Can you tell what the colors are in this challenge?


Your got it...purple and white! The focus on the card is a large snowflake which is glued onto cardstock and acetate.   


When I first made the card, the front would not stay up.  It was too weak.  I added an additional layer of acetate glued together along the top and bottom.   I glued a 2" piece along the bottom front to match the 2" top.  To hide the glue on the acetate on the inside of the card, I attached two 2" pieces of purple cardstock along the top and bottom of the card.  Adding the extra also helped the front to be stronger.


I decorated the front by stamping purple snowflakes and added stickles to give it some sparkle.
Now it is your turn.  What can you come up with using purple and white?


I counted up my Christmas cards made and counted the list of people I need to make Christmas cards for.  I am so happy!  I am 3 over what I need!!  Which is perfect because I always need "just one more card" each year and end up scrambling to get it done last minute.  This way, I already have the "one more" done!  

Go me!!!
Netta


BoBunny Snowflake Stamps
Tattered Lace Christmas Snowflake Frame Die
My Favorite Things Stylish Snowflakes Die
Memento LuLu Lavender Ink Pad
Stampin Up Gorgeous Grape Ink Pad
Stickles Stardust
Purple and White Cardstock
Acetate

Sunday, November 3, 2019

Birthday Butterfly Box

A very good friend had a milestone birthday the other day and I wanted to make her a special card.  It is not one that folds but I was going to see her to give it to her.  This box card, once the top lifts off, releases a bunch of butterflies which look like they are ready to fly off.


Happy Birthday Jan!  

Netta


Distress Oxide ink pads:  Twisted Citron, Peacock Feathers and Mustard Seed
Stamping up Night of Navy ink pad
Sizzlits Die: Funky Brush Numbers
Navy Blue, White, Light Green and White Sparkle cardstock
Memory Box Butterfly Ensemble Model 30071 die
Memory Box Morning Garden Butterflies 30085 die
Ranger Rick Glossy Accents
Spectrum Noir Sparkle markers Soft Jade and Moonlight
Stickles Midnight Blue
Impression Obsession Die Leafy Branch and Foliage Dies
Impression Obsession Die Birthday Top Edgers Die
Stamping Up Flourish Thinlits
Inkadinkado Clear Stamps Meadow Floral

Saturday, November 2, 2019

52 CCT November Sketch Challenge

November Sketch...we are down to the wire at 52 CCT.  Can you believe it is already November and we are now at our last full month of challenges?  Where did the year go?  
If you have been following along, you would know at the beginning of each month we always start with a sketch.  I did not flip it or turn it this time.


Most of the card was die cut except for the sentiment.  I did a bit of embossing for snow on the trees and edge of drift.  To do the trees, I just left the cardstock in the die after I cut it out and used a Ranger Perfect Medium embossing marker to fill in the open areas of the die so I could emboss.  I used the same marker to edge the drift as well to emboss.  The sentiment was stamped first in green and without moving anything, I cleaned off the stamp and inked it back up versamark so I could emboss the words.  


 Here is a tip:  You might have a couple of specialty embossing powders like Winter Wonderland but for the most part you only need clear!  If you stamp with color and emboss over it with clear, it is the same affect as if you embossed with color.  You not only save money by not buying all the ink AND embossing powders but you also save on space!  We all know how important it is to save space....so we can fill it up with something else..*Smiling* 
I used to be someone who bought just about every color of embossing powder until I finally figured this out! 

Here is the sketch.  I would love to see what you came up with. 


If you need more inspiration...head over to www.52cct.blogspot.com & check out the other designers creations.
Thank you stopping by!

Netta
The Paper Studio paper stack
Stamping Up Snowflake Sentiments
Nuvo Crystal drops Simply White Gloss
Ellison Die Holiday Shadow Box Dies
White Cardstock
Embossing Powder :"Winter Wonderland"
Viva Las Vegastamps! Embossing Powder "Clear"
Versamark Ink Pad
Re:Marks by Excelmark Pigment Ink "Florest Green"

Monday, October 28, 2019

Foiling Christmas Folder

My husband bought me the GoPress and Foil machine last year for Christmas.  I have used it with the foil dies in the past but I just learned something new.  I am so excited.  I now have not one but two new ways to foil!  One uses my embossing folders with the GoPress and Foil machine.  The second is how to use the left over foils.


 Using the folder was so easy to do and worked so well my first time, I can't wait to try this method again.


In the picture above, the one that is white with navy snowflakes was with the embossing folder.  
The second photo with mostly navy blue was using up the leftover foil


I was so excited to try this out, I forgot to take photos as I went along so stay tuned.  I will try this again.

Thank you for stopping by!
Netta


GoPress Foil Iridescent Navy Blue
Go Press Foil Machine
Snowflake Embossing Folder
Stamping Up Carols of Christmas Stamp Set
White Cardstock
3D Foam Squares
Spellbinders Holiday Tree Picking Die
Clear Embossing Powder
Versamark Stamp Pad
 Noel Word Die
Stampin Up Night of Navy ink pad