Saturday, September 28, 2019

52 CCT September Technique Challenge

Happy Saturday!  For those of you who have been playing with us at 52CCT, this week is a technique challenge...Easel Cards.  
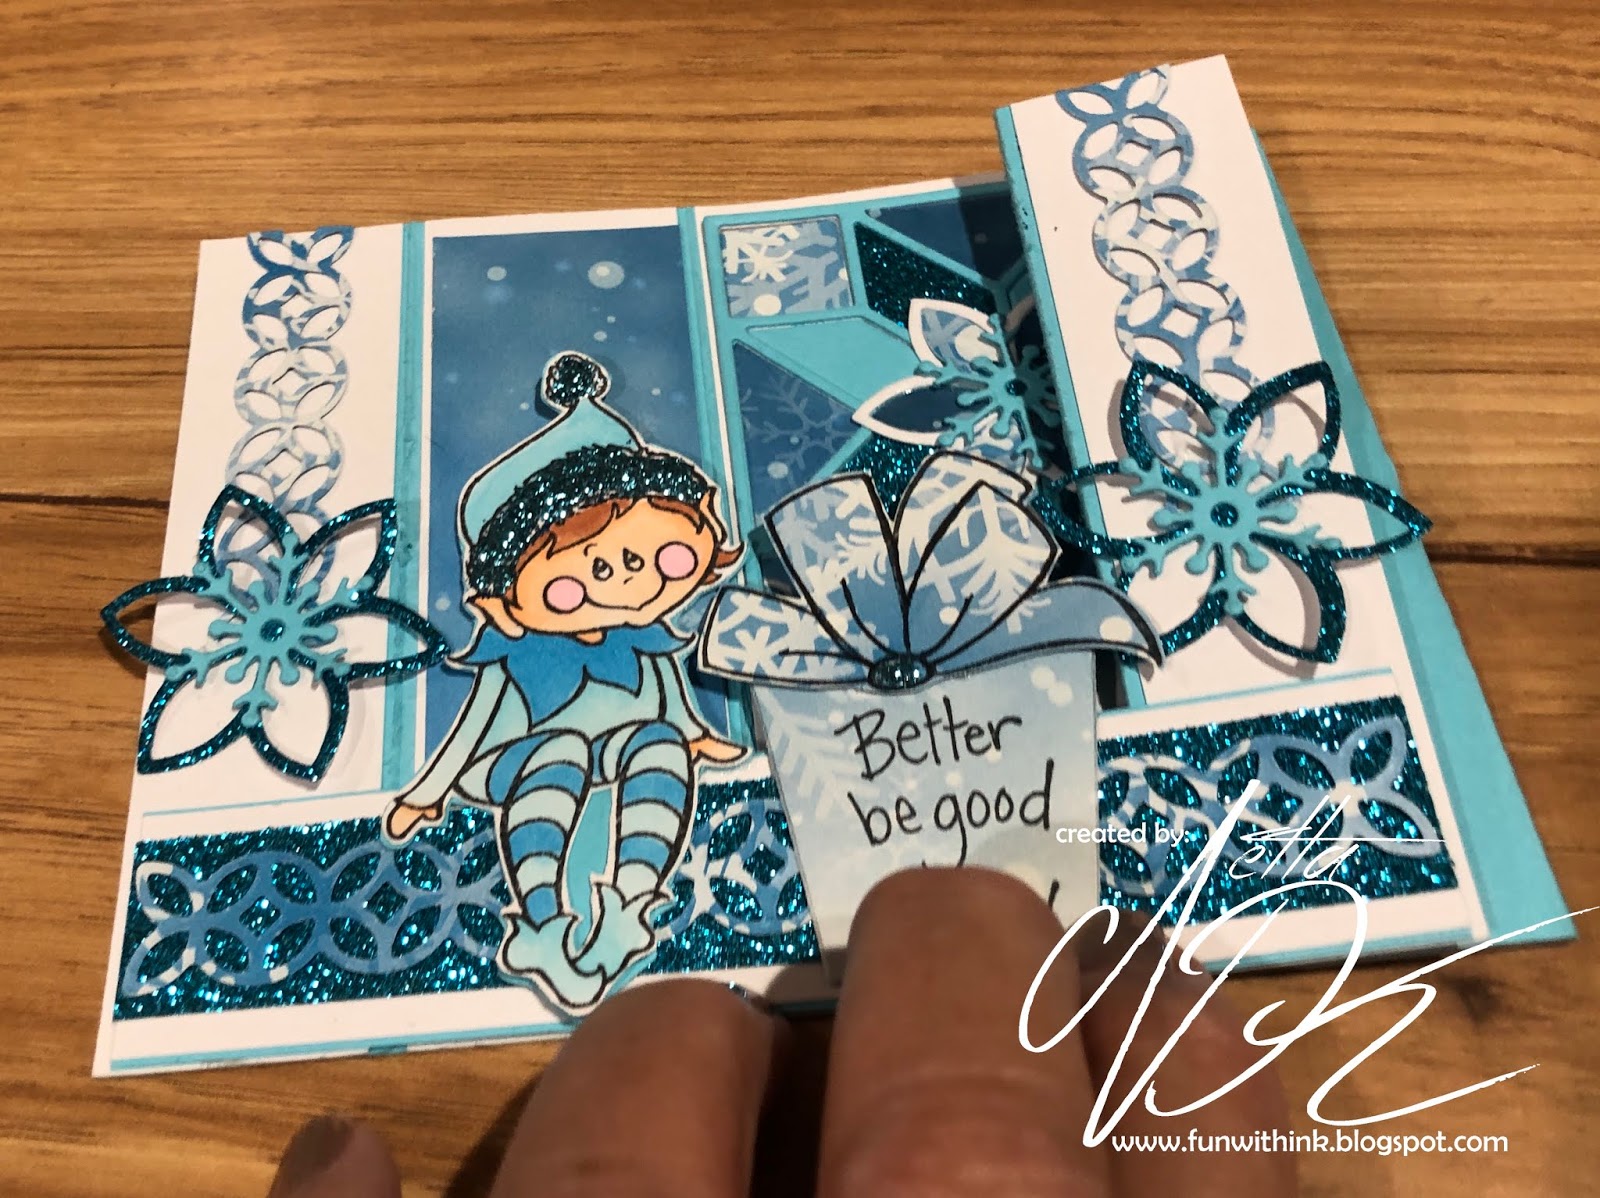
My card is a step up from just an easel card.  It is called a Swing Easel Card.


The close up of the outdoor scene is a Northwoods Rubber Stamp.  If you click on the photo, it will show all the sparkle on the stamped image.  Do you know how hard it is to not touch the image until it completely dries?  Normally I end up touching and messing it up.  So I colored and sparkled up the card before I made the easel card.  It gave it time to dry!


I cut out two Merry Christmas, one in green and one in sparkling white.  I glued the white on top of the green to get a bit of depth on the words.


The cards folds easily to mail in a regular A2 card.


Now, a swing easel card may look intimidating but I found a great video tutorial that walks you through it slowly.  The only difference is the video shows a card that is larger than an A2.  She started out with a 5" x 10" cardstock.  Next time I make one, I am starting with 4 1/4 x 10.  I didn't realize hers was going to be wider until I made mine.  Before I decorated it, I cut it down..equal on both sides to make it 4 1/4 .  You can see the video here

https://52cct.blogspot.com/

I hope you join us with this challenge and be sure to check out the other design team members cards as well! 
Happy Crafting... 
Netta

Northwoods rubber Stamp Company:
#P10553-Winter Church and Stream
Copic Colors:
Y18, R24, R29, B0000, B24, B29,G07 and E #'s 02, 13, 15, 17, 31, 33 and 40
Sparkles:
Stickles Yellow, Nuvo Fresh Snowfall and Wow Glitter Twinklebelle
Spellbinder Die:
Holiday Sentiments
Impression Obsession Die:
Large and Small Poinsettia's Sets
The Paper Studio:
Green and White Sparkle cardstock
Stampin Up Cardstock:
Whisper White

Sunday, September 22, 2019

Arteza Watercolor Flowers


One very large stamp colored with the Arteza Brush Watercolor Pens...cut in half will create......


2 different birthday cards!


Thank you for stopping by!
Netta


Arteza Real Brush Pens:
Bubble Bath Pink, Rouge Pink, Cadmium Orange, Orange Rust, Tawny, Bumblebee Yellow, Lemon Yellow, Light Magenta, Parma Gray, Light Green

Watercolor Paper

Tim Holtz Glorious Garden Stamp

Technique: Camouflage Cards

Glitter
Spectrum Noir Sparkle Colors-Inspired Violet, Biscuit, Rose Quartz, Teacup and Nuvo Midas Touch

Saturday, September 21, 2019

52 CCT September Theme Challenge

Good morning!  
This weeks challenge at 52 Christmas Card Throwdown is Bears.  The fold for this card is a Bridge fold and will fit in an A2 envelope.

I love this image from Whipper Snapper Designs "Hello Friend".  It's a nice size for an A2 card as it is 4 1/2 x 2 1/2".  I used Copics to color the image and then cut it out.  I extended where the two were standing on the snow so that it would fit across the card for the bridge.


To make the Bridge card base:  An uncut piece of cardstock 8 1/2 x 11 will make two bridge fold cards.  Just cut the card in 1/2 at the 4 1/4 mark.  It will give you two pieces of 4 1/4  x 11.  Now trim the 11 inch down to 8" (4 1/4" x 8") and save the extra 3" you cut off as you can use that for the bridge if you want. Waste not want not!  For my base, I had a piece of two sided cardstock left over from the paper pack Snowflake Ridge Collection.   I cut it down to 4 1/4 x 8".   The left over piece fit perfectly on the back of the card to write my sentiment on.


Now score the 4 1/4" x 8" on each end at the 1 1/4" mark.  Slide it in and score at the 2 1/2" mark.  Now, flip it over and do the same thing to the other side of the base.  You want to fold the ends like the image above.  Use a bone folder to get a nice crisp fold.  When you flatten everything down with folds in, you will see the folds do not quite touch in the middle.  That is ok.  It will not matter because the card is not like a gatefold card.  

The bridge across the front can be done anyway you want.  You can use the 3" x 4 1/4" piece you have left over or you can make the bridge fit all the way across the front like I did.  If you want it to fit across like I did, then the piece I used was 5 1/2" in length.  If you use the 3" x 4 1/4", you will have to determine where it needs to be glued down.  Stand the card up like the photo above and set your bridge up against it to measure where to glue it.  


To fold the card so it fits into an envelope, press it down to the right or left.  One side of the folds will lay flat unfolded and the other side will be folded in on the folds.  
I hope you understood all that.  Just leave me a message if you need help.  I would be happy to help you!

Now it's your turn!  We challenge you to create a Christmas Bear Card and please share with the design team at 52 Christmas Card Throwdown.

https://52cct.blogspot.com/

thank you
Netta

Copics Colors:
E #'s 04, 07, 18, 31, 35,40.  Also used #T2, #B02 and #C7.
Whipper Snapper Image:
Hello Friend #BBY900
Impression Obsession Die:
#079-U Birch Trees
Newton's Nook Designs Image:
Sentiment from "Winter Memories" 
Stampin Up Image (not shown):
Sentiment on the back from Beautiful Baubles Set
Sizzix Snowflake Shapeabilities Die

Sunday, September 15, 2019

Celebration Birthday Bouquet


This was a relaxing card to make.  I love to sit and color quietly.  Brings back my inner child!  *S*


I cut the front of the card a little short so I could hang the flower cluster over the edge.  I backed the back of the flowers with another thin cardstock because of the overhang.  You could see the copic color on the back and I wanted to hide that.


Thank you for stopping by.  Enjoy your day

Netta


Gemini Stamp and Die Set Sunflowers

Copic colors 
YG03, YG05, YG11, YG13
Y13, Y17, Y19
B32, B37
E33

Stamping Up
Whisper White Ribbon


Saturday, September 14, 2019

52 CCT September Color Challenge

This week's challenge is a color challenge: black and white.  


This card is a very quick card to make if you are in a hurry to make a few Christmas Cards.  I used a die on black cardstock to cut out the area and backed it with white sparkling cardstock to resemble winter/snow.  I had a slight issue on my plan.  I was going to run out of the white sparkling cardstock to finish cutting out the trees.

Here is a trick that I used on this card to get my extra piece I needed.  If I had glued my black top piece down onto the mat, you would have only seen the sparkling white edge and everything underneath the black would have been wasted. The trick is to cut out the middle.  Just leave enough to glue the top piece down.  In my case, I had to leave some along the top because of the open area on the black cardstock.  It gave me enough to get my trees and words.


This card is so quick, I even did another one with blue and white.


You have to agree though, the black and white, makes such an elegant card.  Please head over to 52 Christmas Card Throwdown as you will find so many inspiring and fabulous cards from the other Design Team members!

https://52cct.blogspot.com/

Thank you for stopping by!
Netta

Amazon

The Paper Studio 
Christmas Cardstock Pack

Impression Obsession Die
Fir Trees

Sizzix Die
Christmas Phrases

Spellbinders Die
Holiday Sentiment


Monday, September 9, 2019

Junk Box Christmas


I just wanted to show another card I made from digging into my junk box.  I did the background on this card and did not like it.  I have a coordinating Christmas embossing folder and stamp.  I inked and stamped the image down first and then matched up the inked portion to the embossed folder images.  Ran it through my Big Shot and I did not like the results.   Some areas of the cardstock cracked a bit and the inked image did not quite match up with the folder.  
I gave it a second look and decided to give the background another try.  Matched it up with a gold trim and big bold gold Merry Christmas die cut...now I am thinking it is not so bad.

Got to add it to my pile of Christmas cards.  I am on a roll!

Netta

Hero Arts Sizzix Folder and Stamp Set
Holly Background Set

Tim Holtz Sizzix Thinlits
Merry Christmas die

Memento
Teal Zeal

White and Gold Cardstock

Saturday, September 7, 2019

CAS Christmas Boughs


Simon Says Stamp Pine Bough stencil and Nuvo Glimmer Paste Sparkling Emerald Green for the bough.  Tim Holtz Sizzix Thinlit Merry Christmas die and gold sparkle cardstock for sentiment.  Applied Memento Desert Sand and Bamboo Leaves with a sponge for a little along the edge and on the bough.
Simple and done.

Now, how do you get glitter paste off when you forget to drop the stencil in water as soon as your done?
Lesson learned.....*sigh*


Going to add this to the CAS On Friday   CAS means to keep the card "clean and simple".  I have never joined this challenge before and I struggle big time with keeping my cards simple.  This card looks like it could be classified as clean and simple!  

Later..
Netta

52 CCT September Sketch Challenge

Sketch Time over at 52CCT!
I can't believe we are into September challenges with only 12 weeks left for me to get all my cards done.  Pressure is on!

I saw a lady on youtube who created a fairy card with a moon that was created after the background was done.  I thought that was very different from what I have always done.  Normally I tack down a circle, make my background and then pull off the circle.  I did not do my card like her's (background technique) but I did use her idea of creating the moon after she created the background.


I knew in my head how I wanted to do the sketch. 


I wanted a big moon to be the circle of the card.  First I used White Mask Liquid Frisket and splattered it on the card.  Once it dried completely, I used Distress Oxide Inks with a sponge to make the background.  I used my Light Mister Spray Bottle Tim Holtz gave us in a class I went to and sprayed a small amount of water on the background.  Once that dried, I finished up the moon.  I cut out a thin but sturdy piece of plastic and placed it where I wanted the moon.  Used a small amount of Oxide Black Soot and sponge around the outside edge.  It gave the moon a bit of dept.  Removed the circle and sponged a small amount of Antique Linen and very little Mustard Seed along the top and side of the moon.

After background was done, I rubbed the mask off and it left white flecks like snow falling.  On the moon I had to redo some of the snow with a white gel pen as some of the mask had rubbed off and I did not catch that.  
Finished off the rest of the card and here is my result!


I can't wait to see what you come up with on your version of this sketch!
Have a super crafting day!
Netta

Tim Holtz Distress Oxide Inks:  
antique linen, stormy sky, black soot, salty ocean, tumbled glass, peacock feathers, mustard seed
Stampin Up Rubber Stamps:
Holiday Home for Santa and sentiment
My Favorite Things:
Stylish Snowflakes Die, Window Die, 
Tim Holts Sizzix Die:
Tree Line
Cardstock:
White, Blue Glitter

Thursday, September 5, 2019

Christmas Sparkle

I think I have said this before but I really need to step up how many cards I make for Christmas.  I have 15 weeks left for the deadline and I need at least 2 a week.  For inspiration, I turned to ABC Christmas Challenge.  I had forgotten about this gem of a blog!  The challenge going on right now is S and T.  S for sparkle and T for texture.  I decided to go with sparkle for now and maybe texture next. 


It's so hard for me and I find it so difficult to get sparkle to show on camera so if anyone has a clue what to do, please let me know!  
This card has a lot of nice sparkle to it.  It started with a bridge fold card.  I pulled it out of my "junk box" where I put all my pieces that are mistakes.  I always find a way to use the mistake.  
I struggled with this card because I had no idea what I wanted to do. It took me 3 days to get this together (lol) but I think it came together nicely.  I am pleased.


Isn't that little elf cute?  After I colored him, I backed him with another piece of cardstock to make him sturdy as does not have any support on most of his body.


The next two pictures show how you can fold this down to place in an A2 card.  You should be able to press it down either way easily.


The back of the card is a great place to write what you want and to place your signature stamp.  I have to give kuddos to my big brother for coming up with my stamp aNettacard many many years ago.  He told me one day he opened a card from me and said "Oh look it's anotherNettacard.  He shortened it down "a Netta card".  My original stamp finally wore down so I just recently got this stamp from Rubber Stamps.


Thank you for stopping by.  I am off to go add this card to the ABC Christmas Challenge blog.

Netta

Stampendous:
Seated Elf Stamp

Stamping Up Dies:
Flourish and Quilt Builder

Free Die from Papercrafter Magazine #112:
Christmas Snow Globe

Cardstock:
Teal Blue Glitter paper
White Cardstock
Reminisce Snowflake Ridge Paper Kit

Copic Colors:
B0000, B00,B02, E000, E02, E13, R00

Stickles:
Turquoise

Wednesday, September 4, 2019

Happy 50th Birthday Blog Hop

Welcome crafty friends to a very special blog hop where many of us are teaming up to celebrate a 50th Birthday!!  A crafting friend, Danni, is turning 50 years old today.  She decided to have a blog hop to celebrate this milestone.   I am honored to be a part of this special blog celebration.


The image I used is a digital image from Polkadoodles "Scratch It".  The old lady was first colored with Copics and then fussy cut out. 


I want to share a tip with you.  It works for digital images and stamped images that has a lot of tiny sticking out pieces.  
If you click on the card above, to increase it's size, you will notice she has a lot of stray hairs.  I did not cut those out.  Instead, I cut them off as they are just too hard to cut out!  To get the hairs back on the image, I just printed her out again onto my card front.  I stamped my birthday background right over the top of the uncolored old lady image. 


 No need to worry about masking because I glued the colored old lady right over the top of the uncolored old lady image. Now she has those stray hairs back again!  

Thanks so much for joining us for Danni's 50th birthday celebration blog hop!  If you follow me and came directly here, please be sure to check out the list below of the other blogs in the blog hop. 

Danni, I truly hope you have the best day ever and thank you for inviting me to be a part your birthday blog hop!  

Happy Birthday!
Netta

Here is the blog hop lineup:

Netta - https://funwithink.blogspot.com/ YOU ARE HERE

Monday, September 2, 2019

Confetti Time!

Quick post to share a card I made awhile ago but never got to share.
It's a Stampin Up card perfect for my sister-in-law's birthday!  It was mailed and received finally so I can share it.


I die cut several Happy Birthday words and glued them on top of each other to get a nice height.  It was covered in Crystal Effects and left alone to dry (a very important fact lol).  I love the size of the Happy Birthday Die!  


Perfect birthday card.
Netta