Showing posts with label stenciling. Show all posts

Monday, June 26, 2023

Stenciling Flowers for a Friend

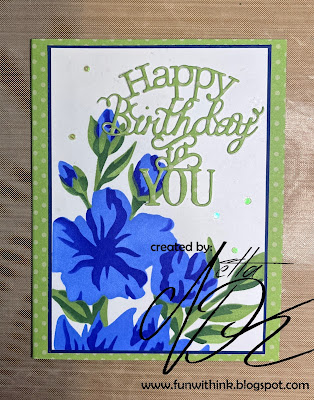
This Altenew stencil is probably one of my top go-to stencils that I use.  I am addicted to flowers. 

 Flowers Dies, Flower Stencils, Flower Stamps.  I have plenty!

I made this card to send to a friend....which we...in the craft world,,,,call it a RAK.

​noun. DEFINITIONS1. 1. random act of kindness: something you do for somebody in order to help them or to cheer them up.

or.........just because! (I added that definition lol)

 
I think it is just so pretty.  
The words were printed on vellum with my computer.  I have learned in the past, heat emboss the printed words or it will never dry or will smudge.  You can't tell but I have a hint of sparkle in the embossing powder that was not done on purpose.  Years ago,  I emptied my black embossing powder into a smaller container that happen to contain a small amount of glitter embossing powder.  The two mixed and voila!  Ever so lightly...sparkling black. 

I used the stencil and softly stenciled in one corner on the inside of the card, using less and less ink to fade out.


I will be popping this into the mail for her tomorrow!


Submitted to Challenge

https://happylittlestampers.blogspot.com/2023/06/hls-june-stencil-challenge.html


Supplies

    Altenew Layered Dahlia Stencil
     Distress Oxide:Mowed Lawn, Twisted Citron, Faded Jeans, Tumbled Glass, Mermaid Lagoon
     Blended Brushes
    Neenah Solar White Cardstock
    Dark Blue Cardstock
    Vellum
    Computer Print
    Black Embossing Powder
    The Paper Studio


Sunday, June 25, 2023

52CCT Distress Ink Blending Snowy Christmas Sunset

 I love this forest and deer stamp and have used it quite a bit. I have had it for years. I love that it can be used for any time of year as it has nothing to do with winter ...unless you add snow!  It would be a perfect masculine card as well.  

 I had an image in mind, on what my card should look like but it took me 3 tries!  My first time I didn't like the colors. It looked like mud as I blended.  Second time I realized I should have stamped the image last as the distress ink made it look like more muted grayish instead of a nice black as I blended.  Three times is the charm they say!

After I was happy with the ink blending for the land, water and sky, I used the sun and ray stencil with the same Squeezed Lemonade and blended it so it went up into the sky.  

After I did the rays I lightly went back over with the pink and blue in the sky again to blend the rays in a little.  On the actual card, the rays are more faint than in the photograph.  I made sure to stamp the image 4 times.  Two times first and then I moved the image over to the left edge to fill in the rest of the land and trees. I stamped 2 more times for the edge.  I wanted that dark crisp black.  Next, came the snow falling and that was white paint splatted with an old toothbrush I keep in my art supplies.  A little trick I learned from back in the day when I learned how to oil paint.  I believe I was around 11 or 12 at the time.  I also used THE BEST EVER white gel pen to make snow...Arteza White Gel Pen.  I have used this type a lot over the years and this brand never fails me!

Can you believe half the year is not even here yet and I almost have all my Christmas cards done!  This is the very first time I am not scrambling in November.  

Where are you at?  Have you even started yet? 

*smile*


 Submitted To Challenge


Supplies

  • Fun Stampers Journey Stay Wild Stamp
  •  Distress Oxide: Faded Jeans, Squeezed Lemonda, Pumice Stone,Stormy Sky, Picked Raspberry
  •  Blended Brushes
  • Neenah Solar White Cardstock
  • Navy Cardstock
  • Christmas Words Company Unknown
  • Precise V5 Rolly Penn Extra Fine
  • Tempera Primary White Paint for snow 
  • American Crafts Pack of 3 Where to Next Stencil for sun rays
  • Arteza White Gel Pen

Tuesday, June 20, 2023

Flying in Just to say Hello

Tomorrow we can all say "Well....Hello Summer!".

Flowers and Butterflies are perfect for saying hello to summer and to a good friend. 


Submitted to Challenge

https://alphabetchallengeblog.blogspot.com/2023/06/f-is-for-flying-anything.html


  Supplies

  • Brutus Monroe Flowering Vine Mixed Media Stencil
  •  Gina K Blue Raspberry and Blue Denium Ink
  •  Ranger Glossy Accents
  •  Memory Box Morning Garden Butterflies
  •  Scrapbook.com Hello Bloom Die
  •  Scrapbook.com Sweet Expressions stamp (inside)
  •  Blended Brushes


Tuesday, June 6, 2023

Stencil Backgrounds

 I had fun over the weekend making a few backgrounds.  I have a lot of stencils and felt it was time to pull them out and play.  I do not have sentiments for them all yet, but they will go into my pile I have for when I need a card.


  Supplies:

White, Black Cardstock
                    Scrapbook.com Rose Bloom Stencil
                    Cathe Holden Layered Vintage Floral 
                    Brutus Monroe Flowering Vine
                    Blended Brushes
                    Distress Oxide: 
                        Candied Apple, Carved Pumpkin, Mustard Seed, Cracked Pistachio, Salty Ocean, Dusty                            Concord, Seedless Preserves, Twisted Citron, Prize Ribbon, Peacock Feathers,                                            Rustic Wilderness, Tumbled Glass,


Monday, September 14, 2020

Stenciling Christmas


I decided to do some stenciling and as I was going through the stencil drawer, I came across some very old stencils from Hampton Art.  
It was a box of 10 fairly large Christmas stencils which they called "Holiday Screens".  
I used Distress Oxide Mermaid lagoon along the top and went into Tumbled Glass.  I kept brushing the Tumbled Glass lighter and lighter until you barely could see the end of the word Christmas.
I sprayed Heidi Swapp Color Shine all over the cardstock to give it a shine like snow falling.  In the picture it looks like droplets of something but trust me...it does have a nice glistening shine all over it.

I wanted to mat the main piece on black to make it stand out more and I also needed to punch a reindeer out.  Instead of wasting another piece of cardstock, I just punched it out of the middle of the mat.  My main piece was going to cover it anyway and the recipient would never know there was a piece missing. 


The words from Stampendous Christmas Wishes were stamped on the black cardstock with Hero Arts Unicorn Pigment ink, hand cut and popped up.  

I need to remember I have this box of Christmas stencils.  They would make some interesting backgrounds.
Have a great day and get some of those Christmas cards done!

Netta

Saturday, August 22, 2020

52 CCT August Technique Challenge

How many have heard of Shadow Stamping?  How many have heard of Shadow Stamping with a stencil?

Here are some videos to help you out if you are never heard of it

I have done Shadow Stamping in the past. You just stamp twice...once with a light color and once with a darker color but the 2nd time is off set just slightly from the 1st.  It gives it a shadow look.  
One of the videos shows how to Shadow Stamp with a stencil...something I have never tried so I did some experimenting.
I found, never use a light cardstock, as I could not tell where I stamped white.  I stamped way off kilter.  I might still use them some way...some how...on a card.

The sample I ended up using on my card was a Tree Stencil on a navy cardstock.  First I inked white with a sponge and then over the top (slightly off from the white), I inked with a dark blue.  You can tell where I inked because blue over the white became a lighter blue.   I wished I had more Christmas stencils to experiment with.

Here is a close up.  It looks like it is a shadow is on the front from a moon at the back of the trees.  I think, if I did this again with the trees, I would stamp at a big distance so it would be more white and less dark.

After the ink dried, I got to thinking...could you emboss with a stencil?  I did a search and found the out others have.  Here is the recipe I used with my Big Shot
Platform
Plate
Rubber Mat
Paper
Stencil
Precision Base Plate

Here is the backside.  It works but next time I would EMboss and not DEboss the image.  Since I already had the front done, I had to place the stencil on top so I could match up the image with the stamped image which caused it to deboss.


Now...go on over to https://52cct.blogspot.com/ and check out the beautiful creations from my fellow Designer teammates.  There will be a place for you to add your card as well for this challenge.
See you over there!  Let's go....

Netta


2 Techniques Used:
Dry Emboss with a Stencil
Shadow Stamping with Stencil

Ingredients:
Memory Box Birch Tree Stencil
Hero Arts Hero Hues Unicorn Ink
Stampin Pad Blueberry Bushel
Navy Cardstock
Foam Mounting Tape
Spellbinders Building Snowman Die
Left over White Glitter cardstock
Winter Wonderland Embossing Powder
Rubberstamps.com Sentiment "Build a Snowman"

Saturday, September 7, 2019

CAS Christmas Boughs


Simon Says Stamp Pine Bough stencil and Nuvo Glimmer Paste Sparkling Emerald Green for the bough.  Tim Holtz Sizzix Thinlit Merry Christmas die and gold sparkle cardstock for sentiment.  Applied Memento Desert Sand and Bamboo Leaves with a sponge for a little along the edge and on the bough.
Simple and done.

Now, how do you get glitter paste off when you forget to drop the stencil in water as soon as your done?
Lesson learned.....*sigh*


Going to add this to the CAS On Friday   CAS means to keep the card "clean and simple".  I have never joined this challenge before and I struggle big time with keeping my cards simple.  This card looks like it could be classified as clean and simple!  

Later..
Netta

Thursday, May 30, 2019

Sparkling Leaf Burst


I think this card is so beautiful, especially with that teal on the bronze mirror cardstock from Stampin Up.  I used an Altenew Leaf Burst Stencil along with 2 colors of Nuvo Glimmer paste.  Glimmer Paste Blue Topaz on the bottom 1/2 of the stencil and on the top 1/2 you can see I used a darker color...Glimmer Paste Sapphire Blue.


See how it sparkles?  That paste glides on so easy and dries so fast.  It dries so fast make sure you clean up the stencil and knife right away.  I keep a small bucket of warm water to drop them in.

This is one of those cards you can keep on hand until you need to add a sentiment to finish it off.   It can be a masculine card, birthday card and in my case.....a thank you card!

*S* 
Whatever you like to do for craft....I hope you have a great day doing it!
Netta