Monday, November 7, 2016

Joy of the Season


Tonight I whipped up this card as I just HAD to try out my new tool...the Big Shot Plus!  My Big Shot died on me yesterday and that was a huge disappointment!  My biggest card making season and no way to use my Christmas dies and folders.  I headed straight to Amazon and was so lucky as it was on sale.  Talk about perfect timing.   Ordered it late yesterday and I received this morning!   The Big Shot plus is the same as the Big Shot but just wider.  An 8 1/2 wide sheet of paper fits in it with room to spare.  I am in heaven.


The dies I used came from Stampin Up Big Shot set called Pretty Pines Thinlits and Spellbinders Radiant Rectangles.  The verse came from Hero Arts Merry Christmas Messages.  The cardstock was leftovers.  

November Stamp Camp Christmas Cards

On Friday, Lisa Reber had one last Stampin Up Stamp Camp until the new year.  It was so much fun seeing everyone!  These are the cards we did.  There was also a goodie box and a bag topper which I did not get done.  


Makes me happy as I have 4 more cards to add to my Christmas stash!

Thank you for stopping by!
Manetta  

Wednesday, October 26, 2016

Serenity Cards


Hello folks
Cooler weather is upon us, even for us in Florida.  
Today I cracked open my Derwent Inktense Water Pencils.  I thought the Christmas Chapel rubber stamp would be perfect to color.  I have seen many stamps colored in one color before and gave it a try.  I think most colors would be pretty.  What you can't see...once again...is the hint of sparkle on the snow that was colored with the signo white pen.  I enjoyed the look so much I did it with a brown pencil.  Both the tag and bow was cut from Stampin Up dies.
The cards were stamped inside with a simple word..Peace.


Thank you for stopping by.  Enjoy the cooler weather!

Sunday, October 16, 2016

Tattered Lace Snowflake

Hope all of you are having a wonderful weekend!  Mine has been great.  Celebrated my 12th Anniversary, the sun is shining and there is a nice breeze blowing.  
I have been busy crafting today and decided to stop a moment to blog.  I wanted to show you a Christmas card I made this morning using a Tattered Lace Snowflake die and Spellbinders Oval Regalia die.   


The cardstock came from a DCWV Latte Matstack.  White is glittered and the grey is textured.  Hard to see both in the photo.  The red glitter is Xmas Red Stickles.  The inside was decorated to match the outside.
 It's was the first time these dies met up with cardstock so I was happy to show these neglected dies some love. 

I am off now to craft some more.  Enjoy your day and thank you for stopping by!

Manetta


Thursday, October 13, 2016

Sympathy Sunset

One of my favorite stamps from Impression Obsession is called Trees and Lake.  I have used it for birthday cards before and this time it is a sympathy card.  The tree stamp was inked with Stampin Up Basic Black.  I used distress inks and sponges to create the sunset.

These two cards were easy but one of them was also the hardest.   One of the cards will go to a very close family friend, Jeff.   Jeff lost one of his sons a couple of years ago and on Friday, he lost his last remaining son to a car crash.  Both sons were very young and both were lost suddenly.  To top it all off, on Saturday his wife had a heart attack and is in the hospital.  I can't imagine the stress and what they are going through right now.  My heart goes out to them both. 

Manetta


Monday, October 10, 2016

Another Winter Bluebird

Another free digital image from Kajsans Scrapbook Blog!  There are several and I think they are so adorable.  

This fold is called Stair Step Fold.  I made a band to hold it closed for mailing.  The back is the size of an A2 card so it fits perfectly into the A2 envelope. The embellishments came from Stampin Up Pretty Pines thinlits and Martha Stewart pine punch.  I discovered recently how nice white flock works for fur so I used it again on the hat.  The image was colored with a mix of Spectrum Noir markers and Twin Touch markers.  Check out the different views below.
Thank you stopping by!
Manetta


Sunday, October 9, 2016

Winter Bluebirds

Hello Everyone!  
It's been a long time since I have been able to print something from my computer.  I never realized how much I use a printer for crafting until I did not have one available.  I had a wireless printer  for a long time when all of a sudden, after updating the software,  we ran into trouble.  If I fixed my computer to start printing from it, it knocked my husband off.  When he fixed his computer to be able to print on it, I got knocked off.  I finally left it alone and stopped fixing mine as my husband uses it to print off billing receipts.  The last time it took him over a day to get his computer printing again.  Ouch!!

He finally decided I needed to get my own wireless in my craft room.  His decision could have come from the fact that I was whining all the time...LOL.  After lots of searching and studying what is available, I decided on a Canon.  I am once again a happy crafter because I can start using some of my diggies collection.

   I found some free and cute Winter/Christmas bird diggies at Kajsans Scrap Blog a long time ago and decided to finally print them out and play with them.  I was experimenting with sparkle pens and Inktense watercolor pencils.  Some of my experiments did not look so great but I finally have a couple I am happy with!


For the snow on top of the hats and branch, I used Tulip Puffy White paint.  The fur on the hat was painted with Wink Of Stella clear and covered with Stampin Up Crystal Effects to give it some dimension. 

The birds have a nice sparkle on them which I was able to show you by holding the card closer to a lamp to take the photo with.


Only 10 more weeks to Christmas.  I still have more cards to make so I better step up my game!!
Where are you at with yours?  Almost done?
Manetta

Sunday, October 2, 2016

Santa Bears


Today I water colored using an acrylic block and distressed ink.  I have never used this technique before where you stamp the distressed ink on the block, spritz it with a little bit of water and paint with a brush.  I really did not know how I would color this image so it was stamped on regular white cardstock.  The plan to use watercolor came after so I had to be careful not to over soak the paper.  

I cleaned up and decided to put my white tulip fabric paint away someplace new last weekend.   I normally use it to do snow or white fur.  I have looked under, in and around everywhere...for the life of me cannot find it!  It never pays to clean up. lol  A disorganized mess works better for me I guess.  I really wanted to make the fur part stand out on the card so I had to come up with another plan.  After digging around I came across some flock I have had for years and rarely use.  I actually like the results!  


What is Christmas without some sparkle right?  I covered the hat and bear with ripped towel paper and sprayed Heidi Swapp White Color Shine to give it a hint of sparkling sheen to the sky.  For the finishing touches after the card dried, I used my all time favorite Signo white pen to put a hint of snow falling in the sky.  

Yesterday was World Card Making day....the day that kick starts making holiday cards for the season.  I do not have anything to show for that day however I did craft.  I was trying to learn a new technique.

I hope you have started making your Holiday cards as it is only 8-9 weeks before everyone starts mailing them!

Thank you for stopping by!
Manetta

Friday, September 30, 2016

Retirement Card-Whatever..

My big brother retired this week so I wanted to send him a Retirement card.  I had no idea what to make so I started searching the internet for retirement...looking for inspiration.   A Retirement clock popped into my search and I knew I could change that into a card easily enough.  I cut the hands out and glued them all down.  The numbers were stamped using a set from a company called See-D's.  My set is about 8 years old.  Not sure if they are still around or not.

My brother received his card today so it was safe to post it on my blog. 


My brothers comment was 
"Thank you Manetta - I am exhausted at the end of the day."
He is hilarious.

Manetta  

Monday, September 26, 2016

Masculine Wildlife Birthday Card

One of my Uncles is turning 70 years old this weekend and for the first time in his life he will have a birthday party that will be a surprise!  (sssshhhhhh don't tell him!  *S*)
 I can't be there so I made him a Wildlife birthday card and mailed it to him.  This is a tri-shutter fold...a little different when you open, so he might need help when he receives it!


The stamps are all from Stampin Up except the sentiment.  That one came from Fiskars Make a Wish Quote Set.  To make the moose stand out a bit more, I covered him in Stampin Up Crystal effects.  Everything was stamped with Versafine Vintage Sepia.   This fold allows the A2 card to fold flat for mailing.


Back home in NH, it is fall so that is the color theme I went with.   I know he will enjoy the card since he use to hunt all the time. 

Happy 70th!
Manetta 


Sunday, September 25, 2016

Christmas Pines

About a week ago I got the Stampin Up Christmas Pines stamp set and Pretty Pines die set.   I have been patiently waiting until I had time to sit and play with them.  Tonight I finally got that chance!

In my Junk Box I found a card that had Gold Vellum already glued down onto a Cranberry Red card.  Also found in my scraps some off white cardstock, piece of Cranberry Red cardstock and a small piece of Gold Vellum.  


The only stamping was the sentiment stamped on the front came from the Christmas Pines set.  Card came together easy.

Another down on my Christmas Cards!
How are you doing on your cards?
*S*
Manetta

I am submitting this into Week 38 Only Christmas Card Challenge. 

Saturday, September 24, 2016

Which Side? Naughty? Nice?

I just love this Elf!  He was so much fun to color!  
The Naughty and Nice document he is holding will have a name printed in once I determine who will get this card.  You can bet, for fun, the name will most likely go on the Naughty side!!


thank you stopping by!
Manetta

I had submitted this into Week 30 Only Christmas Card Challenge. 

Wednesday, September 21, 2016

Christmas Window

Even though I have not shared a great deal, I have been making Christmas Cards all year.  On the off days I do not craft I will start posting some of them, especially since making Christmas Card season is upon many of you.
This is a card I believe I made back in July.  I had many of the pieces left over from 2015 season so decided to use them up.  Here is a post where the extra pieces came from Magical Christmas.  The window scene was recreated but the A2 card itself is different.  


How are you doing on your Christmas Cards?  Have you begun yet?  *S*
Manetta

Sunday, September 18, 2016

Kaleidacolor Leaves

I have these leave stamps and 3 color combos of ink that has not been pulled out in over a year so I decided to play with them.  It was time to make more sympathy anyway. While I was at it, I made additional birthday card.  


The inks I used was Kaleidacolor Denim, Blue Breeze and Autumn Leaves.  I was quite sure they would be dried up by now and was shocked to see they were still nice and juicy!  They are made to slide apart so you can re-ink them without bleeding into the other colors.
The leaves are from a very old set from Close to my Heart called Skeleton Leaves.  It is a nice set of 4 different shapes clear stamps.   Not sure why but I have rarely used it.  The ink worked well on the leaves.  Reminds me of fall the way one leaf can have different colors.  Could be used for masculine cards easily enough.
These are very hard for me to do......one layer but I pulled it off.
Cards are already shipped off or used.  

Thank you for stopping by!  Have a great day!
Manetta

Friday, September 16, 2016

Stampin Up Class-Card 5

I saved the best for last!  This card was my favorite card we made that day.  It is a Halloween shaker card.
To make the circle area that holds the halloween shaker pieces, we used a product I had no idea that was out there!  Normally I would use tiny pieces of pop dots placed very close together around the open area.  We used a pop dot product but they are in long thin strips.  I searched online to find where I could buy them and found some at Amazon.  Unfortunately they are out of stock.  The ones I found come in a package of 132 pieces that are 1/8 inch x 4 3/8 inch long.  Definitely be on the lookout where to get some either online or in stores.  The one important thing to remember when you make a shaker card, is that you glue the acetate piece behind the circle cut out area before you start putting the whole card together.  


I did not buy the tree die but the more I think about it, the more I want it.  I can see it being something easily used even for Christmas cards.

Thank you for checking in today.  Have a great day and hope you get some crafting in!

Manetta


Wednesday, September 14, 2016

Stampin Up Class-Card 4

It is so hard to believe it is already mid-September!  Soon it will be time to send off my Halloween cards to my grandkids.  At the Stampin Up Holiday 2016 Catalog Kick Off last weekend, we also did a couple of Halloween cards.

Here is one of the cards using stamps made for the jar stamp and die sets.  A little creepy.  A little icky.  Totally Halloween.  Perfect for my oldest grandson!


No crafting for me today as I am heading into work, but I hope you at least have a fun crafting day!

Manetta

Tuesday, September 13, 2016

Week 37 & Stampin Up Class-Card 3

Card #3 coming up and into my Christmas card stash.  I am really making a jump on my cards this year.  
Out of the 3 we made, this was my favorite and it was not the easiest. Well... easy yes....long process yes.  
After we used the die to cut out the Santa, we were suppose to save most of the pieces to put back.  Whoops!  I was busy cleaning up my area and mine got trashed.  So I found some white scraps and recut the pieces I needed.  Lesson learned...slow down and concentrate saves you work.

After I had the tiny pieces cut, I had to color them.  It was hard to hang onto them all and not lose them.  Once the Santa was glued down, I glued all the face pieces down as well as the hat.  


Since I did not get to finish this card there, I used a sentiment that I had here at home. It was too long to stamp so I cut the stamp in half so I could stamp "dear santa" inside the small area.  Inside the card it says..."define good".    Sunglasses were a nice touch since I live in the Sunshine State Of FL.

Adorable card for sure!
Thanks for stopping by..
Manetta

Monday, September 12, 2016

Week 36 & Stampin Up Class-Card #2

Here is card number 2 from the Stampin Up Class.  Another Christmas Card to add to my stash and it is a mouse!  I love mice Christmas cards so I WILL be buying this set!  They are so adorable! 


Again....the nice sparkling glitter will not show up...*shrugs*....oh well!  *S* 

Also submitting this card to Week 36 Only Christmas Card Challenge.

Enjoy!
Manetta


Sunday, September 11, 2016

Week 35 & Stampin Up Class-Card 1

Today I went to a Stampin Up Holiday 2016 Catalog Kick Off and we made 5 cards today.  


Sharing with you one of the Christmas Cards we made.  The gingerbread house was actually from one of their Christmas paper.  We just cut it out.  Real cute.  I wish the glitter would show when I take photos....a real challenge of mine!  Someday I will figure out how to take a better photo.


I am also submitting this into Week 35 Only Christmas Card Challenge.  

Thank you for stopping by...
Manetta


Friday, September 2, 2016

From Junk to Birthday

I have a box that I call my Junk Box.  It has a bunch of trial and error works of mine that didn't make it onto a card.   I just can't quite throw the mistake away so it goes into the box.  
Every now and then I will dig in that box and something will stand out to me.  Parts of this card came from that box.  


The white circle was thrown in the box because one side of it did not cut out correctly so I positioned it so that part was off the edge of the card.  


The background was an experiment gone wrong with watercoloring on a piece of cardstock.  The sentiment was cut crooked so I cut it down to make a tag.  The butterflies were left over from another project.
So...........I was able to make 3 pieces from that junk box and transform them into a beautiful Birthday Card.  

What do you do with your works of art gone wrong?  Do you throw them away?  You might want to start your own junk box. You never know!

Have a great crafty day!
Manetta


Thursday, September 1, 2016

Krwwwazy Birthday Baker


I just love this digital image from Bloobel Stamps!  I love weird so this fits right in with me.  
I apologize for not having the list of colors as I put them away before I could record it.  I do know other than the face, the colors came from Touch Markers.  The skin colors came from Copic.  

I used Stamping Up pop up for the birthday cake.  


Inside it says "Why is a birthday cake the only food you can blow on and spit on and everyone rushes to get a piece?"

Have a super day and thank you for stopping by!
Manetta

Wednesday, August 31, 2016

One Little Baby


Here is a quick little baby card needed....yellow because my husband couldn't remember if the baby born to his co-worker was a boy or girl!

This is actually a folder and I just added the middle piece.  I covered the packages along the bottom with yellow stickles.  

Simple and easy!

Have a craft day!
Manetta


Tuesday, August 30, 2016

Cooling Down with a Christmas Card

It has been hot here where I live!  Working on Christmas cards does not really cool me down but the idea of snow is refreshing.

Here is my latest Christmas card I made.  This one is simple, just mask one side of the white cardstock.  After you are done stamping and sponging, remove the mask and finish the card.


Thank you for stopping by and have a great day!

Thursday, August 25, 2016

My Christmas Dream Place

 When I was younger, I had the opportunity to go into a home of an elderly couples home.  I fell in love with it and have often dreamed of having a home like that some day.  It was located in an area away from any other homes..surrounded by evergreen trees.  The home had big windows that looked out at a beautiful scene.  Just nature to look at which was heaven to me, especially seeing the evergreen boughs collecting the falling snow and heavy.  I often imagined myself sitting  in front of the window curled up with a blanket and cup of cocoa...and there walking into my view is a deer!


This card took me three tries to get the folds just right so when you closed it everything was perfect.   I had piles of scraps all around me by the time I got done but I love it.  Here are some more photos of how it looks when opened.


This set of stamps was a set I got free last year in a magazine.  To make the snow, I used Tulip Puffy Dimensional Fabric Paint.  

Can you believe that we have only 3 months before the Christmas cards start hitting the mail?  I hope your like me...and working on them!

Hugs,
Netta


Wednesday, August 24, 2016

Hint of Christmas Sparkle


Loved making this card.  Picture just does not do it justice.  The images were stamped with Memento London Fog. I colored the Inkadinkado Christmas Poinsettia with Copic colors R20, R29, RV21 and Rv04.  The leaves were colored with Touch Markers #59 and #58.  The berry branch was colored first with Copic R29 and then with a Gelly Roll Red Star color (sparkling red).  I used a Gelly Roll Silver pen and outlined all of the images to give it the shimmer sparkle around them.

I may need to make a couple of these cards.  Going to be hard to give it away at Christmas Time!

hugs,
Netta

Monday, August 8, 2016

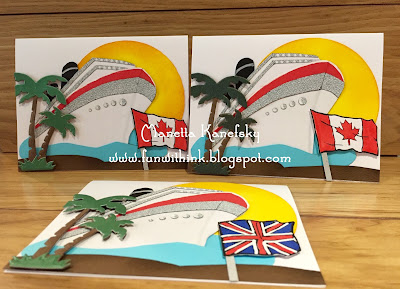
Cruising


A co-worker is heading off on a cruise today and wanted to bring 3 cards with her.  She use to work for a cruise line and the crew that worked together at that time decided to have a reunion.  Reunion is being held on a cruise with the same cruise line they use to all work for.  She wanted 3 cards for the 3 closest people to her....2 Canadians and 1 British card.

Inside the cards:  "Let's travel again".  

To get a larger photo, click on the pictures.


I found a photo of a cruise ship that I used as my guide to created the ships by cutting and glueing pieces of grey, red and white paper.   I must admit the cruise ships took me a bit to get angles and pieces to fit to where I was happy.   The palm trees came from Spellbinders "Paradise Palms".  Flags were black and white images I printed, colored and cut out.

Thank you for stopping by!
Netta


Wednesday, July 27, 2016

Triple Time with a Twist

Triple time stamping sounds like you are stamping 3 x's but it is all about the paper layers.  You could do 2, 3 or 4 layers if you want.  Make it your own.  The most common is the 3 layers.  The twist comes into to play when the layers are glued down at an angle.  Not the normal "even on all sides" like I did HERE for a Hanukah card.


The measurements for the white stamping layers are as follows:
4"
3"
2" 

The measurements for the purple layers are as follows:
8 1/2" x 5 1/2" (card base, folded in 1/2)
3 2/8" matt layer
2 2/8" matt layer

  I laid all 3 white layers down on the table...placing them on top of each other to get a visual of what it would look like when the card was done.  Without moving the pieces...I carefully picked up each corner and place a removable glue dot.  That will keep all the pieces from moving once I start stamping.  

Now start stamping on the white cardstocks that are all layered.  Make sure you hit 2 or 3 of the layers when you stamp.  Do not worry about the missing sections when you stamp near the edge.  Those areas will be covered with the purple cardstock when you have it all together.

Once you are all done stamping, remove each piece and remove the glue dots.  Now mat each piece with the coordinating purple cardstock.

Now start gluing down the pieces on top of each other matching up the way you stamped it....like putting a puzzle together.  The stamped images will line up...the sections that did not stamp (at the edges of the cardstock) will now be hidden by the purple mats.

Give this technique a try if you haven't yet!  It is fun and you can stamp anything you want on the top.  Stamp dogs if you are giving a card to a dog lover.  Stamp big words all over it.  Stamp balloons if it is a birthday card.  The many ways to change up this card is huge and fun.

Love to see what you do with the Triple Time with a Twist Technique!

Happy Crafting!
Manetta
Tuesday, July 26, 2016

Beachy Birthdays

When you live in Florida....it makes sense to make beach birthday cards right?
 So I made a couple!  The one with the window already went to a co-worker and the other is hanging around waiting for a home.
The background of each card came from a Stampendous Stamp Set called "Seaside Chair".  I was so excited to buy this set and I know it will get a lot of uses out of it.  


The Flamingo bird is a die set from Top Dog Dies.  The die set also has a party hat, puddle of water and another wing that I did not use.  Very cute set.  I used a white pen to make the waves in the water in both cards.


The window is a Tim Holtz die and I actually have a piece of acetate behind like a window pane.  I made the background so that it would fit in the window.  The shells are just some buttons I had leftover from years ago.

Thank you for stopping by once again!

Manetta


Saturday, June 4, 2016

Sincere Condolences

A little embossing.  A little stamping.  A little die cutting.
You get a simple sympathy card.