Monday, December 30, 2013

Very busy Christmas Time!


I have been absent but not idle!  Not only was I busy trying to get ready for Christmas and finish my Christmas cards but I also had to get ready for a two week vacation!  

Now that is behind me and I am now on vacation, I thought I would just take a few minutes to post some of the cards I had been working on!


Netta


Friday, December 6, 2013

The Only Ones to Enjoy the Snowstorms...Snowmen

Ever happen to look at your pile of cards you made and discover you had some kind of theme going without knowing it?  I seem to be enjoying making Snowmen cards this year. because I have many made!  
Here is one of them...made from an embossing folder, sparkle, tulip puffy paint for snow, sponge, ink and markers!!


"Christmas Hugs"
Netta

Sunday, November 24, 2013

Happy ThanksChanukah!!

Wow!  I like this!!  Hanukkah and Thanksgiving all in one card!  
How great is that!  

This is the first time since 1888 that the two holidays combined.  I am guessing I won't be seeing this happen again so I took advantage of it.   Instead of making 10 cards....I only had to make 5 cards!!


I found the digital online.  Printed them out with my new printer onto my favorite white cardstock-Georgia Pacific.  I have not been able to figure out how to print in fast mode for my digital images so I wasn't sure if the ink would smudge when I colored it with my markers right away.  No smudging and no extra drying time thank goodness!!

The gold paper was embossed with Sizzix folder, trimmed with a Stamp Up edger and glued down to a navy blue mat that was edged with Fiskars punch.  After taping down my Turkey (off the mat so I trimmed part of the circle off), I wrapped a gold thin cord around three times.  To make sure everything would stick down well, I used my Scor-tape to hold it together with.  Yellow stickles and a couple of gold sticker bling finished off the card. 
 The cards are A2 size.

All 5 have been signed and ready to go in the mail tomorrow.  

To those who celebrate both holidays.....Happy ThanksChanukah!!!

Netta

Touch marker colors: 94, 101, 103, 35,R13,  77, 89, RP6 and 183
Specturum Noir marker colors: OR1 and GB5
Digital I found online: Coloring Pages For All Ages

Wednesday, November 20, 2013

Snowmen are Happy!


You can more about this card and how I made it at 

*s*
Netta

Sunday, November 17, 2013

Believe

This card reminds me of my childhood.  Enough said....


*happy smile*


Tim Holtz Alterations Sizzix Reindeer Games, glossy cardstock, Ann Griffin Winter Wonderland Cricut, 

Tuesday, November 12, 2013

Serene Winter Day

You know in your head what you want to create for a card but do not have all the pieces?  Well...I have been wanting a window die to create a card like this for a long time.  I finally broke down and ordered one.  These cards were so much fun putting together that I ended up making 3. 


A perfect serene winter day!

Supply List:
Spellbinders Shapeabilities D-Lite Window Die, Navy Blue and White Cardstock, Cricut Anna Griffin Winter Wonderland cartridge, EK Success Alpine Trail Edger Punch, Star Dust Stickles, Versafine Majestic Blue, sponge

Monday, November 11, 2013

Winter Birds


I am so in love with this new stamp I got this year!!  It is called Winter Birds From Stampendous.  

I stamped the image on white cardstock and used a T-Ruler to mark a line across the top but stopping before the birds.  I cut straight across until I got to the birds.  I cut around them and then continued on to cut straight the rest of way.  I used my Touch Markers to color the blue birds and branch.  The snow  on the branches and the pom-pom on the hats are actually Tulip Puffy Paint.  I layered it on and used my heat gun to heat it up to make it look like puffy snow.  The blue around the white cardstock is from sponge and blue ink. A little bit of blue sparkle was an added touch on the birds.

My husband is going through my cards and claiming which ones he wants already.  I have news for him.  This year I get to pick first!  *S*

Have a great crafty day!
Netta

Wednesday, November 6, 2013

2 Poinsettias: Metal Gold and Backing

Backing Poinsettia?  
Your saying what does that mean?
Read on....
When I cleaned my craft room and discovered new old toys to play with...one of those was sheets of self stick metal sheets in the most beautiful bright reds, greens, golds and blue.  
I used one of the golds and ran it through the Cuttlebug with the SU embossing folder "Petals-a-Plenty".  I cut it in 1/2.

Stuck 1/2 down on red cardstock that was folded into an A2  card.  Cut scrap striped paper and placed it onto the other 1/2.

My poinsettia is Spellbinders Shapeabilities Layered Poinsettia Die.  Because it is self stick, it was easy to layer each piece down.  In the middle I found a gold self stick bling that was left over from a project 2 years ago.  The best thing was pressing right down in the middle on the bling made the leaves pop up and look more 3D.

Winter Blossoms came from an old set of Close to my Heart Stamp set "Winter Blossoms".  I found where someone was selling it on Etsy but I don't think it is a set sold anymore.  


Now comes the explanation of the Backing Poinsettias.
As I was cleaning up...I discovered when I pealed the backing off the metal sheets...I naturally had another Poinsettia already created!!!  One side was very waxy, shiny and pretty.  The other side was like paper.  All I needed to do was to glue it down but making sure I had the waxy side up!  

When creating....even waste can be made into something beautiful!!  I wished that I had thought of using the backing off the gold pieces.  By then they had been thrown away and was not useable.  


I was concerned about making enough cards for this year but I think I am actually going to make it1

Hugs
Netta

Tuesday, November 5, 2013

Golden Christmas Flower


I was playing around with two new craft items I got recently.

One is the Anna Griffin Cricut Winter Wonderland Cartridge.  I cut out the swirl leaves that you see here.  I used gold stickles to sparkle up the leaves.
The second is the Spellbinders Shapeabilities Layered Poinsetta Die which is the Poinsetta.  I only used two layers on this card.
I sponged gold ink along the edge.  This card is actually very pretty when you see it in person.  Sometimes photos just do not do it justice!
I have not stamped a Sentiment on it yet.  I am holding off until last minute as I am not sure what I want to put there yet.

Thanks for stopping by!
Netta


Sunday, November 3, 2013

Let It Snow

On to the next Holiday!!

Halloween has passed and November is here.  Wow...time has flown by this year.

Today I worked on a challenge...to use a circle and a square on our creation.  I made a Christmas card.


This stamp is an Inkadinkado Snowy Cabin Wood-mounted Rubber Stamp.  I first inked it with Versamark and then on top of the Versamark I inked it with Stampin Up White Craft ink.   stamped it on some dark blue cardstock, sprinkled clear embossing powder and used my heat gun to melt the embossing powder.  
I used my Nestability round die to cut the image out but before I removed it, I stuck it down on white cardstock.  Using the die as my guide, I trimmed the white cardstock down.  A thin layer of Star Dust stickles decorated along the edge of the blue and I set that off to dry.  
Using the same blue I cut out a Sizzix tag and stamped Let it Snow and also layered the stickles along the edge and set that off to dry. 
The background paper was piece left over from a Christmas Stack of paper.  The Martha Stewart snowflakes were cut from white scraps.
Once the Stickles was dried, I taped everything together.  

One more card done!!
on to the next....

*S*
Netta

Thursday, October 31, 2013

Happy Halloween Hat Day!

After weeks of tearing apart my craft room...I can finally say I am crafting again!!!  
The other day I made 8 Christmas cards but before I start posting on Christmas I want to show you my Halloween project.

At work we cannot get dressed up however they are allowing us to have "Hat Day".  There is a contest going on who has the best hat.  I hope I win!


I bought a plain Witch hat from a Halloween store and bought all my supplies in the decoration area in Michaels.

The hat is a small purple hat made to look tilted on a headband.

I used a hot glue gun to glue all my pieces onto the hat.  The pieces were all decorations made to go into a Halloween display.  I just started tearing apart, peeling and glueing onto the hat.

Around the brim I glued a Halloween vine.  I had black twill and I sort of made a design on the right side.
On the left side I glued a vine going up the side to the top of the hat.  On the vine I attached black and purple sparkled flowers.  A few purple sparkled pumpkins, balls and bats glued here and there finished it off.

I had a difficult time getting the lighting right to take a good picutre.    My husband said it was sooooo me!! LOL

Wish me luck!!!

Happy Halloween everyone!!!

Netta

Saturday, September 21, 2013

Neighborhood of Friends

I was so thrilled when asked to join in posting on a new blog "We Be Craftin'".  The blog was created for 7 crafting friends coming together to share the love of crafting and creative processes.  Because there are 7 unique individuals with different taste when it comes to crafting, you will never know what will be posted next! There will be a mix of jewelry making, photography, handmade cards, scrapbooking, sketches and etc. 

For my first post on "We Be Craftin'", I posted #5 Christmas card I created


Head on over to "We Be Craftin'" to check out my first post and sign up so you don't miss any other post in the future!!

Thank you and have a super crafty day!
Netta

Wednesday, September 11, 2013

Birthday Flutter By Hop Winners!


I am a day late getting this up.  My apology to the winner and to those who were waiting!  I am having issues posting on my blog. 


CONGRATS!!!
The winner is  

VICKI 

Please contact me with your mailing address at scrappingnetta@gmail.com so I can get your paper pack right out to you!

Here is what Vicki said...


Blogger *Vicki* said...
WOW! Such a beautiful design!! I'm sure Danni will just love it!! :) Thanks for sharing! HUGs
September 4, 2013 at 9:59 AM
         
Thank you everyone who joined in on the blog hop for Danni!
Netta

Wednesday, September 4, 2013

Birthday Flutter By Hop

Today is the first of TWO
Flutter By Wednesday blog hops to celebrate 
Danni's (the owner/creator of FBW) birthday!
Today we have the friends of Danni fluttering along to
share some amazing creations to inspire you!!
You should have fluttered here from Jackie's blog "Paper Moments"! if not--start at the beginning of the hop at the 
Be sure to leave comments at each stop that you flutter to 
as there are some surprises hidden! 
You have until September 9th, 2013
 at midnight CST to flutter along!

We hope that you’ll also join in this week’s challenge at 
anything goes with a butterfly or fairy! 
A little butterfly told us that if the challenge gets
over 100 entries there will be a prize!!

Here’s my Butterfly project for today...


My butterfly was made with Vellum and and stickles.  Perfect for Danni as I hear through the grapevine...she LOVES butterflies and glitter...*S*  
What Danni doesn't know...but will now....this card went into the mail to her for her birthday!

HAPPY HAPPY BIRTHDAY DANNI!!!!

Be sure to help make this the best birthday EVER for Danni by leaving a birthday messages by midnight September 9th and some lucky person will win a DCWV Latte Cardstock Matstack! (Winner will be announced on my blog September 10th so be sure to check back here.)

Now you should hop on to Sandi's blog "Slightly Off Center" ! 
Don’t forget to flutter to the FBW
Blog tomorrow for another hop full of more fluttery inspiration!!

Have a wonderful crafty day!
Netta

Sunday, August 25, 2013

Monochromatic Birthday Wishes


This card is a monochromatic card which basically means using all the lights and darks of one color.  This card is using shades of purple.
The front of this card is actually larger than an A2 card, which opens in the back.  The border sticks out beyond where you open it.  The frosting has Stampin Up Crystal Effects on top with a hint of Stampin Up glitter to just give it a lil sparkle.  I love how the green just pops against that purple.

Now off to go create some more!

Netta

Friday, August 23, 2013

To the Happy Couple

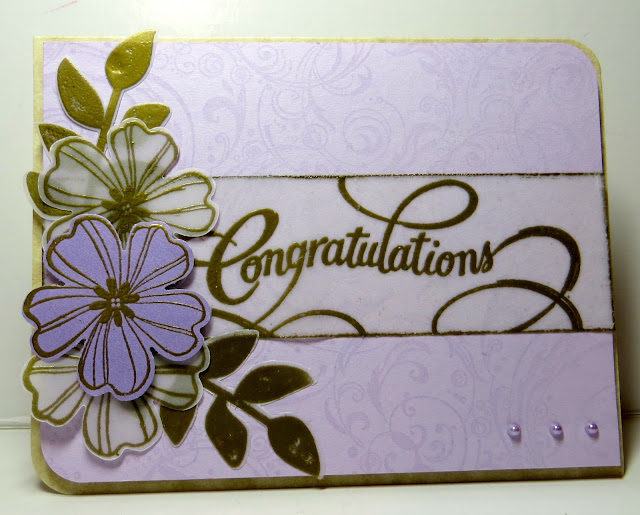
First I created a background by stamping with versamark on a light purple piece of cardstock.  Next I cut the cardstock down to fit the size I wanted for my A2 card and rounded out two opposite corner ends.  Congratulation, flowers and leaves were all embossed with gold on Stampin Up Vellum.  It is the easiest vellum I have found to emboss on.  Two of the flowers and the background was popped up with pop dots.  Three light purple pearls in the corner was the perfect touch.  


Congratulations to the newly married couple! 

Netta

Thursday, August 22, 2013

Christmas Is Coming

A couple of weeks ago, I finally got my first set of Christmas Cards done for the year!!  3 down....147 to go!!  LOL

This stamp set is called "Christmas Is Coming" from Crafter's Companion.  I won it last year and never inked it.  The pickup and mailbox is all one stamp which barely fits an A2 card.  The words "Christmas is Coming" also comes with it along with "Greetings".  This set gives you everything you need to stamp in and outside the card.  I colored it with my Touch Markers and the background was sponged with my Memento Inks.  A little Stickles glitter for snow finished off the snow.  

It's a beginning......now to keep going!
*S*
Netta


Wednesday, August 21, 2013

Magical Marquee Birthday

I found a wonderful video on how to make a Marvelous Magical Marquee card at

It is not a fast card to make.  I think it took me a whole afternoon as I could not get it to open correctly.  Once I got the hang of it, I was able to make two birthday cards.  

I have two versions on how to keep it closed.  
If you have nothing to do one afternoon, give this a try.  The recipient of your card will certainly feel special!

Have a great crafty day!!
Netta


Monday, August 19, 2013

May the Wind Always Be At Your Back...

My brother loves to ride and does so at every moment.  I knew I needed to make him a birthday card about riding.  I found a free digital image online and it was perfect although I had no idea what the rest of the card would be! 

It took me a couple of quick image prints to get the correct size for the A2 size card I wanted to make.  I got a photo of him by his bike for all the colors and colored the image with my touch markers.  After I was done, I cut the image out.  The image had hair but I hand cut out a bandana  & glued it down on the head like he wears it.  I also put his initials on the pocket of the jacket. With my favorite white pen, I created the beard he has in the picture.  With pop dots stuck to the back of the image and I set it off to the side.  
Not sure why I could not get a good picture but the brown on the bike is actual silver and the grayish is actually black!


I grabbed a couple of stamps, sponges, ink and scrap paper to create the background.  
If you look at the photos, you can see where I even made reflection of the weeds in the water.  To make the reflection, I stamped with the blue on the back of a piece of plastic.  Because the plastic is so slippery, I pressed the image down very carefully onto the water but opposite of the weeds. 

The cardstock was folded to form an A2 Easel Card.  I matted the background on black and glued it down onto the Easel card.  The biker was stuck down on the background.  


 It looked funny with a biker standing in front of water, so I sponged black along the bottom to look like dirt.  To continue the land out from the water edge, I made the rest look like a highway and a great scenery for a biker to stop and rest!

 I had some yellow tape that I layered on black paper to make a road.  The words were printed out with my Cricut and sponged with ink to look the background.


I had one issue....Somehow, even with measuring, I stamped the Happy Birthday too low, but I still think it came out well!  


I know he will enjoy receiving the card just as much I enjoyed making it for him.  

*Happy Birthday Big Brother*

*S*
Netta


Sunday, August 18, 2013

Mojo Monday #306

I have decided I need to sit down before the next month and write down every card I need to make along with the date needed by.  September is an easy month so I will fill up the extra time making Sympathy cards for the local nursing home I donate to.  Out of 5 cards needed, I made 3 this weekend.  First up....

Anniversary Card for my brother and sister-in-law.


I did faux stitching on the outside mat.  The Circle mats were cut from Spellbinders.  I saved the butterflies that punched out to use on the card.  The butterflies were cut from Martha Stewart punch (largest) and Stampin Up (smaller vellum).  All of the highlighting and faux stitching were done with THE BEST white pen ever....uni-ball Signo pigment ink pen.    

The 2 hearts were cut out from Sizzix die cut.  I punched a lot of little flowers with a punch I bought in a $1 bucket at Michael's Craft Store.  I glued them all over the heart and put a drop of blue Stickles in the center.  I also added a couple of stickle covered butterflies on top.  The flowered heart was popped up with pop dots slightly off set from the heart with faux stitching.  


I am submitting this to Mojo Monday!

thank you for stopping by...=)
Netta

Sunday, July 28, 2013

Flowers for Your Birthday

Long ago someone stamped an image for me and mailed it to me.  I finally colored the image and made a card with it.  I wish I had this stamp besides the fact that I am addicted to flowers but also because I can see lots of uses for it! 

After coloring the images, I used sponge to sponge some ink around the flowers

*S*
Netta

Internet is Back...AGAIN..

I think that I am back for real!
I thought I was...it lasted just a very short time.

Apparently the internet company (who shall be nameless *S*) kept telling us it was our modem.  We spent $130 for a new one and internet lasted just a few short hours.  We went down completely and this time it affected many people.  Apparently they had a piece of equipment going down and we were feeling the affects of it.  It took them a couple of days to get it fixed.  Since back online yesterday, we have not had any problems...*knocking hard on wood* ...lol

Netta

Thursday, July 25, 2013

Internet Is back!! Fathers Day Card

Ahhhhhaaaa...it feels good to be back!  Not having internet for so long almost killed me but I was able to keep my sanity by reading emails and responding by cellphone. lol
Cable company came out finally after much frustration only to discover it was our modem.  New one was bought last night and I am back online!!

I had forgotten to show you what I made my Father-in-law for fathers day this year!  This man lives for "fixing things".  He is like the tool time guy on TV.  He has a can opener he "tweaked".  I refuse to be in the same room when he pulls that out to use.  It has more power..yes..I do give him that!!!  Too much power!  When you put a can on it...step back!!!  That thing zings so fast around the can and the only way to shut it off is to yank the cord out of the  wall.  
My cards to him normally have something to do with fixing things.

This was his card.  Inspiration came from the net and I wish I remember where I got the idea from.  (If your out there...let me know!)  
This card could be used for any occasion for a man.  


Have a super day!!  See you soon
Netta

Tuesday, July 9, 2013

Toy Story Birthday Party 2013

I just recently returned from a 2 wk vacation to NH and MA to visit my family.  2 weeks prior to leaving, I made decorations for my granddaughter (3) and grandson's (1) combined Toy Story themed birthday party.  I wanted to share what I made....all done with the Cricut.  The largest images are about 11-12" high.  The banner was created to hang along their big fence but due to a major rain storm, we had to find a new place for the long banner to hang. Buzz was about 12" x 12" and was made to look like he was flying in the sky and pulling the banner.

Enjoy!

Netta