Showing posts with label nestabilites. Show all posts

Monday, February 16, 2015

SBR-Us Challenge 61-Valentine Heart

Hello Hello!!  
Merry Christmas
Happy New Year
Happy Valentines Day
Did I miss anything while I was away?

Yes I am still here!  Yes I have still been making cards.  Just time got by me so I apologize!

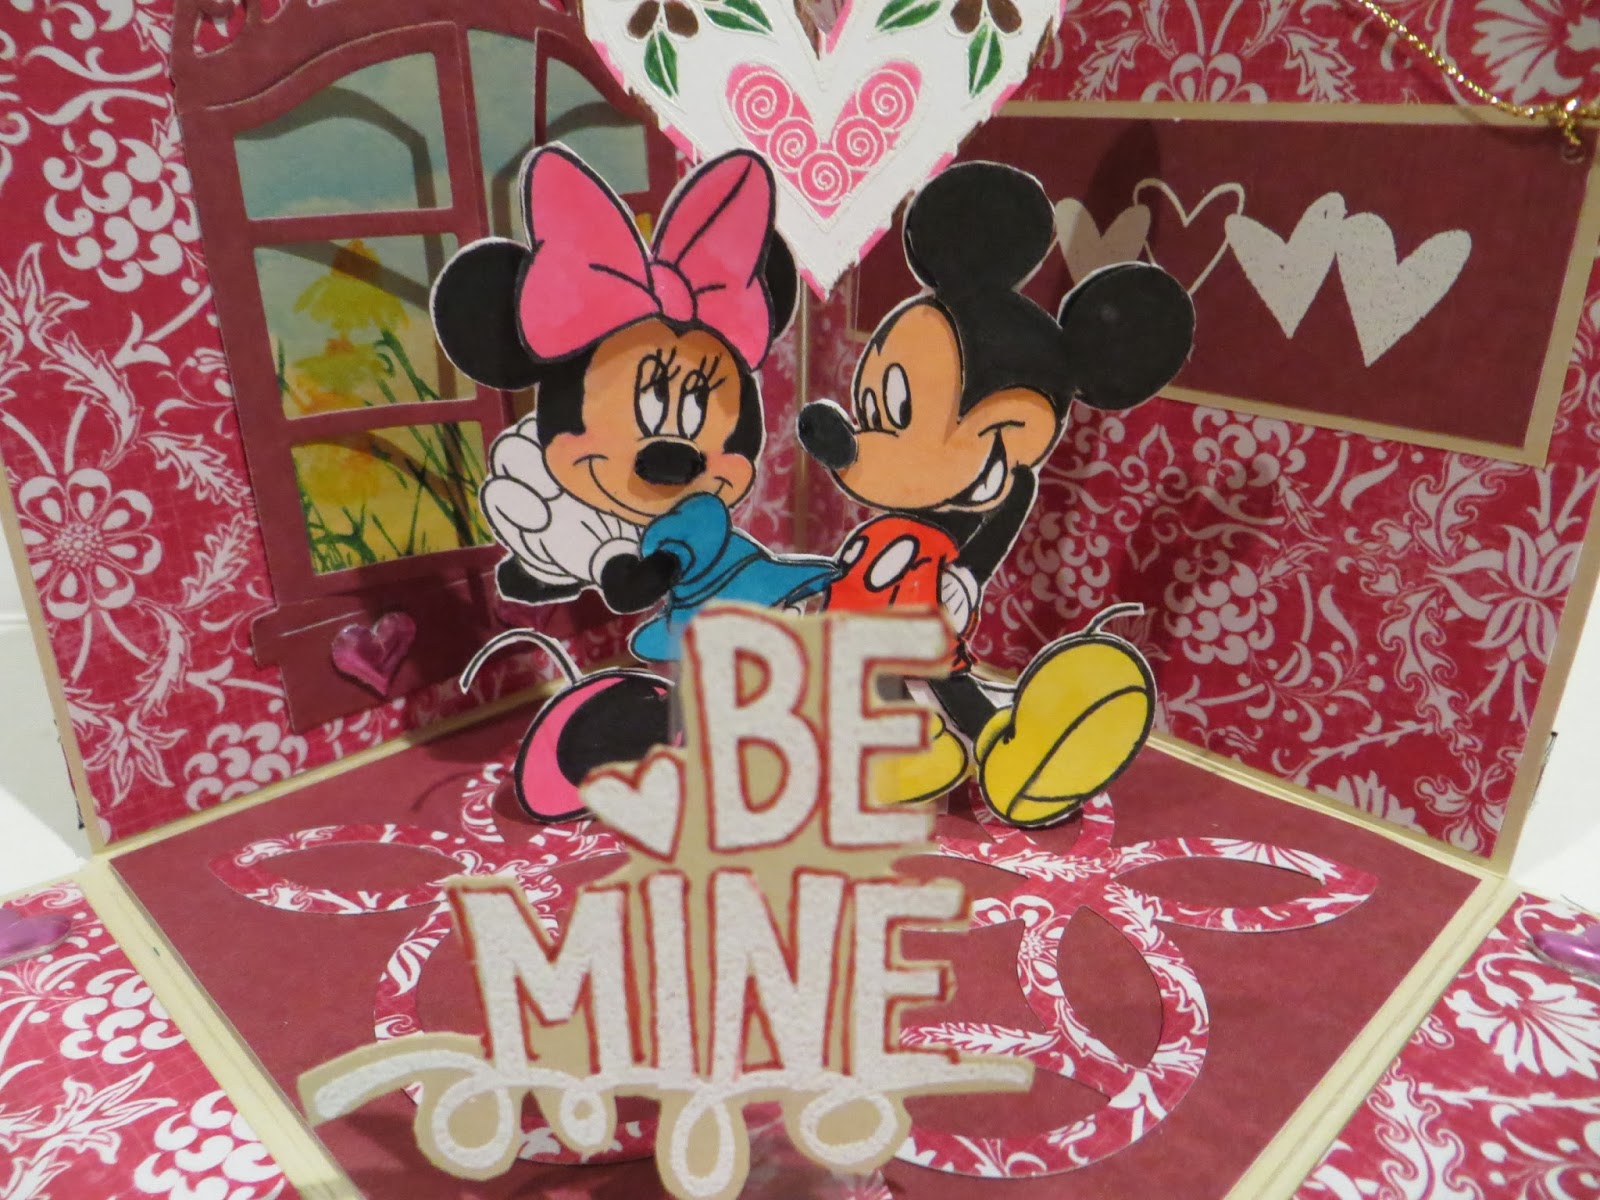
I am taking a much needed break from busting out 130 Christmas Cards which I used all but 4 cards.  Not much of a head way for 2015 Season but I will get there soon enough.  Lately I have been practising on how to color images for my cards.   The classes that I am taking are from Kit and Clowder.  If you ever wanted to take a class to color images (all types of alcohol markers, pencils and watercoloring), ...now is the time!  Not only is the time is right due to the ratio of Aussie to USA but the classes themselves are the best!  Lots of support, feedback, videos and complete books you can print out.  Right now I am taking the skin and hair class.  I colored an image for my husband's Valentine first and then I did the class.  
WHAT A DIFFERENCE!!!  The classes really work...lol

My first attempt looks like she hit the tanning booth and got a yellowish tan..UGH..


Here is my card after the first two lessons in the skin and hair class.  Many more to go as you can tell.  At least I have a "before" and will have an "after" as soon as I finish the coloring hair lesson.  That class is next in the lessons.  My husband loved the card and saw beyond the fact that the hair needed serious work.   That is what you call love *S*.


I bought this image from Slinky Tart and is called "From The Heart".  She has some serious cute images!  Will be buying more in the future from Slinky Tart.

Thank you for stopping by!
Netta

Wednesday, October 1, 2014

Christmas Card Swap

Did you know Christmas was only 12 weeks away?  wow...I swear the older I get...the faster time goes!!  

I joined a Christmas swap recently and had to make a Christmas card with layers size 5 x 5.  I do not normally use 5 x 5 cards but the cards that returned back was so adorable I will definitely have to use the cards!!!  I will post the cards I received tomorrow.  

The card I chose to do was mostly done with a punch, ink and cricut.  The Poinsettia is from Anna Griffin Winter Wonderland. 


It was easy to sit and put these together once I got all the pieces cut.   I tend to add a lot of glitter on cards lately...something my sister Faye got me hooked on.  Not a lot of glitter on this one.   I like the final results.  Layered but easy to mail still.


Next post I will share all the cards I received in return!

Netta

Thursday, May 29, 2014

Facebook Quote Inspiration

I came across a quote that was posted by many on Facebook and it was my inspiration to do this card. 


 Many liked the quote...I looked beyond the quote and took in the nighttime blues and the stars.  I thought..that would make a beautiful card!


I only used 2 stamps on it.  One was a Stampin Up tree stamp from the set called "Serene Silhouettes".  The other stamp "With Deepest Sympathy" came from Impression Obsession set called "Sympathy Sentiments".

To make the card, I brayered Stampin Up Pacific Point ink all over the entire white cardstock.  I stamped the tree 2 times on the card.  I used Black StazOn ink to stamp the tree facing up because I wanted a nice dark black color.  I used Versafine Onyx Black ink to stamp the tree facing down for the reflection.  The reason I used a different ink for the reflection is because I did not want that crisp black color.  I wanted to ink it and stamp off some of the color on a scrap piece of paper first and I could not do that with the StazOn ink.  

Next I tore a piece of towel paper with small bumps to mask off where I wanted the grassy knolls and inked up a sponge with StazOn.  After I was got the area I wanted sponged with black ink, I flipped over the ripped paper towel so I could ink the reflection of the grassy knolls in the water.

With another sponge, I sponged on Stampin Up Night of Navy ink to get the darker sky along the top and along the very bottom of the water.  

Finished the main part of the card with stamping the sentiment with Stampin Up Whisper White ink and using Gelly Roll Clear ink pen to make the twinkling stars.  Don't forgot to add the stars in the water as well for their reflection as well!

I made 2 more with same technique. One I forgot to take a picture before it was mailed off. =( 
 The sentiment on this card is from the same Impression Obsession set called "Sympathy Sentiments".


Hope this inspired you to try brayering and sponging on your creation!  Just be prepared to get some ink on your fingers!

Netta

Wednesday, May 7, 2014

2014 Mother-n-Others Invite

This weekend will be the 12th big event at a local nursing home called Mothers-N-Others.  It is celebration held in the Alzheimer section for basically all the Caregivers and Families who take care of loved ones with Alzheimer.  For the past 9 years I have been making and donating the 30 invitations they needed.  It is difficult for me to sit and make 30 invitations (really more like an A2 card) the same way however  the nursing home does get great feed back on how the family members look forward to the invites.  One elderly gentleman has been saving them each year.  That is what makes it all worth while.  That is why we do what we do...make cards and give them away.  It is that smile that we get in return.


Thank you for stopping by..
Netta

(Inside)
“Your strength and patience reach forever
As we make this difficult journey together.
Please preserve the memories once shared
And protect my dignity when I lapse to care.
For each day I will need you a little more
To hold my hand and to reassure
As my thoughts fade and my memories dim
Know that my heart still loves you deep within.”

-Author Unknown

Thursday, February 13, 2014

Birthday Book


I have a difficult time making a stash of birthday cards and picking one out  for my own family and friends birthdays.  Each card is made with that person in mind.

There is a woman who helps out in our office a couple of days a week and her birthday is Friday which is Valentines Day.  I thought about her and two ideas came to mind.  One fact was the obvious...Hearts and red.  The second idea was the fact that she loves loves loves to read.  I went with my second idea.  I was so happy I had the Book Label 7 Nestabilty.

I had no idea how I was going to make the card so I turned to Pinterest.  I found some beautiful cards using the Label 7 and making them into an Easel Card.  That helped me to get going however I wanted to go one step better.  I made the bottom look like a leather bound book.  I have made faux leather before but I came across a video where they used a mix of glycerin and water in a spray bottle.  Glycerin was suppose to help the cardstock soak up the water better and get into the fibers...making it much softer and pliable. I gave it a try.  Works great! 

Here is the bottom of the card.


 I should have taking pictures of the process but didn't.  I will make another faux leather and create a tutorial next week. 

Her birthday is tomorrow but I won't see her so I am giving her the card today.  I know she will love it!

Enjoy & thank you for stopping by!

Netta


Sunday, February 9, 2014

Mickey & Minnie Box Valentine

I have been wanting to make a Exploding Box Card for a long time.  I finally bit the bullet and tried it out.  Mine was one layer only.  I wanted it look like part of a living room with Mickey standing there proposing his love to Minnie.  

The box is completely 4" square.  You can see the directions I used was a video at http://www.youtube.com/watch?v=E9KWY63kbzI.

I did not want two sides to fall and realized it after I got the box all cut and folded.  The easy fix was to put a ribbon decoration around the bottom and around the top edges of the box.  I split the ribbon on either side of the two I wanted to drop.

Minnie Mouse and Mickey Stamp is a set I have had for years.  I tried to search it online but did not have any luck.  On the stamp it states "Disney All night Media #54J02.

Here are the pictures.  Enjoy & Happy Valentines!

Netta

Here is the box closed with the lid on it.

Close-up of the top of the cover.  The flower and leaves are Nestabilites (

The cover pulls up and two sides drop down.

Side view

Close-up of all the details on Minnie and Mickey which were done with decoupage method.  I absolutely love using Decoupage 3D glue from http://www.crafterscompanion.com/.  The best on the market!

 Nestability die-cut window shows a beautiful day with lots of flowers in bloom. I used torn towel paper, sponge and Memento ink to create the sky.  The Inkadinkado Meadow Stamp set flowers were inked with Memento Markers.  


 The heart was white embossed, colored and cut out from the middle of an Outline stamp.  If you look close, you can see a piece of acetate holding the heart up.  It is free floating and moves as the box top is removed. 


Sunday, November 24, 2013

Happy ThanksChanukah!!

Wow!  I like this!!  Hanukkah and Thanksgiving all in one card!  
How great is that!  

This is the first time since 1888 that the two holidays combined.  I am guessing I won't be seeing this happen again so I took advantage of it.   Instead of making 10 cards....I only had to make 5 cards!!


I found the digital online.  Printed them out with my new printer onto my favorite white cardstock-Georgia Pacific.  I have not been able to figure out how to print in fast mode for my digital images so I wasn't sure if the ink would smudge when I colored it with my markers right away.  No smudging and no extra drying time thank goodness!!

The gold paper was embossed with Sizzix folder, trimmed with a Stamp Up edger and glued down to a navy blue mat that was edged with Fiskars punch.  After taping down my Turkey (off the mat so I trimmed part of the circle off), I wrapped a gold thin cord around three times.  To make sure everything would stick down well, I used my Scor-tape to hold it together with.  Yellow stickles and a couple of gold sticker bling finished off the card. 
 The cards are A2 size.

All 5 have been signed and ready to go in the mail tomorrow.  

To those who celebrate both holidays.....Happy ThanksChanukah!!!

Netta

Touch marker colors: 94, 101, 103, 35,R13,  77, 89, RP6 and 183
Specturum Noir marker colors: OR1 and GB5
Digital I found online: Coloring Pages For All Ages

Tuesday, November 12, 2013

Serene Winter Day

You know in your head what you want to create for a card but do not have all the pieces?  Well...I have been wanting a window die to create a card like this for a long time.  I finally broke down and ordered one.  These cards were so much fun putting together that I ended up making 3. 


A perfect serene winter day!

Supply List:
Spellbinders Shapeabilities D-Lite Window Die, Navy Blue and White Cardstock, Cricut Anna Griffin Winter Wonderland cartridge, EK Success Alpine Trail Edger Punch, Star Dust Stickles, Versafine Majestic Blue, sponge

Saturday, September 21, 2013

Neighborhood of Friends

I was so thrilled when asked to join in posting on a new blog "We Be Craftin'".  The blog was created for 7 crafting friends coming together to share the love of crafting and creative processes.  Because there are 7 unique individuals with different taste when it comes to crafting, you will never know what will be posted next! There will be a mix of jewelry making, photography, handmade cards, scrapbooking, sketches and etc. 

For my first post on "We Be Craftin'", I posted #5 Christmas card I created


Head on over to "We Be Craftin'" to check out my first post and sign up so you don't miss any other post in the future!!

Thank you and have a super crafty day!
Netta

Sunday, August 18, 2013

Mojo Monday #306

I have decided I need to sit down before the next month and write down every card I need to make along with the date needed by.  September is an easy month so I will fill up the extra time making Sympathy cards for the local nursing home I donate to.  Out of 5 cards needed, I made 3 this weekend.  First up....

Anniversary Card for my brother and sister-in-law.


I did faux stitching on the outside mat.  The Circle mats were cut from Spellbinders.  I saved the butterflies that punched out to use on the card.  The butterflies were cut from Martha Stewart punch (largest) and Stampin Up (smaller vellum).  All of the highlighting and faux stitching were done with THE BEST white pen ever....uni-ball Signo pigment ink pen.    

The 2 hearts were cut out from Sizzix die cut.  I punched a lot of little flowers with a punch I bought in a $1 bucket at Michael's Craft Store.  I glued them all over the heart and put a drop of blue Stickles in the center.  I also added a couple of stickle covered butterflies on top.  The flowered heart was popped up with pop dots slightly off set from the heart with faux stitching.  


I am submitting this to Mojo Monday!

thank you for stopping by...=)
Netta

Tuesday, May 7, 2013

So Sorry Sunsets

 *SIGH*  Some cards are difficult to make.  I love to create...don't get me wrong!  It is the reason for the card that gets to me.  

These cards are to go to the local nursing home that I donate too.   Seems more sympathy cards are needed to send to the family members when they lose someone at the nursing home.  =(
At least my cards them feel a little bit better as it is combined with a personal note.


I used a circle Nestabilty taped down onto my cardstock so that I could sponge the ink in a perfect circle.  
(shhhhhh.....don't say anything but I always use the painters blue tape which I stole from my husbands workbench LOL.)  
 I love it as it holds very well yet is not too sticky to make it hard to remove after.  Also, I can use it several times before I have to throw it away.  
After I was done inking, I removed the circle, stamped the image and the "So Sorry" with black Momento ink.  Each card was basically done the same way but different..if that makes sense lol.
I hope you take time to look around.  You never know!  You might find something interesting!  
thank you
Netta

Sunday, April 21, 2013

Mothers & Others 2013

Well the cards are finally done!  I did 31 one of them!!  
They were due by the end of April and I got them all done earlier this week.  I am impressed with myself as I got them done 2 wks before the due date!  
I went through several cards before the right card was chosen.  


My inspiration came from Pinterest at http://pinterest.com/pin/232357661996268901/
Which is really pinned from the home of Elly's Card Corner

Before putting the cards together, I had to cut, emboss and ink all the pieces so it was all done in piecework.  This is the only time where I do piecework as I am not the type of person who will make many cards that look the same.

I used the following to create my card
EK Butterfly Layering Punch
EK Border Sunburst Punch 
Martha Stewart 5 Leaf Punch
Stampin' Up Doily Triple Layer Punch
Stampin' Up Blossom Punch
Nestabilities (put them away before getting the names)
Cuttlebug Dot Embossing Folder

After each piece was punched/cut out, I used a sponge and inked the edge of every piece with Jim Holtz Distress Ink Wild honey.  The Hero Arts "Your Invited" stamp was also stamped with the same ink.  My fingers were pretty "yellow" looking by the time I got done...lol

Since this is an Alzheimer special event on Mothers Day....I found a poem on the internet and placed it inside.

Do not ask me to remember
don't try to make me understand.
Let me rest and know you're with me
Kiss my cheek and hold my hand.
I'm confused beyond your concept
I am sad and sick and lost.
All I know is that I need you
to be with me at all cost.
Do not lose your patience with me
Don't scold or curse or cry
I can't help the way I'm acting
Can't be different though I try.
Just remember that I need you,
That the best of me is gone.
Please don't fail to stand beside;
love me 'til my life is done.

*Owen Darnell*

The event is a celebration for all the Mom's and Caregivers at a local nursing home.

thank you for stopping by!
Netta

Saturday, January 19, 2013

Bright Birthday!


I like this card because it has such nice bright colors!  Perfect for a Birthday card.  It was easy to do and a great way to use up scraps.    The Birthday stamp came from Fiskars  Birthday Cheer set.  The candle stamp was from Spellbinders Shapeabilities which included all the stamps as well.  It fit perfectly over the "I".  I used pop-ups to pop it up higher than the Birthday word.  

I love making the birthday cards...something my box of cards was sadly lacking!

*hugs*
Netta

Thursday, January 17, 2013

Birthday Glitter


I came across a couple of dies that I had not used before so I put them to work...along with some ink and glitter!  What good is a birthday card without all that sparkling glitter!

*hugs*
Netta

Thursday, January 26, 2012

Hello Friend


A little Liquid Leaf Gold painted on cardstock, Black Opal embossing powder, nestabilities and cardstock and you have a Hello Card for a Friend to let them know you are thinking of them!!

*smiling*
Manetta

Wednesday, December 8, 2010

Christmas Cat in Santa Hat


Ahhhh Thanksgiving is done and the Christmas Holiday is here!!! Christmas is my favorite holiday. I have the inside of the house done and the tree is up with lights on. Just need to finish decorating it.
How are you all doing with your Christmas Cards? I think I am ok...might have a few here and there. My total count is at 102 cards made this year!
This card was easy but just took a bit of time between cutting and letting the inside dry. I made it for a woman who watching animals for many people while they are away...including me...I have 3 dogs.
I found a scrap of red paper that worked well and had some nice sparkle to it...what is a Christmas card without some sparkle, glitter and shine!
Stamped Cat in Santa Hat rubber with Mometo Tuxedo Black
Nestabilty cut the window, the red edge and the window (clear transparency)
For the white of the hat I used something like Scribbles (no label on the bottle).

Happy Crafting!
Manetta

Tuesday, September 28, 2010

Lights all a Tangled


This mouse ...from Lighten Up Mouse Set....is busy untangling the lights from the box and hopes to have it done in time to decorate the trees for Christmas! Stamped first and then masked so the row of Christmas trees would be behind him...each bulb on the light strand glistens colors from a drop of stickles....makes for a pretty Christmas Card.
 Thank you for stopping by!
Manetta

Sunday, April 19, 2009

Blue Wedding

Today was a day for just relaxing in my craft room. I wanted to do something different with this wedding dress stamp and since I love blue...that is the color I ran with! First I stamped the dress with black and colored the roses and part of the dress with cerulean blue. The bodice area and hem was colored with a small paint brush and ultra marine shimmerz. The leaves are hard to see but I colored them with apple green. Every line is outlined with light periwinkle blue. I cut the dress out and used my cuttlebug to emboss it. I used plain kids navy glitter glue with a small brush to paint the blue flowers since I do not have any navy stickles (that will definitely go on my shopping list). While that dried, I used my Nestability and Cuttlebug to cut out and emboss the background at the same time (my new favorite technique!!) for the dress. I wanted a wild kind of background so I chose paper called Vintered Vagabond from Zsiage.com. Behind that I used my Cuttlebug and Dotted A2 folder. After the dress dried, I used pop ups to lift the dress up off the background. Supplies *Markers: apple green, cerulean blue and light periwinkle *Zsiage Vintered Vagabond paper *Cuttlebug *Shimmerz Ultra Marine *Nestability Classic Oval *Cuttlebug A2 Textile Texture and Swiss Dot Folders *Dress stamp from IO Life of Happiness Set *Pearl Blings from Michael's

Saturday, March 28, 2009

Birthday for The Boss

When there is a birthday at work, we start our work day by celebrating the birthday with cards and snacks. I have been making my own cards for about 2 years now. This is a card I made my boss last month. It took me 3 hours to make this card because I just could not get it to look right! I used my Cuttlebug and Nestability to cut out the window and to make the window edging. I stamped the cattail weeds, cut them out and glued them down. For the cattail ends I used a slot punch and glued them down on the weeds. Dragonfly was stamped and embossed on vellum. I have popdots under the wings to keep them up off the card. I used sponge to color the sunset, stampd the weeds and used the slot punch again to make the cattails. Supplies *Martha Stewart Border Punch * Cuttlebug *Nestability *DragonFly stamps unknown *Hot Off The Press Word & Scroll stamp *Cardstock: Unknown Following From Stampin Up *Slot Punch *Inspired By Nature Stamp *Classic Ink: Pumpkin Pie, Really Rust, Yoyo Yellow

Saturday, February 21, 2009

It's Official!

I am now a blogger!! I have been wanting to make a blog for quite some time but just never sat down to make one until this morning. Be patient with me as I learn how to use this new way of sharing my talent with you! I will start off by showing you a card I made recently. The Magnolia image was RAK'd to me by someone who has a great talent in coloring and shading (thank you Danni for the image and the inspiration). I had never colored a Magnolia image and I am very pleased with the results! The idea was not mine and was card lifted from Heart Prints. (You need to check out her website..OH MY...awesome cards!!!). I left the tag she is holding blank to stamp something on it like Happy Birthday or Thinking Of You but I am having a hard time with the idea I might be popping her into an envelope to be mailed... You ever have a card you just do not want to part with? SUPPLIES: *Tilda with Tag-Magnolia Rubberstamp *SU paper *Colored with prisma pencils *Microsoft Word program to print the words in a circle *Nesties with my cuttlebug *Martha Stewart border punch *Flower and ribbon