Tuesday, December 27, 2011

On To Thank You Cards


Most of the holidays are over and now it is time to send the thank you cards. I made a card special for my Dog Sitter Michelle. All year she is available last minute to watch my dogs for me if I need to be away for any length of time. I don’t know what I would do without her!
Since her life is always involved around animals (she works for a veterinarian), my cards to her always involves a dog or cat. This is the thank you card I made for her. I will slip some money into it and drop it off tomorrow. I love stamping the images with VersaFine ink. It covers very well and dries so fast. I have used mine constantly for the past year and it is still as good as new!


I hope everyone had a wonderful holiday! I know I did. I almost hate the idea of putting away all the beautiful Christmas lights next weekend. I enjoyed the tree and decorations so much.


Happy Crafting!

Manetta
Thursday, December 22, 2011

Easy Magnetic Bookmark


Need a quick last minute gift for a teacher? Here is an easy craft for a child and a great way to use up an 2011 magnetic calendar.
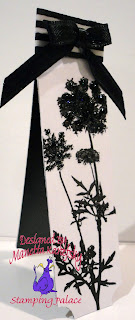
Teachers are surrounded by books so a perfect gift is a bookmark! This craft project took 5 minutes! I had extra 2011 magnetic calendars I will not be using so I cut one down to the size I wanted. Folded white cardstock, glued two pieces of the magnetic calendar on the inside, stamped with Momento Black Ink, put a little bit of black glitter on the flowers, a ribbon on top and I was done! That simple.
When you glue the magnetic pieces to the inside of the cardstock…make sure you have positive and negative facing each other. If you put negative and negative or positive to positive, it will not work. The bookmark slips over the top of the page and the two magnets connect, holding the bookmark in place.


My children have grown up but crafts like this are fun to do with the grandchildren!
Happy Crafting!
Manetta

Sunday, December 11, 2011

Christmas Tags


Cards are done, now on to the “extra” stuff like gift bag toppers, boxes, bags and toppers. Here are a couple of tags I made this week. I found six old manilla tags that I bought at Walmart’s two years ago. They were 5 inches long so I trimmed them down to about 3 1/2 inches. I stamped some white snowflakes, Merry Christmas in gold and used sponge to sponge on color. I got 2 done and 4 more just need the gold Merry Christmas stamped on them. Almost time to wrap my gifts and add these tags on top with a bow!
That’s two tags down and 4 more to go!
Now I heading back to finish my other 4 tags….*S*

Manetta

Wednesday, December 7, 2011

Tealights Christmas Gift


Ever wish you had that one little gift to give to someone to say thank you? You can make several of these in one night and have them ready to hand out!
This cute little box I made holds 4 tealight candles that I decorated with a tissue stamped image. I am thinking about making one for everyone I work with…just a little something to give them at Christmas. They are quick to make, the box only requires one sheet of 8 1/2 x 11 cardstock and one piece of white scrap paper.


I should have posted this sooner tonight but I was looking all over for my camera. I misplaced it and after searching, I gave up. Sat down at my computer and there it was…sitting on my keyboard. My husband has since gone to bed…but I will be sure to ask him how that camera just happened to show up on my keyboard! lol

Happy Crafting!
Manetta


Thursday, November 10, 2011

Cabin in the Woods

Wow.. with four shoulder surgeries this year and therapy..I hadn't realized so much time has gone by since I last posted here! 
But I am on the road to recovery and just started crafting again a couple of days ago.  Ahhhh to feel the scissors and rubber stamps in my hands again....

My favorite Christmas stamps are two that have a cabin on them.  I used one to make a card last night and I wish I could remember where I bought the stamp.

All I did was highlight the snow with blue marker and color the cabin brown.  The cardstock came from the DCWV "The Winter Wonder Stack".  After it was all matted and glued down, I used Stickles to highlight lightly over the snow and on one big snowflake on the background cardstock.


Yup...feels good to be back!
Manetta


Sunday, July 24, 2011

Crayon Resist-Sprinkle of Color

Crunch time is on! I am down to 8 weekends left before my next surgery so that means I have to step it up and get my Christmas Cards done! Yesterday I got 12 images ready to put on a card. This Poinsettia card is one I took my time with. I used the Crayon Resist technique. I tried this technique a few years ago but never used it again. I love how it came out.


Crayon Resist Technique is relatively simple to master and you can get beautiful finished images to use on your creations.  The only issue you might have is using a white crayon on white paper.  It is difficult to see where you have colored so I used a very strong light right over my work area and it made it easy to see.  Here are the step by step directions.

1.  I stamped my Poinsettia image all over white cardstock with stazon black ink.  Stazon is best as it is a permanent ink and will not smudge when you sponge the colored ink.  Many feel it is best to use a glossy cardstock but I used Georgia-Pacific white cardstock I bought from Walmart and it worked great for me.

2.  I used a white crayon and colored on my image where I wanted to highlight.  Because the crayon is waxy, no ink will stay where you color with the white crayon.

3.  I sponged and rubbed in color on the Poinsettia with the following colors of versafine ink  smokey gray, majestic blue and deep lagoon.


4.  Mounted my image on teal paper and attached to an A2 card.  My image was slightly larger than what I needed so I trimmed it and used the extra on the inside of the card. 


I love the colors!  Why don't you give it a try!
*smile* 


Netta

Friday, July 15, 2011

We Are All Here!


This card was a slow process.  I had to stamp, color and cut out each character.  Each character is attached to a separate acetate on one end and the other end is attached to the card.   I added snow two different ways on the card.  Next time you go to any store like Walmart, Target, Michael’s etc…buy the Tulip Puffy Dimensional Fabric Paint in White/Blanc.  You can just squirt it where ever you want.  I used it under the Mistletoe Mouse by just squirting it on the card.  It dries pretty quick if you do not put it on too thick.  There is another way you can use it for snow.
On this card, I used it on the gingerbread house and on the stocking, but if you look at the two, you will notice a difference in the texture.


On the stocking I squirted it on and let it dry.  On the gingerbread house, I squirted it on but I also heated it up with my heat gun.  It gives you the puffy snow look!
Here are some more views of the card.


I used almost the entire Christmas House Mouse Clear Stamp Set on this card.  It was time consuming but fun especially as the characters all bounce around as you open the card!
Now to figure out who will get this creation at Christmas time.  I think someone in my house has already claimed where it shall go…*S*
How many cards have you made so far?


Tuesday, July 12, 2011

Party with the Bears

I made a birthday card for my granddaughter who turned One year old. I used googly eyes and gave each bear a fuzzy nose!

Happy Birthday Gracie!


Monday, July 4, 2011

Christmas in July Has Begun

Christmas in July cardmaking has begun! I am going to try..by the end of July...to do one for each day in July. That will be a big help towards my 100+ cards I need to make.

Here are some I have done already! Hope they inspire you to get going on your cards as well.

Netta 
*updated*
Nominated 7/10/11


Monday, June 27, 2011

Bow So Easy


How many times have you tried to tie a bow using the rabbit ears method? Do you know what I am talking about? Grabbing two loops and tying them in a knot. I don’t know about you, but my bows never come out right. They never lay flat and they are always lopsided!
Using the simple plastic tool called the Bow-Easy helps you make a bow with less stress. The bows range from 2 3/4 inches all the way down to a teeny size 3/4 inch and guess what? They are perfect every time and the options are endless..single loops, double loops, triple loops and more!
Here is a card with a bow made using the Bow-Easy tool. It makes one little detail such a huge difference on the card! Bow making has never been easier!

Manetta


Wednesday, June 15, 2011

Soooo Quiet....

I had a total left shoulder replacement so my crafting has been on hold for now. Until I get back into crafting....here are some more Relay For Life Cards I created.
Enjoy...


Netta

Wednesday, May 18, 2011

Back Aches & Pregnant

8 of us at work chipped in and bought a co-worker baby gifts (she is having twins). Of course, I offered to make a card! She is having a lot of back aches lately. This digital image and words are perfect for her. I created this card like a very large matchbook card. Inside is a large chocolate bar. The size of the card is 8" x 6. The teal pages inside was added to give place for the 8 to sign. I covered the entire Pregant lady with liquid glass.
Thanks for stopping by!
Netta


Friday, April 22, 2011

Relay For Life Cards

On April 15-16 (18 hrs total) my co-workers and I set up a booth to raise money for Relay for Life. Our team also had someone on the track walking at all times. There were three of us that stayed overnight to continue the walking until we had relief in the morning. This year I tracked how many miles I walked....all total...15 miles. I did well this year...only one small blister!
The theme was Movies this year. Your team is given a white PVC pipe and told to create "something" within the theme and it must remain on the track for the entire 18 hours. This year I was given a photo and told to create something from it.
Here is the photo...

And here is what I created out of cardstock...
Our Team is called Circle Of Neighbors. I made the same scene on both sides of the baton. This year our baton held up all night even with the humidity at 100%!
For the next couple of days I will post some of the Relay For Life cards that I made to sell at the booth to help raise money.

thank you for stopping...
don't forget to check back tomorrow for more photos!
Manetta

Sunday, April 10, 2011

Butterflies for Erin

My step-daughter was here visiting one day and trying out some of my craft items. She noticed on the table I had a couple colors cut from the SU Lattice /Trellis die. She laid them down and off set one color from the other and was happy with the results. I had stamped a background and she spritzed it Pssst! Sheer Shimmer Spritz Frost until it was covered in a nice glittery sheen. The next day I used her idea and the background to make her a card. The butterflies are from the Martha Stewarts punch which seems to be getting a lot of use lately!

Erin loved the card!
hugs,
Manetta

More Sympathy...coming up...


Two more for my husband! They were actually backgrounds I made and didn't like. But like all mistakes....I throw them into a container knowing some day I might find a use for them.
Typically I end up liking them!
Thank you for stopping by
Manetta

Monday, February 28, 2011

FEB MCE

The February MCE (monthly card exchange) was different this time. Instead of theme announcement, each participant received a few stamped images to make our card using the Black Magic technique. All images were white stamped on black card stock. I used the gate fold and glued a 3 layer butterfly to hold it closed. I like this technique. Very easy. Very pretty.
Black magic directions can be found at Splitcoaststampers.com


Here is what it says inside the card:


"When you are sad, think of
the butterfly on the morning dew
it will spend its day
fluttering by to watch over you"


Here is the card I received in return! We both picked the same image to use AND we both thought to use butterflies! She used the white to highlight certain areas, where I used the dots with a little highlighting. It looks like we both used blue but actually hers is purple....all the photos I took showed it as blue.
Thanks Jessica!! I love my card!


Thank you for stopping by!
Manetta