Showing posts with label Animals. Show all posts

Saturday, July 15, 2023

Christmas Pets

 I was so excited to be invited as a guest designer this week over at 52 CCT.  Its a Theme challenge this week and the theme is Pets!

What to choose from?  I have dogs in many poses.  I have cats.  I have lambs.  I have so many to choose from!  I ended up with this stamp set "Santa Paws" from Art Impressions.  I have used many stamps in this set but today I am working with the group of singing dogs.

 I stamped the image first and masked it so I could do the sky which is Distress Oxides Prize Ribbon, Dusty Concord and Tumbled Glass.  Those colors are my go-to when I make a night sky.  The stars are splattered Dr Ph Martins Pen White Ink.  it comes with a dropper.  I just dipped a brush into it and splattered the ink. It works the best for me for stars.  Next I colored with my Prismacolor Premier colored pencils.  I love that sentiment that was stamped on vellum and clear embossed with Altenew Crystal Clear embossing powder.  I picked the sentiment up from Rubberstamps.com called Christmas Cheer.

I hope you join us over at the 52 Christmas Card Throwdown.  Just click the link and it will take you over to the Theme Challenge-Pets.  We all would love to see what you make too!


Thursday, July 13, 2023

Highland Birthday

 When I saw this Highland Cow image at Kit and Clowder, I knew right away the birthday I was going to color it up for.  

The card I made is called a bridge card and the bridge part is the fence in front of the cow.  

I printed out the background on a full piece of light weight white cardstock and cut the pieces to fit and glue over each section. 

The bridge part was a fence image printed, flipped over as an opposite and printed again.  I fussy cut it  and glued the largest fence post to the right side and the left large fence post, leaving the center loose.  I pressed it flat to see where I needed to cut and match up the middle to attach at the perfect length. I was lucky that the both sides and the length I needed ended up being perfectly lined up where the two fence post met in the middle!

The Highland cow was large and I wanted it to be the focus of the card and the barn in the background.  The cow is glued to a crossbar to show distance between the fence and barn.

 The highland cow just looks like she is ready to go to a birthday party with her birthday hat of flowers on her head!

Verse Front:  It's never too late to be what you want to be....

Verse Back:  Unless you want to be younger, than your screwed =)

Definitely not your normal A2 card and it BARELY fits in the 6"x9"manila envelope.   The base was a 11"x 5 3/4" and the two sides were folded at 1 1/2" each. 


She got popped into the mail and on her way to wish a dear friend Happy Birthday!

Submitted to Challenge

Creative Creases #61 


Netta

Supplies

  •     Kit and Clowder Highland Cow Image from Feb/Mar 2023 Bonus Class
  •     Neenah Solar White Cardstock
  •     Water Color Waves Farm Fences Clipart
  •     Sentiment printed from Computer
  •     Silhouette Cut Birthday
  •    Altenew Green Heart Gens 


Tuesday, July 11, 2023

Vinnie

 A dear 4 legged family member of my niece's passed away suddenly the other day so I needed to make her a special card.  I wanted her to know our hearts went out to her.  Pets are an important part of our lives and not everyone recognizes the grief someone goes through when they lose a pet but our family does.  We are all animal lovers and we feel their pain.


 Every time someone I know losing their best 4 legged friend, I water color an image for them.   I used Arteza Metallic Water Color Paints and a water brush to color up the image...special for her. 

Inside:  ....so missed.

Thursday, June 8, 2023

52CCT Sketch Challenge- Stack of Christmas Birds

 I saw this stamp and loved it.  Had to have it, however it was difficult for me to color with copic markers.  I think next time I will try pencils. 


 All in all, I think it was perfect for this sketch!


Submitted to Challenge

https://52cct.blogspot.com/2023/06/june-sketch-challenge.html

****Update****


  Supplies:

White Cardstock
                    Stack of Winter Birds Company Unknown
                    Copic Markers
                    Twine from Stash
                    Happy Holiday Sticker
                    DCWC  The Green Stack Recycled Paper Pack
                    Nuvo Glitter Drop
                    Artez White Gel Pen


Thursday, January 2, 2020

Thank You Deer

My husband has been very involved in fund raiser since about 2003 for a disease called PSP.  PSP is a short name for "Progressive Supranuclear Palsy" which is an uncommon brain disorder that affects movement, control of walking, balance, speech, swallowing, vision and thinking.  
He needed a thank you card because someone gave a donation of $5,0000 toward their big walk that is coming up in a couple of months.  With a donation that size, he wanted to recognize now with a thank you and not wait until after the walk.  It just has the word "everything" stamped inside and with a lot of blank space so he could write a special message.

I love the Simon Says Frame dies.  Both the image and the navy background was cut using it. The card is just one flat layer.  I just replaced parts like a puzzle onto the white cardstock base and threw away the extra pieces.  I love how the die cuts that thin layer out of the image so I could replace it with the navy on the outside.  Just brings it all together.


Thank you for stopping by.

Netta

Copic Colors #E19, E31, E13, B000, B28, B05
Simon Says Frames Dies
Stampin Up In the Meadow stamps
White and Navy Cardstock
Air Brushing
Post it Note
Stamping Up Circle Punch 1 1/4

Saturday, September 21, 2019

52 CCT September Theme Challenge

Good morning!  
This weeks challenge at 52 Christmas Card Throwdown is Bears.  The fold for this card is a Bridge fold and will fit in an A2 envelope.

I love this image from Whipper Snapper Designs "Hello Friend".  It's a nice size for an A2 card as it is 4 1/2 x 2 1/2".  I used Copics to color the image and then cut it out.  I extended where the two were standing on the snow so that it would fit across the card for the bridge.


To make the Bridge card base:  An uncut piece of cardstock 8 1/2 x 11 will make two bridge fold cards.  Just cut the card in 1/2 at the 4 1/4 mark.  It will give you two pieces of 4 1/4  x 11.  Now trim the 11 inch down to 8" (4 1/4" x 8") and save the extra 3" you cut off as you can use that for the bridge if you want. Waste not want not!  For my base, I had a piece of two sided cardstock left over from the paper pack Snowflake Ridge Collection.   I cut it down to 4 1/4 x 8".   The left over piece fit perfectly on the back of the card to write my sentiment on.


Now score the 4 1/4" x 8" on each end at the 1 1/4" mark.  Slide it in and score at the 2 1/2" mark.  Now, flip it over and do the same thing to the other side of the base.  You want to fold the ends like the image above.  Use a bone folder to get a nice crisp fold.  When you flatten everything down with folds in, you will see the folds do not quite touch in the middle.  That is ok.  It will not matter because the card is not like a gatefold card.  

The bridge across the front can be done anyway you want.  You can use the 3" x 4 1/4" piece you have left over or you can make the bridge fit all the way across the front like I did.  If you want it to fit across like I did, then the piece I used was 5 1/2" in length.  If you use the 3" x 4 1/4", you will have to determine where it needs to be glued down.  Stand the card up like the photo above and set your bridge up against it to measure where to glue it.  


To fold the card so it fits into an envelope, press it down to the right or left.  One side of the folds will lay flat unfolded and the other side will be folded in on the folds.  
I hope you understood all that.  Just leave me a message if you need help.  I would be happy to help you!

Now it's your turn!  We challenge you to create a Christmas Bear Card and please share with the design team at 52 Christmas Card Throwdown.

https://52cct.blogspot.com/

thank you
Netta

Copics Colors:
E #'s 04, 07, 18, 31, 35,40.  Also used #T2, #B02 and #C7.
Whipper Snapper Image:
Hello Friend #BBY900
Impression Obsession Die:
#079-U Birch Trees
Newton's Nook Designs Image:
Sentiment from "Winter Memories" 
Stampin Up Image (not shown):
Sentiment on the back from Beautiful Baubles Set
Sizzix Snowflake Shapeabilities Die

Sunday, April 14, 2019

WaterColor Dog Sympathy


Most dogs and humans have long and close connections.  Many of us need them and they need us.  If you are like me...losing your 4-legged friend might be one of your worst days.  

I know two who lost their long time friends within the same week so making two dog sympathy cards was double hard.
I used Arteza water color brushes to color up the two different images to match the breeds.  They have already received them in the mail so it was ok to share now.

In time...may the memories of their precious friend soften the sadness of their hearts.
 
Westie

Schnauzer

Arteza Colors:
Bright Blue
Artic Blue
True Blue
Parma Gray
Bumblebee Yellow
Wisteria Purple
 
Big hugs to you both.

Netta

Monday, November 12, 2018

Christmas Minc Bears

I decided to try my hand at using the Heidi Swapp Minc Machine and foil. 
 A little bit of coloring red and sparkle on the hat makes for a simple quick but cute Christmas card. 


So quick....I actually made two.


Have you tried foiling? If not, the idea is just to use heat and pressure of the Minc Machine or laminator that presses the foil against the image printed with toner.  A regular printer would not work because the image is printed with an ink jet.  If you have all the equipment/tools and have not tried, you should!  You might be pleasantly surprised.

Netta


Sunday, November 11, 2018

Winter and Polar Bear


This was a quick card to make.  Scrap Papers took care of this card...white cardstock and a blueish background with white dots.  I am considering them as snow and to top it off, I added one little cluster of snowflakes stamped in white.  A circle punch took care of moon and trees cut from Tim Holtz Set Merry Christmas.

Stamped the Recollections Polar Bear onto a scrap of white and even though a die came with the set, I cut it out with scissors. I was not sure if this was still available to buy, but I did find it at Amazon so you can see what it looks like. Copics colors BG11 and BG13 to lightly color the bear and scarf.  I hand cut the snowy hills and popped each layer from the one behind to give it a 3D look.  The hills also have the edge colored with BG11.

Thank you for stopping by.  Now...go get your scrap box out and use them up!

Netta

Saturday, November 3, 2018

Bugaboo Reindeer

I had printed and colored up two of the digital reindeer image from Bugaboo (see 1st card here Crazy Reindeer), so I decided to go ahead and make the second one into a card.  I fussy cut it out and glued it on after creating my background.


 For my birthday I had received the Copic Air brushing system. I played around with spraying some different colors to get some practice and saved them in my junk box.  My junk box is a container where I throw samples/practices/cards with mistakes/etc into.  Sometimes I will dig into it because there might be something I can cut up or use on a card.   The background on this card was one of those practice pieces.  

I am slowly getting to my goal for Christmas Cards this year.  I might actually be done early!  yaaaaaa
Happy Crafting....
Netta

Friday, October 26, 2018

Crazy Reindeer


This digital image was free from Bugaboo Stamps back in 2017 I believe.  Never used it before so I printed it and colored it up with my copics.  I fussy cut it out so I could glue it down on the background I had airbrushed earlier today.  The background of snow was just hand drawn with copics.  The snow was done by using my favorite....white gel pen.  I love this crazy reindeer all done up.  He is so cute!


Happy crafting
Netta

Tuesday, October 23, 2018

Another Christmas Pet for 52CCT

Update!  
I got Honorable Mention for October Pet Theme!  


Another pet card for 52 Christmas Card Throwdown!  
With a sponge  and Nuvo Mousse Powder Blue..I covered the entire background. Next I used the mousse color Coastal Surf to get a darker color along the top edge. The mousse glides on so smoothly and has such a pretty sheen to it.  I stamped snow swirls all along the top and sprinkled glitter on it.
The cute stamp is from Whipper Snapper called "Hello Friend".

I die cut the Merry Christmas words twice....once on white cardstock and once right through the scene.  After I got the card put together, I glued the white words down into where I cut out and then put the blue words right on top so they are raised slightly yet still part of the scene.  
If you try this Camouflage technique, make sure you save all the little tiny pieces you would normally throw out.  You need to put them back as well.


One more added!

Netta


Monday, October 22, 2018

52 CCT Challenge-October Theme

Update!  
My card was chosen as the winner for this October Pet Theme!


This weeks challenge at 52cct.blogspot.com is about theme's and the theme is Pets.  I had to dig hard to find something that was considered a pet and not a wild animal like a polar bear, deer or moose.  I finally remembered I had bought a set of stamps last year from Art Impressions called "Santa Paws Set".  As a matter of fact...I liked this set so much I bought it twice!  LOL  Gave the other set to another friend.  

I used the group stamp in this set and the words "Happy Howl-idays!".  I also used two stamps from a Stampin Up set called "Winter Woods".  I used the mask technique so the trees look like they are behind the group of dogs. 

I got to play with my Derwent Inktense 36 pencils for this card.  It's been a long time since I pulled them out and I think I will do more with them.  After the card was put together, I used Nuvo Crystal Drops "Simple White" for the fur on the hats and for snow.  The snow on the ground and tree were sprinkled with a dusting of sparkle while wet & then extra knocked off.  I only wanted a hint of sparkle.  Snow falling was just a white pen.

Well I am off to go add this to Christmas Card Throwdown for pets. 
Hope to see you there too!

Netta


Friday, October 6, 2017

Saving Paper

How many of you have special paper you don't want to use up?   
Or perhaps you do not have enough to do what you want?

For my card, I wanted enough of the sparkle paper to mat my image and to die cut a design out.  I only had enough to mat the image with.

Here is a trick!

Cut the middle out.  

It gives you an extra piece of paper to mat your image....

and have enough left over to die out!

After the card is put together....no one would even know there was missing paper on the back of that image.

Hugs
Netta


Wednesday, February 22, 2017

Gracie

Do you keep a stash of cards and when you need one, you just pick one out....or are you like me?  I do not have a stash of cards and make them as I need them.  I try to think about the person as I make their card.

Someone I know had a birthday on Valentines day but I didn't want to make a card that had a Valentine theme.  I wanted something totally different.  She has a Yorkshire Terrier named Gracie, so I found a free image online and colored it with Twin Markers.  I used a picture from her FB page to use as a guide to color her with.  I used rectangles to cut the image so I could layer it up.


The background took a bit between the layers and drying.  I cut a piece of black cardstock in the size I wanted.  I brushed a layer Lumiere  Metallic Bronze all over the cardstock.  I was not fussy and some of the brush strokes left black showing through. After I was done, I tilted the cardstock up over the trash can and sprayed Tattered Angels Glimmer Mist in colors blues, greens, peach, lemon and candy red.  I just kept spraying the colors to let them run down mixing in some areas. After I was happy with those colors my final coat was Heidi Swapp white color shine which I just sprayed over it in different areas.  I linked what each product was in Amazon in case someone wanted to see what they looked like.   I ran it through the Sizzix with an embossing folder while it was still a little bit damp.   

I popped it into the mail to her and had to wait to post the card here so she would not see it ahead of time. she has received the card so I was safe to post it!

Manetta

Sunday, October 2, 2016

Santa Bears


Today I water colored using an acrylic block and distressed ink.  I have never used this technique before where you stamp the distressed ink on the block, spritz it with a little bit of water and paint with a brush.  I really did not know how I would color this image so it was stamped on regular white cardstock.  The plan to use watercolor came after so I had to be careful not to over soak the paper.  

I cleaned up and decided to put my white tulip fabric paint away someplace new last weekend.   I normally use it to do snow or white fur.  I have looked under, in and around everywhere...for the life of me cannot find it!  It never pays to clean up. lol  A disorganized mess works better for me I guess.  I really wanted to make the fur part stand out on the card so I had to come up with another plan.  After digging around I came across some flock I have had for years and rarely use.  I actually like the results!  


What is Christmas without some sparkle right?  I covered the hat and bear with ripped towel paper and sprayed Heidi Swapp White Color Shine to give it a hint of sparkling sheen to the sky.  For the finishing touches after the card dried, I used my all time favorite Signo white pen to put a hint of snow falling in the sky.  

Yesterday was World Card Making day....the day that kick starts making holiday cards for the season.  I do not have anything to show for that day however I did craft.  I was trying to learn a new technique.

I hope you have started making your Holiday cards as it is only 8-9 weeks before everyone starts mailing them!

Thank you for stopping by!
Manetta

Wednesday, September 21, 2016

Christmas Window

Even though I have not shared a great deal, I have been making Christmas Cards all year.  On the off days I do not craft I will start posting some of them, especially since making Christmas Card season is upon many of you.
This is a card I believe I made back in July.  I had many of the pieces left over from 2015 season so decided to use them up.  Here is a post where the extra pieces came from Magical Christmas.  The window scene was recreated but the A2 card itself is different.  


How are you doing on your Christmas Cards?  Have you begun yet?  *S*
Manetta

Thursday, August 25, 2016

My Christmas Dream Place

 When I was younger, I had the opportunity to go into a home of an elderly couples home.  I fell in love with it and have often dreamed of having a home like that some day.  It was located in an area away from any other homes..surrounded by evergreen trees.  The home had big windows that looked out at a beautiful scene.  Just nature to look at which was heaven to me, especially seeing the evergreen boughs collecting the falling snow and heavy.  I often imagined myself sitting  in front of the window curled up with a blanket and cup of cocoa...and there walking into my view is a deer!


This card took me three tries to get the folds just right so when you closed it everything was perfect.   I had piles of scraps all around me by the time I got done but I love it.  Here are some more photos of how it looks when opened.


This set of stamps was a set I got free last year in a magazine.  To make the snow, I used Tulip Puffy Dimensional Fabric Paint.  

Can you believe that we have only 3 months before the Christmas cards start hitting the mail?  I hope your like me...and working on them!

Hugs,
Netta


Wednesday, May 11, 2016

Whole Lotta Bull....Birthday Bull

Today I am sharing a masculine birthday card which opens a bit differently than what I normally make.
The bird stamp inside and the moose outside is from Stampin Up Walk in the Wild set.
The brown paper with circles and stripes is all one piece that was left over from another project and it fit perfectly.
The card is one that you prop up and the opening is the circle area at the top.  I am not a fan of masculine cards.  Like many, I find them difficult to create.  This card came together pretty easy which is unusual for me.  


The moose was colored with Copics E15, E21 and E33.  For the sky I have a piece of heavy plastic that was cut into cloud shapes.  I sponged it with Memento Summer sky. The grass was sponged with Memento New Sprout and Cottage Ivy.  I did faux stitching around the circle on the inside.

Popped this card into the mail today for a brother-in-law's birthday.
Happy Birthday Steven!


Friday, January 8, 2016

Puppy Love

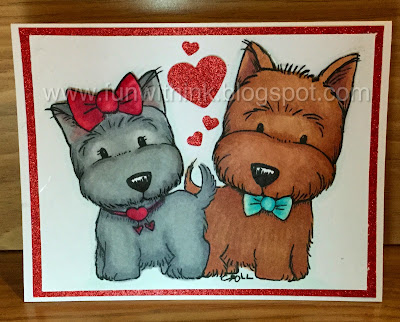
I got a digital image from Tiddly Inks that was just perfect as a Valentine card.   I printed the image twice on Georgia Pacific cardstock but only cut out and colored the heads on one.  The other image I colored the entire image using a mix of Spectrum Noir, Copic and Blick Studio.   I am trying to use up extra paper so I found some Paper Studio red glitter cardstock in my stash that was perfect for punching out the hearts and for the border.


After the card was all put together, I placed the heads upside down onto a soft mat and used a McGill 8mm stylus tool to rub carefully only on the areas of the snouts, bow, bowtie and little heart necklace to make them puff out.  Before I glued them down onto the images, I used favorite decoupage glue where I had just used the stylus tool because once dried, there was no way those areas would be pushed flat!

Here are a couple more photos.  I tried to get some good photos so you could see what it looks like puffed out.


This card went together pretty fast.  One down and 5 more to go!

I am entering this card into two challenges..
1)  The Outlawz-Twisted Thursday Challenge: Anything goes and the twist is to use a pet/animal on it.
2)  Danni's January Heart Challenge

Thank you for stopping! Feel free to leave comments...I love them!
Netta