Showing posts with label Only Christmas cards challenge. Show all posts

Monday, November 7, 2016

November Stamp Camp Christmas Cards

On Friday, Lisa Reber had one last Stampin Up Stamp Camp until the new year.  It was so much fun seeing everyone!  These are the cards we did.  There was also a goodie box and a bag topper which I did not get done.  


Makes me happy as I have 4 more cards to add to my Christmas stash!

Thank you for stopping by!
Manetta  

Wednesday, October 26, 2016

Serenity Cards


Hello folks
Cooler weather is upon us, even for us in Florida.  
Today I cracked open my Derwent Inktense Water Pencils.  I thought the Christmas Chapel rubber stamp would be perfect to color.  I have seen many stamps colored in one color before and gave it a try.  I think most colors would be pretty.  What you can't see...once again...is the hint of sparkle on the snow that was colored with the signo white pen.  I enjoyed the look so much I did it with a brown pencil.  Both the tag and bow was cut from Stampin Up dies.
The cards were stamped inside with a simple word..Peace.


Thank you for stopping by.  Enjoy the cooler weather!

Monday, October 10, 2016

Another Winter Bluebird

Another free digital image from Kajsans Scrapbook Blog!  There are several and I think they are so adorable.  

This fold is called Stair Step Fold.  I made a band to hold it closed for mailing.  The back is the size of an A2 card so it fits perfectly into the A2 envelope. The embellishments came from Stampin Up Pretty Pines thinlits and Martha Stewart pine punch.  I discovered recently how nice white flock works for fur so I used it again on the hat.  The image was colored with a mix of Spectrum Noir markers and Twin Touch markers.  Check out the different views below.
Thank you stopping by!
Manetta


Sunday, October 9, 2016

Winter Bluebirds

Hello Everyone!  
It's been a long time since I have been able to print something from my computer.  I never realized how much I use a printer for crafting until I did not have one available.  I had a wireless printer  for a long time when all of a sudden, after updating the software,  we ran into trouble.  If I fixed my computer to start printing from it, it knocked my husband off.  When he fixed his computer to be able to print on it, I got knocked off.  I finally left it alone and stopped fixing mine as my husband uses it to print off billing receipts.  The last time it took him over a day to get his computer printing again.  Ouch!!

He finally decided I needed to get my own wireless in my craft room.  His decision could have come from the fact that I was whining all the time...LOL.  After lots of searching and studying what is available, I decided on a Canon.  I am once again a happy crafter because I can start using some of my diggies collection.

   I found some free and cute Winter/Christmas bird diggies at Kajsans Scrap Blog a long time ago and decided to finally print them out and play with them.  I was experimenting with sparkle pens and Inktense watercolor pencils.  Some of my experiments did not look so great but I finally have a couple I am happy with!


For the snow on top of the hats and branch, I used Tulip Puffy White paint.  The fur on the hat was painted with Wink Of Stella clear and covered with Stampin Up Crystal Effects to give it some dimension. 

The birds have a nice sparkle on them which I was able to show you by holding the card closer to a lamp to take the photo with.


Only 10 more weeks to Christmas.  I still have more cards to make so I better step up my game!!
Where are you at with yours?  Almost done?
Manetta

Sunday, October 2, 2016

Santa Bears


Today I water colored using an acrylic block and distressed ink.  I have never used this technique before where you stamp the distressed ink on the block, spritz it with a little bit of water and paint with a brush.  I really did not know how I would color this image so it was stamped on regular white cardstock.  The plan to use watercolor came after so I had to be careful not to over soak the paper.  

I cleaned up and decided to put my white tulip fabric paint away someplace new last weekend.   I normally use it to do snow or white fur.  I have looked under, in and around everywhere...for the life of me cannot find it!  It never pays to clean up. lol  A disorganized mess works better for me I guess.  I really wanted to make the fur part stand out on the card so I had to come up with another plan.  After digging around I came across some flock I have had for years and rarely use.  I actually like the results!  


What is Christmas without some sparkle right?  I covered the hat and bear with ripped towel paper and sprayed Heidi Swapp White Color Shine to give it a hint of sparkling sheen to the sky.  For the finishing touches after the card dried, I used my all time favorite Signo white pen to put a hint of snow falling in the sky.  

Yesterday was World Card Making day....the day that kick starts making holiday cards for the season.  I do not have anything to show for that day however I did craft.  I was trying to learn a new technique.

I hope you have started making your Holiday cards as it is only 8-9 weeks before everyone starts mailing them!

Thank you for stopping by!
Manetta

Sunday, September 25, 2016

Christmas Pines

About a week ago I got the Stampin Up Christmas Pines stamp set and Pretty Pines die set.   I have been patiently waiting until I had time to sit and play with them.  Tonight I finally got that chance!

In my Junk Box I found a card that had Gold Vellum already glued down onto a Cranberry Red card.  Also found in my scraps some off white cardstock, piece of Cranberry Red cardstock and a small piece of Gold Vellum.  


The only stamping was the sentiment stamped on the front came from the Christmas Pines set.  Card came together easy.

Another down on my Christmas Cards!
How are you doing on your cards?
*S*
Manetta

I am submitting this into Week 38 Only Christmas Card Challenge. 

Saturday, September 24, 2016

Which Side? Naughty? Nice?

I just love this Elf!  He was so much fun to color!  
The Naughty and Nice document he is holding will have a name printed in once I determine who will get this card.  You can bet, for fun, the name will most likely go on the Naughty side!!


thank you stopping by!
Manetta

I had submitted this into Week 30 Only Christmas Card Challenge. 

Wednesday, September 21, 2016

Christmas Window

Even though I have not shared a great deal, I have been making Christmas Cards all year.  On the off days I do not craft I will start posting some of them, especially since making Christmas Card season is upon many of you.
This is a card I believe I made back in July.  I had many of the pieces left over from 2015 season so decided to use them up.  Here is a post where the extra pieces came from Magical Christmas.  The window scene was recreated but the A2 card itself is different.  


How are you doing on your Christmas Cards?  Have you begun yet?  *S*
Manetta

Tuesday, September 13, 2016

Week 37 & Stampin Up Class-Card 3

Card #3 coming up and into my Christmas card stash.  I am really making a jump on my cards this year.  
Out of the 3 we made, this was my favorite and it was not the easiest. Well... easy yes....long process yes.  
After we used the die to cut out the Santa, we were suppose to save most of the pieces to put back.  Whoops!  I was busy cleaning up my area and mine got trashed.  So I found some white scraps and recut the pieces I needed.  Lesson learned...slow down and concentrate saves you work.

After I had the tiny pieces cut, I had to color them.  It was hard to hang onto them all and not lose them.  Once the Santa was glued down, I glued all the face pieces down as well as the hat.  


Since I did not get to finish this card there, I used a sentiment that I had here at home. It was too long to stamp so I cut the stamp in half so I could stamp "dear santa" inside the small area.  Inside the card it says..."define good".    Sunglasses were a nice touch since I live in the Sunshine State Of FL.

Adorable card for sure!
Thanks for stopping by..
Manetta

Monday, September 12, 2016

Week 36 & Stampin Up Class-Card #2

Here is card number 2 from the Stampin Up Class.  Another Christmas Card to add to my stash and it is a mouse!  I love mice Christmas cards so I WILL be buying this set!  They are so adorable! 


Again....the nice sparkling glitter will not show up...*shrugs*....oh well!  *S* 

Also submitting this card to Week 36 Only Christmas Card Challenge.

Enjoy!
Manetta


Sunday, September 11, 2016

Week 35 & Stampin Up Class-Card 1

Today I went to a Stampin Up Holiday 2016 Catalog Kick Off and we made 5 cards today.  


Sharing with you one of the Christmas Cards we made.  The gingerbread house was actually from one of their Christmas paper.  We just cut it out.  Real cute.  I wish the glitter would show when I take photos....a real challenge of mine!  Someday I will figure out how to take a better photo.


I am also submitting this into Week 35 Only Christmas Card Challenge.  

Thank you for stopping by...
Manetta


Sunday, May 22, 2016

Sparkling Winter Night Sky


Time to make a Christmas Card for "Only Christmas Card".   Last weekend I went to a craft yard sale and picked up the Stampin' Up "To You and Yours Too".  I made this card using two of the stamps from it.  It's always a challenge for me to get a snowy sky until I discovered this technique. 

To make the snowy sky, drop a few drops of liquid glue (I used the multi mono liquid glue) onto a plastic lid.  Add a couple of drops of water into it and mix it up with a paint brush.  Now using your finger, tap the brush against it so the glue will splatter all over the paper.  If it does not splatter well, add more water to your glue.  Careful not to strike your paint brush against Your finger too hard as that will cause too much glue to splatter.  Also, I did not hold my finger directly over the top of the image so when I tapped the paintbrush against it, the glue went out and forward onto the image.  Protect your area around the image and also cover your image if you do not want snow on it  because it will also splatter all around!  *S*

I tried to get a picture of what I was doing so you get the idea.  Do you know how hard it is to hold a camera and take a photo when you need both hands in the picture?  lol  I finally figured out I could use my ipad to take the photo for you!


 After you get enough glue splatters and your happy, sprinkle fine glitter over the top and knock off the extra by tapping on the back of the cardstock.  You will see you now have the prettiest sparkling snow falling scenery.  

This was my first attempt at it and I could see a couple of globs on it but it was an easy fix by putting the banner across it with the sentiment stamped on it.  I will get better with more practise.  

If you have a Misti and you are doing a black image like my card has...USE IT!!!  Complete black images are hard to get a nice solid black image on the first attempt.  Many use a black marker after but I have tried that.  It will work but for me...I still say you can see the difference.  I used the misti because you can just ink your image back up and re-stamp over.   That tiny deer has antlers....without a Misti...that is going to be hard to match back up and re-stamp otherwise.  

To see more how to make the card...head over to https://www.youtube.com/watch?v=21Q7e4oQ6aA

I am submitting this to:
Only Christmas Card Week # 19 Challenge
F & M Challenge Color Wheel Challenge

Thank you for stopping by.  It is time for me to head out and enjoy the Florida sun and the pool!  Until later.....
 
*Update*
Nominated for Outlaws Twisted Thursday 5/28/2016


Saturday, April 30, 2016

Recycling Christmas

Every once in awhile, I will save old store bought cards that I have received by others .  I just cut them up to make a new card out of the pieces. The card I made came from 2 cards.  The trees pulled off easily enough off one Christmas Card.  The background came off another card.  I just cut it down to fit the size I wanted.   

Here is my recycling Christmas card.


I am submitting this card to Only Christmas Card Challenge Week #16.

Thank you for stopping!  If you try a recycling card, I would love to see it! 


Saturday, April 23, 2016

Black Magic Christmas

The past couple of days, I have been just sitting down coloring images using the Black Magic Technique.  It is a technique I learned years ago.  The first card I will show is a Christmas stamp from Art Impressions.  
It is called Black Magic Technique because you stamp on a dark piece of cardstock and it creates a dramatic look once colored.  Normally they use a solid image for this technique but for this card I decided to try using one that was not solid.  It was difficult to cover the blue and get the white completely white on the penguins and snowman. 


Here is what you need.
  1. Dark colored cardstock like navy or black.
  2. White Craft ink
  3. Just plain colored pencils ( I used Prismacolor Pencils)
  4. White Gel pen that will work well on dark cardstock.  I tried many until I found the one that works the best and leaves a nice crisp white line.
  5. Rubberstamp (solid image is preferred for most)

First thing you do is stamp your image with White Craft ink onto your dark colored cardstock.  You can heat set the craft ink if you have a heat embossing tool but I left mine a few hours to dry.  Craft ink does not dry fast like other inks and if you touch it or rub it, it will smear.
Once dry, color your image with the colored pencils.  Don't be afraid to press hard when coloring.  The richer the color, the greater the contrast.  
After you are done coloring, use the white gel pen to accent the image with dots around it or add lines where you colored.  Just have fun!


I will share more cards in the next day or two of images I colored

Thank you stopping.  Feel free to leave a message below if you have any questions or comments.

I am submitting this card to the Only Christmas Card challenge


Friday, April 1, 2016

Snowy Ornaments


I came across something I had begun last year but never finished and decided it would perfect for several challenges that I needed in a hurry.  Torn paper for snow, a couple of different shapes and sizes punches, snowy paper and voila`.  A new card was born!  
I used this card sketch from Sweet Sunday Sketches for the format on my card.


I am submitting this card to the following challenges:
Only Christmas Card
F & M Layers Challenge
SBR-Us Sketch Challenge
The Outlawz Twisted Challenge: Layers

Have a fantastic day!


Saturday, March 26, 2016

Halloween Meets Christmas

I know...you are thinking.....this card does not look anything that resembles Halloween. 

My husband and I love to decorate for Halloween.  This year, while doing some major overhaul on the Halloween items we stored, I came across a couple of 19 1/2 in x 26 in sheets Strathmore Chromolux Mirri Sheets.  We bought them at a Halloween store.  They sold as haunted mirrors and we used them in one of the displays a couple of years ago.  I thought about throwing them out but being like most crafters, I look at stuff with the eyes of a crafter and ask...What can I use this for?  

Well right then a lightbulb went on and I thought of the Jim Holtz Adirondack Alcohol Inks I had. This reminds me of tin foil and also of silver shining cardstock.  I decided to cut them down to size and give them a try.  Dies cut beautifully on it and embosses well.  The alcohol inks work just perfectly.  


For this card, I used  Cottage Cutz Lantern & Poinsettia die to cut it out.  I colored it using the Jim Holtz Alcohol inks and a small paint brushes.  The background was embossed with snowflakes which i think is a Martha Stewart folder.  

I am entering this card into the following:
FB Only Christmas Cards Week 11
Outlaws Twisted Thurs to use Green
F & M Challenge

Thank you for stopping by!

Thursday, March 17, 2016

A Warm Hello

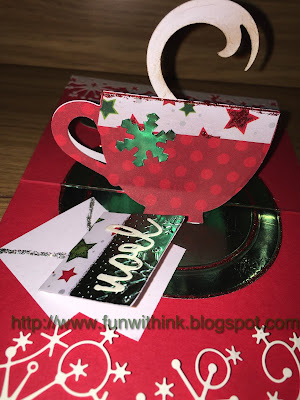
I wanted this card, when opened, to resemble a winter tablecloth with a hot cup of coffee or tea sitting on a saucer.  Doesn't the spoon look like it is ready with sugar to stir into the hot beverage?  I imagined the person is relaxing at the table while opening their Christmas cards they received in the mail.  The card opened on the table is where I will place my greetings to the recipient.  
It's a card within a card!

(Just click on each photo if you would like a larger view)


 I am entering this card into the following:

FB Only Christmas Cards Week 10
F & M Snow or Glitter Card Challenge
SBR-Us Challenge #49

Thank you everyone in advance for the kind words!


Sunday, March 6, 2016

Elf-On-A-Card

A little glitter paper, elf image, left-over green paper, few copic markers, a card sketch and a Spellbinder "Radiant Rectangles" makes a cute Elf Card!!


I am entering this card to the following challenges:
SBR-Us Challenge #92
FB Only Christmas Cards Week 9

I hope this inspires you to start making Christmas Cards...it is never too early in my book!


Friday, March 4, 2016

Reindeer Games Screen Divider

I had to make a shaped card so I went with the Screen Divider fold.  The card folds right up and fits into an A2 card.


 The base starts with an 5 1/2 x 11 card.   Along the long side I scored the card at 2 3/4, 5 1/2 and 8 1/4.  At the scored lines, fold the card with mountain and valley folds.  To create the legs, fold 1/2 the card, center and punch the 2 panels with a decorative punch about 1/2 way up at the bottom.  Then do the same to the remaining 2 panels.  I used a Stampin Up label punch. 


You can use any decorative border punch for the top of the card.  The rest is just panels you decorate and place on the card.


The stamps I used here is an Art Impressions set Reindeer Games.  The stars are from Heidi Swapp and Jingle all the Way came from Marianne design Collectable.  The images were colored with Stickles glitter glue and Copic Markers.

I am entering this card into the following challenges: 
 Danni's Dreams Challenge
F & M Shaped Card Challenge
Only Christmas Cards Challenge

Have a super day!