Showing posts with label butterfly and dragonfly. Show all posts

Monday, July 10, 2023

Color Wheel-Monochrome Green Butterflies

 I have been looking at the color wheel (see info at the end of this post).  There are 6 different combos on the color wheel that I want to try.  Today is the first combo and I am using the Monochrome Combo.  It fit well with the next challenge for Alphabet Challenge Blog.

The next alphabet is the letter "G" and at Alphabet Challenge Blog, they are calling for the color green so I submitted this card...

The sequins are sea-green so I think that is why it picked up a blue shimmer but they are actually green so I used a flash on the card to show it.
The 2 small butterflies are painted with LuminArte Green Tea Twinkling H2O's and has such a pretty green shimmer to it.

 
The top butterfly has 3 layers.  The second layer is vellum colored with Copic G24 green.  The top layer is vellum colored with the same LuminArte Green Tea Twinkling H2O's.

Behind the Memory Box Butterfly Spectacle die cut of butterflies and opening is a piece a green cardstock I had for years.  It has flowers and butterflies all over it.  It was perfect for the window area of the die cut when I popped it up with pop dots.


I am submitted this to G for green at Alphabet Challenge

 https://alphabetchallengeblog.blogspot.com/2023/06/g-is-for-green.html


 Now, about that Color Wheel...

 I have had an EK Success Rainbow Color Wheel for YEARS and never really used it. 

 I decided to do a bit of research and find out..how do you really use it?  I am never really sure when I pick my colors.  What really goes well together?  Apparently, using a color wheel, will help me to quickly pick out colors and options depending on what is my end goal!  The color wheel has a middle that spins around and you can move the arrows around to choose your colors. It will also have arrows to help with the different combinations.  Depending if you are going for a single color or up to 4. 

  • Monochrome Combos is a variation of a color that you like and the shades would be clustered together on the color wheel.  For example: dark blue, slightly lighter blue, and light blue.  This is a great choice if you want your card to be identified with a particular color.
  • Complementary Combos would be colors that are directly across from one another on the color wheel.  This wheel has a black arrow. This would work if you want a high contrast like yellow and purple or teal and red .  You can also mix up the shades like a teal with pink (shade of red). 
  • Analogous Combos are colors that sit directly side by side on the color wheel like violet, blue and teal.  All three of the colors sit next to each other on the color wheel.  You can use 2, 3,or 4 if you want.  
  • Split Complement Combos would be one color on the wheel but do not use the color directly across. Instead you would use the color to the left and the color to the right of the complementary color.  So if you chose yellow, directly across is purple but use the two colors to the right and left of the purple which would be blue-purple (to the right of purple and red-purple (which is to the left of purple).  This color wheel shows an orange triangle with two even sides and one short side.
  • Triad Color Combos is a variant of the Split Complementary colors.  This one uses colors that are found equally spaced on the color wheel.  You pick a main color and the other two would be accent colors.  Remember you can use any of the shades of a colors to tone down any of the colors if you don't want to use a bright bold color.  An example of Triad color would be purple, green and orange or red, yellow and blue. It shows on the color wheel as a red triangle with three even sides.
  • Another variation is Tetrad Combos.  Same as Triad but uses four colors and shows on my color wheel as green rectangle for a Rectangular Tetrad or a purple square for a Square Tetrad.   

Tuesday, June 20, 2023

Flying in Just to say Hello

Tomorrow we can all say "Well....Hello Summer!".

Flowers and Butterflies are perfect for saying hello to summer and to a good friend. 


Submitted to Challenge

https://alphabetchallengeblog.blogspot.com/2023/06/f-is-for-flying-anything.html


  Supplies

  • Brutus Monroe Flowering Vine Mixed Media Stencil
  •  Gina K Blue Raspberry and Blue Denium Ink
  •  Ranger Glossy Accents
  •  Memory Box Morning Garden Butterflies
  •  Scrapbook.com Hello Bloom Die
  •  Scrapbook.com Sweet Expressions stamp (inside)
  •  Blended Brushes


Wednesday, September 9, 2020

The Outlawz Color Challenge with a Twist

 I have been working the birthday cards really hard this past week and I hit a brain freeze.  No ideas came to mind so I turned to The Outlawz to challenge my brain.  First thing I came to was a Color Challenge with a twist.  The twist was to add one butterfly.  I opened my stamp and die book and my eyes fell on the Die'sire "Lace Butterfly" die.  I used shimmer white cardstock and cut out the die.  I placed the die cut over plain white cardstock to see where the wings and center of the. butterfly was.  I used a sponge and sponged on one color of the Distress Oxide where the wings would be,  another where the body was and one more all around the edges.

The challenge was to use at least 3 of the colors offered.

I took a photo of the colors I used plus I used the dark purple for the card base and matted the words with the dark purple as well.


UPDATE:   I started another one ...same idea and I messed up.   I pulled it back out and was able to fix it.  I actually like it better! 


Off to go post it at the The Outlawz Challenge site and probably take a look around to see what else I can do!

Thank you for stopping...
Netta

Monday, April 15, 2019

Fluttering By to Say Thank you


Dropping by to show you a simple quick card.  
Simple only because I used left over pieces that were already colored.  All I did was to glue, stickle and add the words.  Sometimes it pays to dig in my box of throw aways!

Enjoy your crafting day!
Netta

Monday, May 15, 2017

Dies That Traveled Far

I got several dies on Amazon that traveled from China... dirt cheap and free shipping.  They arrived several weeks ago and I had not tried them out yet.  Yesterday, I decided to sit down and use some of them.  

I must admit, they cut excellent and I rarely had to poke any pieces out after.  Most of them fell right out.  If you are like me...I dislike dies that are time consuming.  

Here are some of the dies.  I have a few more which I hope to use soon!

Celebrate card has two new dies used.  The stitched square and green leaves. 

 I used the butterfly square for the Birthday Wishes card.  It was a scrap piece of paper I had experimented on with water colors. 

 I think this palm tree with the person laying in a hammock is my favorite die out of the bunch (so far).  Again for this card I used a background that went wrong.  I was able to salvage it by cutting it down for this card.  You see the birds?  That is a die that came with the hammock die.  I almost threw it away thinking it was a piece of left over metal!  It is so tiny so if you buy this one...watch out for the little guy!

 This peacock card also used up some scraps.  I glued the peacock onto some sparkly cardstock.  I fussy cut all around the peacock so the feathers showed the sparkly purple.

To be able to play again is so much fun!  I missed it!

Thank you for stopping by and have a wonderful craft day.

Netta


Sunday, March 26, 2017

Four-Fold Get Well Card


Four-fold...great card when you need a lot of pages for many to write a message!  The best part..it fits into an A2 envelope for mailing.


Here is the 1st page I left blank for writing.


The card opened showing all 3 pages for writing a little get well message.  Sorry for the shadow.  I just could not get the lighting to work for me today.  

Have a great crafty day!
Manetta


Rubber stamps: Stampin Up "Thoughts & Prayers"
Leaves: Impression Obsession DIE334-Y
Cardstock: Stamping Up
Stamping Up Butterfly die


Friday, September 2, 2016

From Junk to Birthday

I have a box that I call my Junk Box.  It has a bunch of trial and error works of mine that didn't make it onto a card.   I just can't quite throw the mistake away so it goes into the box.  
Every now and then I will dig in that box and something will stand out to me.  Parts of this card came from that box.  


The white circle was thrown in the box because one side of it did not cut out correctly so I positioned it so that part was off the edge of the card.  


The background was an experiment gone wrong with watercoloring on a piece of cardstock.  The sentiment was cut crooked so I cut it down to make a tag.  The butterflies were left over from another project.
So...........I was able to make 3 pieces from that junk box and transform them into a beautiful Birthday Card.  

What do you do with your works of art gone wrong?  Do you throw them away?  You might want to start your own junk box. You never know!

Have a great crafty day!
Manetta


Tuesday, March 29, 2016

Butterfly Border

I recently bought a Memory Box Kensington Border die that is so pretty.  I used it to make two sympathy cards to add to my stash.  One I left simple and the second darker one I used a little bit of purple glitter on the butterflies.  
The sentiment "With sympathy" came from one of my favorite sympathy word sets from Impression Obsession.


Have a great day!!

Sunday, March 27, 2016

Spring is in the Air

Nothing like a Birthday card with butterflies and flowers to say Spring in the air!


This is another card where I used a piece of the Strathmore Chromolux Mirri Sheets to cut the flowers out and colored with Tim Holtz Adirondack Alcohol Ink.  I used a technique from Crafts on the Run blog to glue the die cut into the negative image cut from the background.  She recommends embossing the background and then cut the image out of it so that is what I did.   A little bit of stickles on the butterfly wings and on celebrate finished off the card.  The word celebrate is from the Sizzix Tim Holtz thinlit set Script Celebration Words. 

I am submitting this card to the following challenges:

Thank you for checking out my creation!


Sunday, March 22, 2015

Butterfly Punch and Bokeh Technique

Have you seen the Bokeh Technique being posted on many blogs on the internet?  
When I originally searched the word Bokeh technique to find out the directions, the sites that came up first were photography sites. So I searched what the word meant and this is what I found...

"Bokeh in Photography is the aesthetic quality of the blur produced in the out-of-focus parts of an image produced by a lens.  Bokeh has been defined as the way the lens renders out-of-focus points of light."

Someone very smart figured out how to take that technique and transfer it onto paper using ink/water colors.  It looked a bit daunting to me but after researching it I discovered it was an easy and interesting technique. Possibly addicting!
(Check it out...Watercolor Bokeh Tutorial at Splitcoaststampers)

I used a butterfly punch to punch out a couple of butterflies after the Bokeh background was dry and covered the butterflies with Diamond Stickle.  While they dried, I put my card together.


Once the background was matted and glued down onto my card, I glued the butterflies back down flat onto where I had punched them out.  

Let me know if you give this a try.  I would love to see your creative work of art.

thank you for visiting!
Netta


Monday, February 23, 2015

SBR-Us Challenge 54-Butterfly

Working hard to get all caught up on the Challenges to a Yahoo Group I belong to.  Yesterday I was able to create two cards that matched their Challenge #54.  Each card has the same color and style but different flower stamps. 

Challenge was to have a butterfly on it.  


Hope you have a crafty day.  I am off to work.  My crafty time will be tonight!  
See you then..
Netta

Wednesday, May 7, 2014

2014 Mother-n-Others Invite

This weekend will be the 12th big event at a local nursing home called Mothers-N-Others.  It is celebration held in the Alzheimer section for basically all the Caregivers and Families who take care of loved ones with Alzheimer.  For the past 9 years I have been making and donating the 30 invitations they needed.  It is difficult for me to sit and make 30 invitations (really more like an A2 card) the same way however  the nursing home does get great feed back on how the family members look forward to the invites.  One elderly gentleman has been saving them each year.  That is what makes it all worth while.  That is why we do what we do...make cards and give them away.  It is that smile that we get in return.


Thank you for stopping by..
Netta

(Inside)
“Your strength and patience reach forever
As we make this difficult journey together.
Please preserve the memories once shared
And protect my dignity when I lapse to care.
For each day I will need you a little more
To hold my hand and to reassure
As my thoughts fade and my memories dim
Know that my heart still loves you deep within.”

-Author Unknown

Tuesday, March 4, 2014

Sketch Challenge #4-Butterfly Sympathy

Butterflies galore!

Well...3 anyway lol.  
My first attemp was a flop.  I did not get them even at all.  For the second attempt, I drew a light pencil mark across the card and it helped...still a little off but that is ok!  I stamped the first butterfly from a Martha Stewarts clear rubber stamp set and stamped that in the middle of the card with versamark.  The left and right butterflies were matched up wing tip to wing tip and the bottom of the wings were set along the pencil line.  I used heat embossed the images and sponged Versafine Majestic Blue all over it.  


This is the sketch from Challenge #4 that is used.


I used a ruler to draw another light pencil light where I wanted the blue to end and I cut along that line but going around the butterflies.  
I had a scrap piece of paper that had like a blue crackle paint on it.  It looked perfect for the bottom half.  
Thanking of you sentiment is one of the stamps in the Stampin Up Wet Lands set.

I am going sympathy, Christmas and birthday so I don't get dragged down by too many birthday or too many sympathy.  This way it also gets my Christmas cards started.  So far it is working!

Have a crafty day tomorrow!
Netta

Wednesday, February 19, 2014

Heartache and Memory


Quick post today to show you a card that was all done in gray and black.  Very simple and quick card. It is not often I make a card that has a verse on the front.  This time it just fit well.  
This Impression Obsession poem is my favorite and I use it a lot on my sympathy cards.  
If you click on the photo you will be able to see just a hint of sparkle.

Thank you for stopping by!
Manetta

Thursday, February 13, 2014

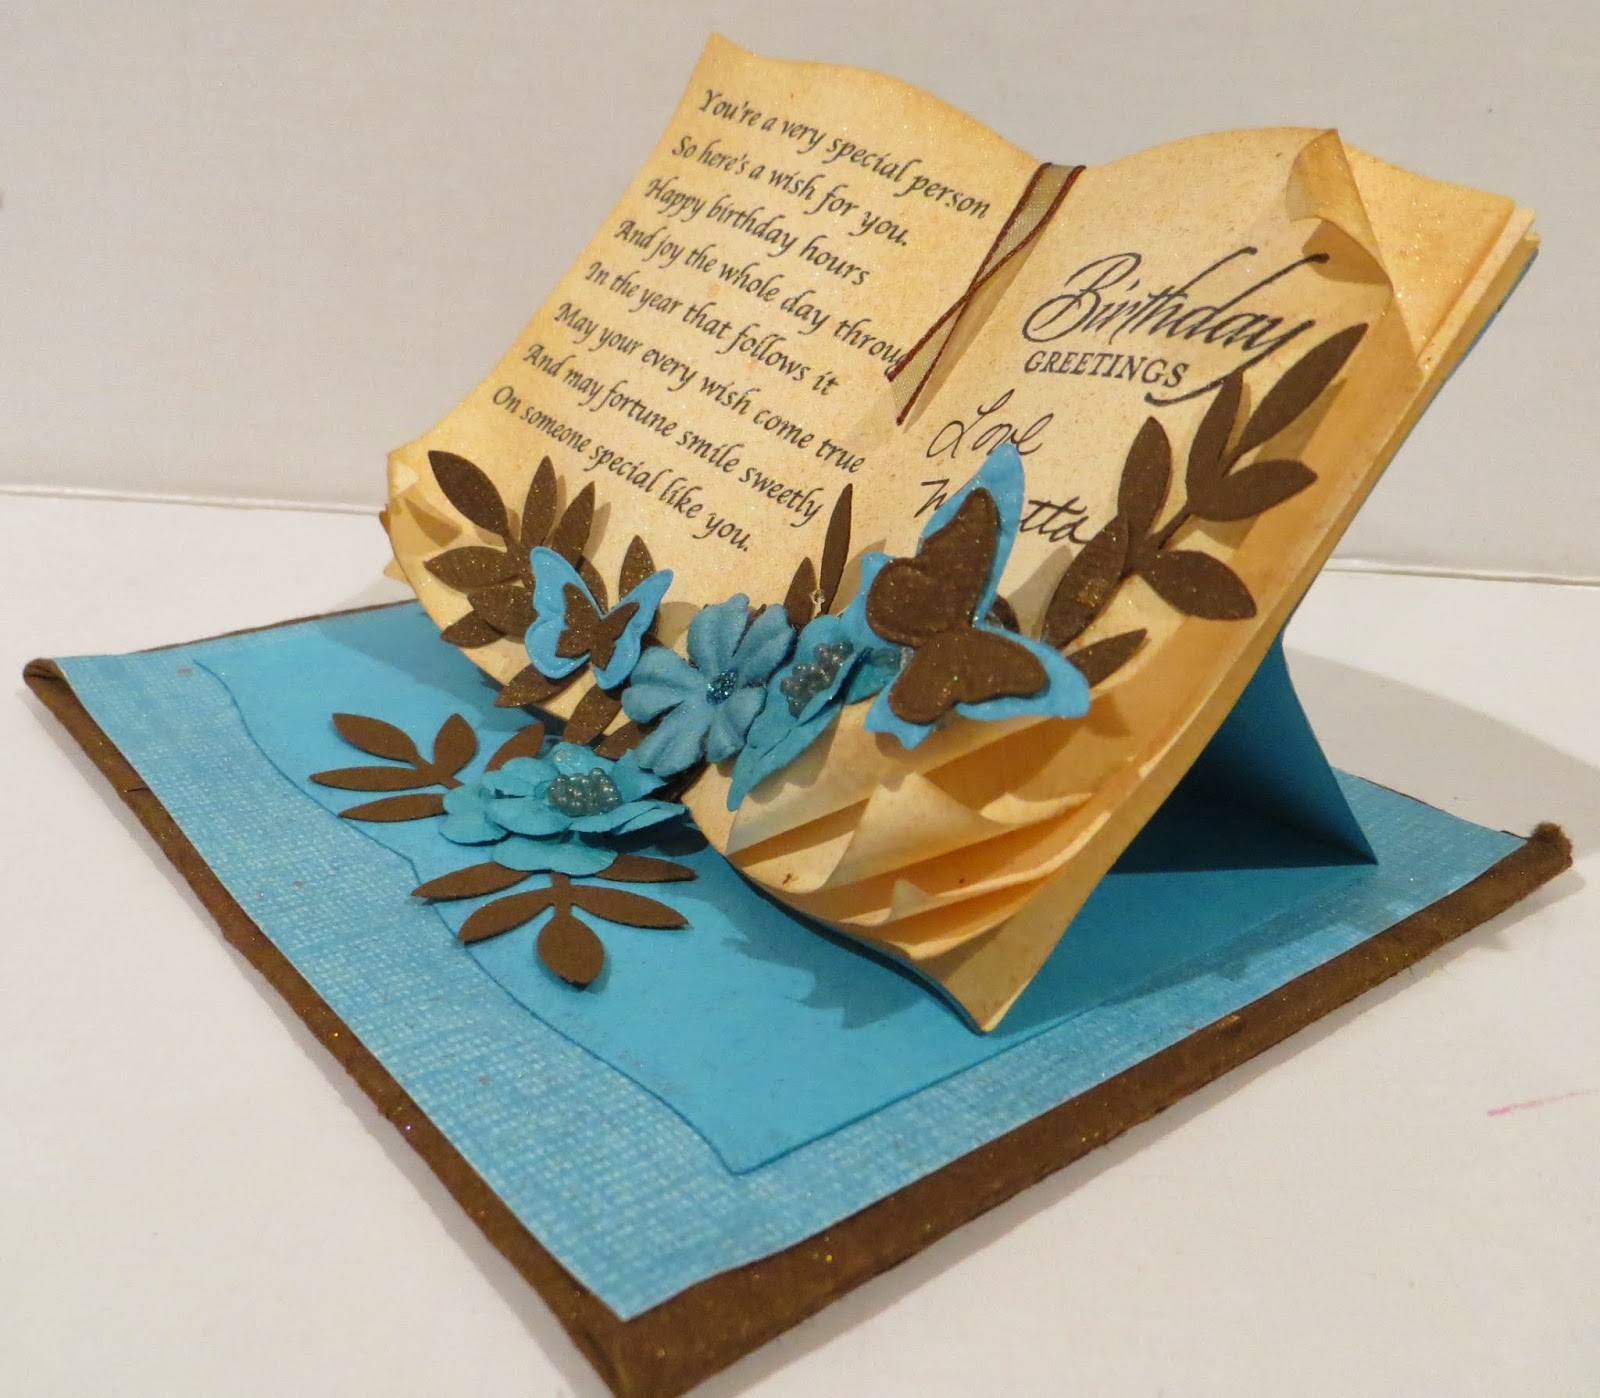
Birthday Book


I have a difficult time making a stash of birthday cards and picking one out  for my own family and friends birthdays.  Each card is made with that person in mind.

There is a woman who helps out in our office a couple of days a week and her birthday is Friday which is Valentines Day.  I thought about her and two ideas came to mind.  One fact was the obvious...Hearts and red.  The second idea was the fact that she loves loves loves to read.  I went with my second idea.  I was so happy I had the Book Label 7 Nestabilty.

I had no idea how I was going to make the card so I turned to Pinterest.  I found some beautiful cards using the Label 7 and making them into an Easel Card.  That helped me to get going however I wanted to go one step better.  I made the bottom look like a leather bound book.  I have made faux leather before but I came across a video where they used a mix of glycerin and water in a spray bottle.  Glycerin was suppose to help the cardstock soak up the water better and get into the fibers...making it much softer and pliable. I gave it a try.  Works great! 

Here is the bottom of the card.


 I should have taking pictures of the process but didn't.  I will make another faux leather and create a tutorial next week. 

Her birthday is tomorrow but I won't see her so I am giving her the card today.  I know she will love it!

Enjoy & thank you for stopping by!

Netta


Tuesday, February 11, 2014

Card Lift Nautical Sympathy

Sheena Douglas posted a card on Facebook that I thought was absolutely beautiful but it will not let me post a URL to the card.  I card-lifted the idea from the creator Allie Gower but changed up the line design's.  
I think it is perfect for a Sympathy card for a Man. The image is from Impression Obsession-

My card....

Allie Gower's card....


Wednesday, September 4, 2013

Birthday Flutter By Hop

Today is the first of TWO
Flutter By Wednesday blog hops to celebrate 
Danni's (the owner/creator of FBW) birthday!
Today we have the friends of Danni fluttering along to
share some amazing creations to inspire you!!
You should have fluttered here from Jackie's blog "Paper Moments"! if not--start at the beginning of the hop at the 
Be sure to leave comments at each stop that you flutter to 
as there are some surprises hidden! 
You have until September 9th, 2013
 at midnight CST to flutter along!

We hope that you’ll also join in this week’s challenge at 
anything goes with a butterfly or fairy! 
A little butterfly told us that if the challenge gets
over 100 entries there will be a prize!!

Here’s my Butterfly project for today...


My butterfly was made with Vellum and and stickles.  Perfect for Danni as I hear through the grapevine...she LOVES butterflies and glitter...*S*  
What Danni doesn't know...but will now....this card went into the mail to her for her birthday!

HAPPY HAPPY BIRTHDAY DANNI!!!!

Be sure to help make this the best birthday EVER for Danni by leaving a birthday messages by midnight September 9th and some lucky person will win a DCWV Latte Cardstock Matstack! (Winner will be announced on my blog September 10th so be sure to check back here.)

Now you should hop on to Sandi's blog "Slightly Off Center" ! 
Don’t forget to flutter to the FBW
Blog tomorrow for another hop full of more fluttery inspiration!!

Have a wonderful crafty day!
Netta

Sunday, August 18, 2013

Mojo Monday #306

I have decided I need to sit down before the next month and write down every card I need to make along with the date needed by.  September is an easy month so I will fill up the extra time making Sympathy cards for the local nursing home I donate to.  Out of 5 cards needed, I made 3 this weekend.  First up....

Anniversary Card for my brother and sister-in-law.


I did faux stitching on the outside mat.  The Circle mats were cut from Spellbinders.  I saved the butterflies that punched out to use on the card.  The butterflies were cut from Martha Stewart punch (largest) and Stampin Up (smaller vellum).  All of the highlighting and faux stitching were done with THE BEST white pen ever....uni-ball Signo pigment ink pen.    

The 2 hearts were cut out from Sizzix die cut.  I punched a lot of little flowers with a punch I bought in a $1 bucket at Michael's Craft Store.  I glued them all over the heart and put a drop of blue Stickles in the center.  I also added a couple of stickle covered butterflies on top.  The flowered heart was popped up with pop dots slightly off set from the heart with faux stitching.  


I am submitting this to Mojo Monday!

thank you for stopping by...=)
Netta

Friday, June 7, 2013

Favorite Colors


Browns and teals together are my favorite colors ...but to add red?  WOW
That strip of red is just perfect and really pops.  
I think this birthday card is perfect for a man.

*S*
Netta


Monday, May 6, 2013

Jumbo Peony Birthday


Yesterday I made a sad Peony Sympathy card.  Today I made a happy Peony Birthday card!
Few leaves, a butterfly, border and ribbon and there you go!!
Oh can't forget the "icing on the cake"....a little sparkle to top it off!

*smiles*
Netta