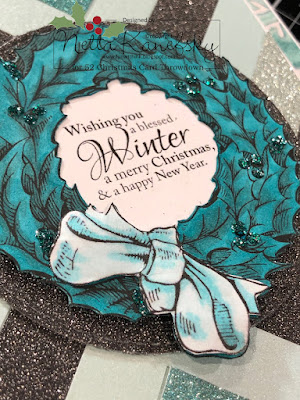
Herringbone technique is the challenge this week. You probably have seen it on quilts. The idea is to plot and plan where to place the pieces down. The hardest part on this card is planning what paper to use! I went with plain shimmer or sparkle cardstock on this card. You will need 3 or 4 colors.
You can glue each piece as you place your strips down but I just ran my base cardstock through my Xyron to cover the whole thing right away. I chose to use the darkest color first and placed it down diagonally across the card. In the photo below it is the longest black piece. Now decide where to place two shorter strips on either side of the long piece. You can now see it formed 4 different size triangles...one on each side. The size of each triangle will depend on where you put the dark strips down. It's your choice!
It's hard to see because my next color is the same shimmer color as the base but if you look close you can see how the next two pieces went.
Keep placing strips until you have the triangles filled in. Some of the triangles might require more fill in than others. I realized after I took the photo below, I had grabbed the wrong color on next two triangles. I was able to remove them easily and replaced them with the shimmer cardstock that I originally started with. At least you can easily see how the next pieces are placed!

Once you have everything filled in, trim all the edges to match the base.

Here is the base finished off so you can see all the strips on this card.

The photo at the top shows the finished card and in the center of the card is a digital from Graciellie Designs. I printed one set of the sentiment and 2 of the wreath on my computer. Colored the wreath on one and just the ribbon on the other with copics (#BG45, BG49, BG18, BG000, BG45)....fuzzy cut the colored wreath outside and inside. I glued it down over the words, leaving the very edge unglued so I could trim it underneath. I just lifted the edge of the wreath so the tips of my scissors could cut underneath in a rough circle. I did not have to be perfect because no one would see underneath the wreath as it would be glued down.
The ribbon on the 2nd wreath was cut out. I flipped it over onto a sponge mat and used the McGill Paper Blossom ball tool to rub the center of the ribbon. It gives the ribbon a 3D affect when you glue it down. I put a small amount of silicone glue underneath so the ribbon would keep its shape in mailing.

What a great way to use up scraps! I have seen the Herringbone Technique but I do not recall if I have ever tried it on a card.
I enjoyed making this card so I went back and created another card.
On this card I used 4 Christmas scrap paper, My Favorite Things Square Die, Stickles green and Recollections Christmas*Noel Stamp set.
Stay safe and keep crafting
Netta


5 comments:
tes cartes sont superbement élégantes Netta, très joli résultat avec ces papiers scintillants, bien loin de la recup de papier que j'ai utilisé, biz
So nice of you to show the herringbone step by step!
Netta: You've made 2 wonderful herringbone cards for this challenge! My favorite is the shimmery teal one. I just love the contrast of light and dark tones with the teal that coordinate with the wreath focal. Wonderful cards! I enjoyed your tutorial too! I took a different approach, almost like a quilt but starting in the center of my quilt then working my strips in opposite quadrants from each other. It was great to see different approaches from the team!
Beautiful card, thanks for photo tutorial.
Such a great technique for using leftovers, don't you think, Netta? The beautiful wreath completes your card perfectly! Your second card is also super well done and looks just as great as the first one! Rosi x
Post a Comment